Arranging a balcony or loggia can significantly increase the level of comfort of living even in the smallest apartment: here you can organize a space for relaxation and work, for playing sports or a playroom for kids, for storing various things and studying. The room on the balcony can be either separate or combined with the main space of the apartment. There are many options for implementing such projects. The main thing is to correctly draw up an action plan and choose the optimal design and finishing option.
It all starts with the windows
One of the critical initial stages is glazing the balcony. The indoor climate depends on the choice of designs. To choose the most suitable solution, you need to determine the purpose of the future room.
If this is a space for year-round use, it is necessary to install thermally efficient double-glazed windows. The presence of air chambers between the glasses significantly reduces heat loss.
Since glass structures themselves are the most vulnerable place for cold penetration, ensuring a comfortable climate depends on their choice.
For seasonal use, the room can be glazed with “cold” frames, but then a full-fledged room on a loggia or balcony simply won’t work, because no one wants to work, study, or relax in the cold.
Today, metal-plastic windows have the highest thermal insulation properties. It is these models that most contribute to creating an exceptional climate on the balcony for any pastime, for whatever purpose the additional room is created. Double-glazed windows effectively protect the room from heat loss and excessive heating during the hot season. But still, a favorable atmosphere is created only in conjunction with additional measures to insulate the balcony.
Let's look at the work step by step on how to remodel a balcony.
1. Preparatory stage:
- Provides for clearing the balcony of things, furniture and other items;
- Checking the condition of load-bearing concrete structures of slabs and walls. Sealing cracks, chips with mortar, leveling surfaces;
- When expanding the space, you will need to prepare and install a metal frame with the removal of the structure and attach the frame to the wall, slabs, followed by pouring concrete and leveling the surface. This frame will allow for high-quality exterior cladding and internal insulation of the balcony.
2. Glazing, the next stage after the preparatory work:
- For a loggia, a combined room will require warm glazing. A loggia window, consisting of a multilayer double-glazed window and a PVC profile with hinged opening doors, will retain heat inside the loggia and limit the penetration of cold;
- When using cold glazing, double-glazed windows and window sashes can be made from different materials, such as wood, aluminum, and plastic. In this case, retaining heat inside the room will be impossible or difficult due to the lack of tightness of the window structures.
Also read on our website: Kitchen on the balcony: how to remodel, options, advantages, stages of work
3. External finishing of the loggia and internal insulation.
The exterior finishing of the loggia is made with building materials that are resistant to external atmospheric factors, such as siding, PVC boards, which are tightly joined to each other outside the loggia and fixed to a metal frame.
Having finished the exterior finishing, you can begin to insulate the loggia internally. To ensure a comfortable temperature, the reconstructed loggia for relaxation should be carefully insulated, using insulation made from mineral materials, expanded polystyrene, penoflex, polystyrene foam, which allows for monetary costs and is practical for insulation.
The joints of the insulation and especially the corner joints are carefully sealed with additional foam. For more thorough thermal insulation, additional foil polystyrene foam or penofol is laid on top of the main insulation, and the joints are sealed with foil tape, ensuring a sealed volume of thermal insulation.
4. Work is being carried out to combine the space of the balcony or loggia with the room.
- It should be borne in mind that it is impossible to completely dismantle the building structures of the wall in the doorway due to the supporting structure;
- It is better not to dismantle the threshold between the room and the loggia, since the floor slab rests on it or you should consider strengthening the metal structure during possible dismantling;
- If you leave the threshold, you should equip it, make a ramp, or a small step, or raise the floor level on the loggia;
- When leveling the surfaces of the balcony and room, you should take into account the weight of the slab, which is built up with thermal insulation, metal structures and other finishing materials, so that the balcony slab does not collapse;
- You should consider the issue of wiring lighting and supplying electricity for additional heating of the volume on the loggia or other portable heat sources, as well as so that sockets and switches do not interfere and are located in places convenient for use;
- To provide additional heating on the loggia, it is proposed to use a heated floor system consisting of an infrared film floor or a heating cable laid in a concrete screed, ensuring temperature maintenance using an adjustable thermostat.
Also read on our website: Making a greenhouse for a balcony with your own hands
5. Finishing work.
When combining a loggia with a room, you should think about decorating the loggia room. While maintaining the harmony of color and design, the finishing materials used must be harmonious and match the design of the room.
The most common finishing materials are PVC plastic and wooden lining. When installing, you should follow the sequence of work:
- Installation of panels begins from a complex corner, the first panel is fastened into the corner with a ridge and secured to the frame;
- Subsequent panels are tongue-and-groove connected and secured to a wooden frame, forming a single structure;
- The last panel is cut to size; at a corner connection, two panels should form an outer or inner corner when joined;
- In places where switches and sockets are installed, round holes are made in the lining for mounting points;
- After installing the panels around the perimeter, decorative corners are installed and the baseboard is installed.
The finished room from the loggia after finishing work becomes a full-fledged room. By using the internal space wisely, you can take into account all the features when planning and installation. For more complex installation work, it is better to involve competent specialists.
Insulation
To convert a balcony into a room, you need to consider a system of additional thermal insulation. As a rule, fences are insulated for better heat retention during the cold season.
To ensure a comfortable climate, it is also important to provide room heating. The optimal solution is a “warm floor”, which is enough to heat a small loggia or balcony in cool spring or autumn, but in winter you will need an additional radiator, convector or device for temporary use.
It should be noted that stationary batteries connected to the central heating system must be agreed upon with the relevant authorities. Such projects must be safe, so it is important to take into account any loads and increases in those on existing structures.
The third stage - interior decoration
First you need to make the flooring. Since it is already insulated, all that remains is to make the outer covering. To do this, you need to lay wooden logs on it and secure them well. After this, you can lay out a tongue and groove wooden board. If the balcony is being converted into a bedroom or recreation room, then you can lay laminate or make any other covering, and lay a rug on top. Then it won't be cold. If this is a kitchen, tiles or linoleum will do.
Finishing the loggia with environmentally friendly wooden paneling.
Now you can move on to finishing the walls. First you need to think about the lighting and lay the wires to the place where the lamp will be located. After this, a frame made of wooden slats or a metal profile should be attached to the walls and the finishing should be laid on top. It can be any material.
Drywall is popular today, on which you can later hang wallpaper. This option is suitable if the room turns into a bedroom. You can also use wooden lining or laminated PVC wall panels.
Design and finishing options
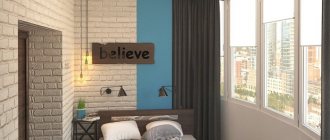
The choice of design and finishing solutions is an entirely personal matter, because it all depends on taste and preferences. The purpose of the room will also play a role - whether it will be a relaxation area on the balcony or a children's room, an office or even a bedroom.
Most often, minimalist designs are chosen for loggias and rooms here, because excessive detailing and decor can reduce the free space, thereby reducing the level of comfort. If the space of the room allows, choose country, Provence, Scandinavian style, less often shabby chic, hi-tech. In any case, the environment must be functional and harmonious to ensure proper comfort.
About the features when arranging a room
Making a decision to carry out work on converting the space on the loggia into a room and combining it involves the following features:
- The area of the room increases with the added space from the loggia;
- Increases illumination and the possibility of using additional light sources;
- The market value of an apartment with a converted loggia increases;
- Any type of room can be made to suit your desires;
- It is better to entrust the drafting and coordination with authorities to specialists.
During the work process, additional features appear:
- It is advisable to treat the walls with an antiseptic composition against fungus and mold before finishing;
- The suspended ceiling should be made of lightweight materials or simply plastered and whitewashed;
- It is better to decorate a wooden floor with laminate, parquet or carpet;
- When decorating, use bright and rich colors, you can use flower ornaments, artistic paintings that can decorate the interior and bring freshness and harmony to the new room.
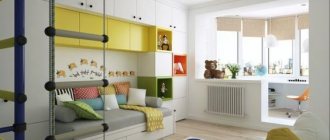
Children's room
Arranging a nursery on the balcony most often involves organizing a play space, since a safe and warm room for sleeping and studying requires quite a serious investment. It is optimal to do this when combining - full or partial - with adjacent rooms.
The basic rules for safety and comfort in arranging a room for children are:
- warm floor;
- high railings;
- durable and safe double-glazed windows;
- sustainable furniture items;
- environmentally friendly materials.
Work zone
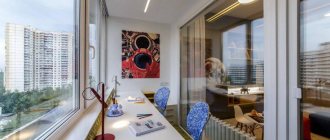
A good solution would be to create a personal office on the loggia, especially if you have to take work home or work remotely. You don’t need a lot of space to set up a work area, and it’s easy to create reliable sound insulation. This is very important for privacy and comfort in a large family.
You will need comfortable and functional furniture with a laconic design:
- shelves for documents, books (more details: “shelves on the loggia“);
- computer table;
- anatomically shaped chair.
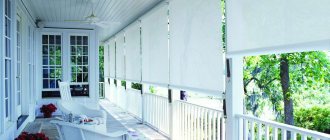
The advantage of this office option is that one wall of the room is a window, so during the day the work area is well lit. For comfortable work in summer it is necessary to provide curtains or blinds. They will create comfortable partial shade.
For classes in the dark, it is necessary to install electricity and install lamps. The lighting on the loggia should be bright enough, but soft.
On a miniature balcony, the work area can be made at the end or the surface of the window sill can be designed as a tabletop. A large protrusion should be installed on special brackets to provide stability. For walls and furniture, it is advisable to use calm, neutral colors that will be pleasing to the eye.
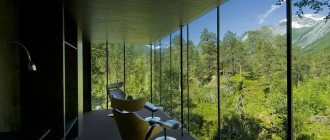
Bedroom or office
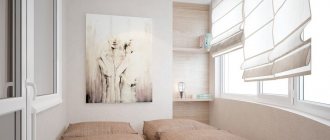
Rarely does anyone decide to set up a bedroom on the loggia: direct sunlight may fall here, and all measures to ensure comfort may not be effective enough for quality sleep. But everything is possible, and the desire to organize a bedroom on the balcony can be realized, although at a significant cost for effective glazing, insulation and heating of the room.
The design depends on personal preferences, cardinal direction and the availability of space for additional structures:
- Whether you want to create an intimate setting or a purely relaxing room;
- What time do the sun's rays hit here?
- Is there enough space to accommodate a wardrobe or work area?
By answering a few questions, you can find the optimal solution for arranging an additional room.
- If the sun shines here for a long time, you can use fairly dark colors for decoration to visually reduce the brightness of the rays, especially when arranging the bedroom.
- If there is no need for a work corner (computer desk or dressing table), then you can only use a bed for sleeping and a few shelves for personal belongings. It is quite possible that even a small balcony can accommodate a built-in wardrobe.
- A work corner or dressing table can also be built into the end part of the room, combined with a window sill if the glazing is carried out, or a full-fledged work space can be installed on a large loggia.
But a balcony is an ideal space for arranging a work office, especially if the apartment does not have a separate room for this. This is a convenient solution for those who work remotely or often take work home. This option is especially convenient for providing comfort and privacy in a large family.
Parapet repair
To begin interior decoration of the loggia, you need to protect yourself from bad weather - glaze the area. To do this, you need to prepare a parapet.
If the loggia fence is a metal lattice, there are two exits:
- Cut off the old structure and instead lay a parapet of gas silicate blocks.
- Restore the fence and line it on the outside with corrugated sheets or vinyl siding. Lay a gas silicate parapet on the inside, close to the grating.
When the loggia is already equipped with a stone parapet, all that remains is to decorate it from the outside.
The external decoration of the parapet should be done in the same tone as the facade - there is less chance that it will have to be redone when legitimizing it after the fact.
Continuation of the room
Before making a room out of a balcony, you should consider the size of your budget and the possibility of using solutions that will not contradict technical standards and safety rules. Sometimes a more profitable, but no less effective option is combining a balcony and a room. This increase in usable area will make any space more functional.
Options for arranging such a continuation may be different:
- Complete combination leads to the merging of rooms, and the balcony windows become the windows of the room. There is no longer any hint of the presence of a loggia. The implementation of the design involves the standard use of space - as if it were part of the room from the beginning.
- Partial unification of spaces can be realized only by removing translucent blocks - windows and doors. Then a small section of the wall remains, which can serve as a zoning element, a table - both dining and working. This design can be converted into a shelf or chest of drawers.
- The combination of rooms can be transformable: standard fences between rooms are removed, and sliding panoramic systems are used instead. They divide or combine space at the request of the owners.
With any of the decisions, it is important to select the most practical materials that will be durable for use in the conditions chosen by the owners of the premises. The warmer the balcony, the more traditional the coatings can be - wallpaper, interior paint, etc. If the room is not insulated effectively enough and is not used all year round, preference should be given to treated wood, ceramic finishes, and imitation stone.
Balcony room design
After completing the rough finishing, you can begin to carefully design the new room. Of course, its foundations are laid in the design project at the initial stage, but many issues are resolved “along the way.” One of the key points in choosing finishing materials, textiles, furniture and decor is the purpose of the room.
Bedroom design on the balcony
To properly design a bedroom on the balcony, it is important to solve two issues - the organization of a sleeping area and the regulation of natural light.
Sleeping area - comfortable mattress on a hard base
The choice of sleeping place directly depends on the configuration and area of the room, your financial capabilities, style decision and desired level of comfort. You can choose one of the following options:
- Chaise lounge, couch, folding bed. They are distinguished by their compact size, mobility, practicality and low price.
- A chair-bed or a compact sofa that can be pulled forward. When folded, they can serve as a resting place for a small company.
- Mattress. This may be a model with a hard base that replaces a bed, or a soft version that can be rolled up.
- Reclining bed. The sleeping place reclines only for sleeping, and then is put away in a closet, cabinet or simply pressed against the wall.
An original solution - a compact folding pouf
As for lighting, the ability to provide high-quality shading during sleep and adjust the light flux during other hours is important for the bedroom. Black-out or dim-out curtains, as well as blinds, roller blinds or Roman blinds are perfect for these purposes. If their severity and minimalism are not to your liking, you can dilute them with airy tulle.
Curtain option with low light transmittance
How to organize your workplace
A workspace on the balcony usually includes a table, storage systems for all the accessories needed for work, and proper electrical wiring. An experienced craftsman can handle the latter, but the choice of furniture will fall on you.
Note! For a small room, it is recommended to make custom-made furniture. This allows you to make maximum use of the available space. For a spacious room, ready-made solutions are also suitable.
The table can be a standard structure of a table top with supports or just one table top. The last option saves a little space and is relevant for a room of any configuration.
What are storage locations? These are a variety of shelves, cabinets, wall cabinets, racks, drawers, an extension over the table, etc. By filling the balcony space vertically with them, you will free up space for moving, and everything you need will always be at hand.
Solutions for efficient use of space
In what style to decorate an office on the balcony, how to choose and place furniture for the most comfortable work, read in a special publication.
Winter garden in the apartment
>
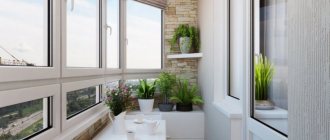
A winter garden on a balcony with good lighting is a great idea if you love plants. Decorative foliage, flowering herbs, spicy herbs, vegetable crops for home use – there are plenty of options. What's important here? Formation of a comfortable microclimate for flowers and proper placement of planting containers.
In order for plants to please the eye, they need to create the necessary conditions:
- Humidity. Few representatives of the flora tolerate dry air, so it is advisable to install a humidifier on the balcony. To monitor the corresponding indicator, a hygrometer is useful.
- Additional lighting. You will have to worry about installing phytolamps in advance. And if these are not desktop compact models, then attach special importance to the reliability of their attachment to the suspensions.
- Ventilation. Humid, stagnant air is an excellent environment for numerous fungi and infections that affect plants. The problem can be solved simply by regularly setting the flaps to micro-ventilation mode or installing a supply valve.
- Heating the room. If insulating the walls of the room is not enough for active plant growth, you can use mobile heaters or special stands that resemble electric burners. They are needed, for example, for germinating seeds.
For the balcony to truly resemble a winter garden, there must be a lot of flowers there. To place them, you should use the available vertical space - buy racks, shelving, hanging flowerpots, etc.
Placing plants on shelves
Important! To properly care for flowers, each of them must be approached freely.
Dining area on a warm balcony
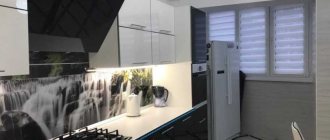
The dining area on the balcony will become a logical continuation of the adjacent kitchen. With a sufficient area of the room and a competent selection of furniture, it can easily accommodate not only the whole family, but also a small group of guests. This allows you to free up kitchen space for free movement or installation of household appliances.
To decorate the dining area, the kitchen and balcony are most often combined by dismantling the window and door unit. The remaining part of the wall can be converted into a bar counter or equipped with an original tabletop.
The tabletop can also be positioned linearly, along one of the walls. This solution will save space, but is a little inconvenient for communication. If this point is especially important, choose a traditional table. The most ergonomic models are those with a round tabletop. Folding options are ideal for a small room.
Designer tip: complement the dining table with wall cabinets or floor cabinets, placing spices, cutlery, preparations or kitchen utensils in them. Choose textiles that match the style, and then the room will become cozy and comfortable to stay in.
Gym on the balcony
An insulated, well-lit and ventilated balcony is perfect for setting up a mini sports hall there. What is important? Safety and load on the base plate.
It is not recommended to install Swedish stairs or horizontal bars on a balcony, even with a high parapet. There is a high risk of damage to double-glazed windows during training and even falling out onto the street. This is especially true for families with children.
Opt for stable and stationary exercise machines that do not require wide limb spans. For example, it could be an exercise bike. If the room is small, limit yourself to one item. Otherwise, place sports equipment so that when performing exercises on one of them, you do not cause injury by touching neighboring ones.
Photo ideas
The room on the balcony can be equipped both for permanent residence and for occasional use. And the choice of design, materials and effective solutions depends only on your goals and objectives. We should not forget that such work increases the load on existing structures, so it is important to find the safest options for implementing the project.
Basic tips for transforming a balcony into a living room
Transforming a balcony requires thoughtful details, namely:
- Cleaning the balcony (throwing out unnecessary things, cleaning, if necessary, destroying old finishing materials).
- Strengthening the balcony structure.
- Waterproofing (protection from humidity and cold).
- Balcony insulation.
- Choice of glazing.
- Finishing of ceiling, floor and walls.
- Choosing the interior design of a new room.
The most important thing is, before you start repairing the loggia, contact the state housing inspectorate. It is necessary to make all the necessary amendments to the cadastral and technical passports, and after permission from the inspection, you can begin redevelopment.
Before renovation, you should understand whether an increase in square meters is really necessary. Since converting an ordinary balcony into a living space will require significant time and financial costs.
Waterproofing
The purpose of waterproofing is to prevent the penetration of moisture from the outside and, as a result, to protect the insulation from getting wet and losing its thermal insulation properties.
Types of waterproofing materials:
- Rolled - bitumen and polymer For the loggia, polymer ones that do not require the use of burners are preferred. Convenient for laying over mineral wool insulation on walls and floors, fastened with a stapler to the joists.
- Penetrating action Ideal for concrete bases. Easy to apply with a brush or roller, penetrating deeply into pores and microcracks.
- Coatings (mastics) An alternative to penetrating compounds - effective for waterproofing concrete and brick. Apply with a brush in two layers in perpendicular directions.
- Sealants Used for sealing joints of enclosing structures, shallow cracks and crevices.
The ceiling, walls, parapet and floor of the loggia must be waterproofed before insulation - easiest with penetrating or coating compounds. Properly performed waterproofing is the key to the durability of the insulation.
Room design
The renovation work has been completed and now all attention is turned to the selection of finishing materials, furniture sets, various accessories and other elements. Depending on the functional focus, the room is decorated taking into account a harmonious combination of colors and shapes. In the bedrooms, children's rooms and living rooms on the former loggia you can arrange a winter garden with numerous flowers, cacti and ornamental trees.
How to wash laminate flooring with a vacuum cleaner?
Find out how to make liquid granite with your own hands by following this link.
Atlas Concord tiles: https://trendsdesign.ru/materialy/plitka/kak-podobrat-material-dlya-utepleniya-fasada.html
Bottom line
With proper insulation and insulation, a balcony can be converted into almost any room. And, using various materials for finishing and decorating, this room can be made not only functional, but also beautiful. This way, you will have a separate room that you can use as you wish. What to equip on the balcony - an office, a kitchen, a bedroom, a nursery - is up to you, and decorating the room is a great opportunity to show your imagination and design skills.
Zoning options for annexation
Dividing a room into several functional zones is one of the most popular solutions in decorating residential premises. In a room with a balcony, make a proper division into specific places for relaxation (billiards) or work.
Partition
Should I leave the partition or remove it completely? It all depends on your desires and the goal that was pursued when creating the design of a balcony combined with a room. If the removal of windows also affects the wall, then the free space in the common room increases significantly.
You don’t have to completely remove the wall, which allows you to implement interesting design ideas. For example, an opening in the form of an arch looks very sophisticated and emphasizes the notes of aristocracy in the interior of the room.
In the photo you can see the combination of a balcony with a room, the interior of which is dominated by elements of Scandinavian style.
An interesting idea would be to arrange a desk on the partition located under the balcony block. A tabletop is attached to it, a chair or armchair is placed next to it, and the workplace is ready. This connection of the balcony with the room is shown in the following photo, which shows the design of a desktop in a children's room.
There are also options when shelving is installed in place of the former window. They are used to store books or important papers (if it was decided to make a personal office on the balcony), and plant lovers install stands for fresh flowers.
The photo shows an example of how to connect a balcony with a small room.
Zoning with light
If you still decide to remove the partition completely, but want to divide the room into functional zones, then use a slightly different technique. We are talking about the use of lighting devices, through which it is possible to correctly zoning the space.
The place for sleeping and relaxation is highlighted by bedside lamps. In addition, you can create a multi-level ceiling above the bed and install spotlights in its elements.
We use furniture
Have you removed a partition and only realized after finishing the work that you shouldn’t have done it? Don’t despair, because well-placed furniture can do the job perfectly. Even low shelving will help to visually divide the room into several parts, and if desired, they can be moved and make the room more spacious.
Sports section
The modern rhythm of life increasingly forces us to think about our health. But, as a rule, we don’t find time to visit gyms.
Why not set up a gym on the balcony? Not the real one, of course, but a mini version. No major modifications are required. We’ll just place compact exercise equipment on our loggia that won’t take up much space.
This could be a treadmill, a horizontal bar mounted on the front wall, or an exercise bike. There is no point in listing all the available simulators - there are a lot of them. It all depends on your desire and, unfortunately, is limited by the availability of free space on the loggia - no alteration will increase its area.
The mini-gym is shown in the photo below.
A small sports corner after remodeling the loggia