Every person has a piece of furniture in their home, such as a desk.
It is needed for preschoolers, students, and office workers. You can not only write with it, but also do handicrafts. Despite the fact that the modern market offers a wide range of desks, sometimes it can be difficult to make the right choice.
We offer you to make a table that will fully meet your requirements, room size, and technical specifications.
Advantages
In addition to the desire to make furniture on your own, you need to have a special tool and some skills.
If you have everything, then you can start making a table for a schoolchild. The advantages of making furniture items yourself include:
- saving money;
- the ability to make furniture of any design, size and shape;
- independent selection of consumables.
The advantages of making furniture with your own hands
Of course, in order to make any pieces of furniture yourself, even the simplest ones, you need to be able to work with carpentry tools. It is quite simple to acquire this skill - it is recommended to train on simple and miniature products (for example, a shelf for a hallway or a coffee table), and only then move on to larger ones. A desk is one of the simplest designs, because many people prefer to choose basic options without additional elements in the form of shelves, a cabinet or a footrest.
The main advantages of self-manufacturing structures include:
- cost savings;
- you can choose the best quality materials;
- creating your own unique design;
- the ability to take into account the features of the room layout.
If you already have experience in making furniture, you can create a more complex design
Another advantage in “protecting” self-made furniture is the opportunity to realize creative potential. In addition, such work can be done step by step, slowly and even enjoying, while following all the instructions and manufacturing technology.
Design and construction
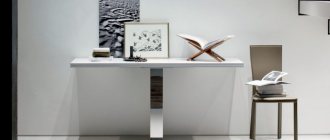
Before creating a drawing of future furniture, it is worth deciding on its design and construction. As for design, it’s worth starting from personal preferences, the general style of the room, and the needs of the owner.
The design of the table can also be anything, from simple to complex shape. If you are new to this business, you should start with a simple table shape without any additional elements .
Most often, such products include classic models consisting of a table top, sides and several drawers.
If you don’t doubt your abilities, you can make a table of complex design with:
- numerous drawers;
- shelving;
- add-ons;
- cabinets.
Options for placing double desks in a children's room
Today, furniture manufacturers have a wide range of desks for two schoolchildren with all kinds of shelves, add-ons and cabinets. And it’s great if the size of the room allows you to install a ready-made school corner in the nursery. Sometimes the design you like does not suit the size, color or design and you have to order a desk according to your size. But individually made furniture will allow you to accommodate two schoolchildren as comfortably as possible.
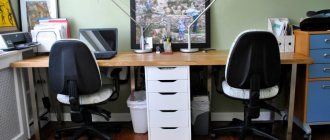
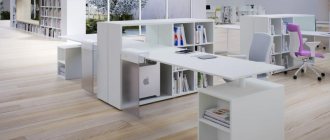
Along the window
If the room is at least two meters wide, the window, as a rule, occupies most of the wall. This allows you to conveniently place two work surfaces side by side, directly along the window, or order a single table top from wall to wall, increasing your work space. A lower cabinet installed in the middle will help to delimit the territory. Shelves or wall cabinets are best placed on the side walls. Despite natural light, additional light sources should be provided for dark winter days. And in bright sunlight, the children should be able to cover the window with a light curtain.
When installing a desk along a wall with a window, it is important to ensure there are no drafts. To prevent your children from catching a cold, carefully insulate the window sill and frames. It is not advisable to place indoor plants on this windowsill, since when caring for them there is a possibility of water leaking onto notebooks and textbooks. If the heating radiator is located under the window, the table must have a back wall so that the children do not overheat.
It is not recommended to place the learning area along the window if children have problems concentrating. Life outside the window will be distracting, making it difficult to concentrate on tasks.
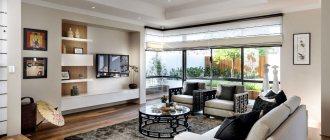
In one line
The location of a desk for two children along the wall is convenient for both a square children’s room and a rectangular one. The advantage of this table placement is the ability to place all the books and notebooks directly in front of your eyes, on shelves and sections suspended above the table. A small shelving unit , partition or lower cabinet in the center of the tabletop will help zone the area It is also recommended to place laptops or computer monitors in the center of the work surface.
Daylight, of course, will not be enough. The lamps can be installed either on the tabletop or mounted on the wall and shelves. Or purchase a mobile lamp with a “clothespin”, which makes it possible to move the light source to any place above the table.
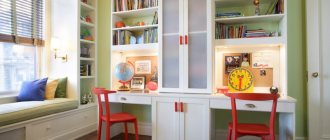
Corner location
One of the most popular options for spacious children's rooms are corner tables . There is probably a free empty corner in any children's room. “L”-shaped tables are conveniently located with one tabletop along the window and the other against the wall. It is important to maintain identical dimensions of both “wings” of a corner desk for two children. It will be convenient for schoolchildren to complete tasks without being distracted or interfering with each other.
An economical variation would be to install two identical straight tables at an angle of 90 degrees. A cabinet of the same height between them will allow you to move computer monitors into a corner, away from your eyes. They will not interfere with activities and are beneficial for vision. A corner table can also be used to divide a room into study and play areas. For children of primary school age, it is equally important to have space for games and entertainment. In this case, one of the tabletops is located facing the wall, and the second is at a right angle to it.
When choosing a corner location of the table, you should obtain the consent of the children. Since corners are associated with punishment in childhood, the learning process can cause discomfort.
In front of each other
This arrangement of desks suggests three options:
- Back to back. Two identical tables, corner or straight, are located along opposing walls. Without seeing each other, children easily concentrate on tasks. In this case, it is possible to design each study place individually.
- Eyes to eyes. It is better to separate two tables put together or one with a wide tabletop with a superstructure with bookshelves and just a partition so that the children do not play pranks and do not distract each other from home exercises. In a small room, such placement is unacceptable, as it requires a lot of space.
- Consistently. Two tables are located next to each other, just like in a classroom. There are individual nightstands along the side of the wall and under the countertops, and bookshelves on the walls.
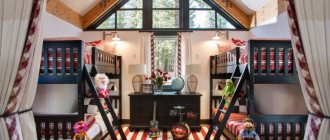
Under the bed
For younger schoolchildren, a loft bed can be an ideal solution for organizing personal space. Located under the bed, the desk has a large tabletop, a sufficient number of shelves and drawers, giving each child the opportunity to decorate and organize their own corner as they like. Loft beds located along one wall
Folding table
In a small room, a folding desk . Of course, daily unfolding or sliding apart becomes boring and weakens the structure. But he also disciplines children. After all, after finishing homework, everything needs to be removed and the table folded, otherwise the playing space of the room will be occupied.
Table transformer
Having the ability to set the height of the tabletop in accordance with the height of the child, and orient the angle of the lid to suit the lighting, transformable tables allow you to protect children's eyesight and maintain correct posture. Equipped with drawers for writing utensils and shelves or hooks for school bags and backpacks, convertibles are ideal for students of any age. In design, such structures are similar to school desks and are equipped with height-adjustable chairs.
The design of a children's room must be treated responsibly and carefully. safe living space for your children for many years to come.
Wood, solid wood or furniture board?
You can build a table for a schoolchild from:
- furniture board . In its production, solid oak, birch, beech, and coniferous species are used. To work with this material, you must have experience in making furniture;
- veneer _ This lumber is classified as natural. Its thickness does not exceed 3 mm. Modern manufacturers offer a wide selection of materials of different textures, textures and colors. The advantages of veneer include: environmental friendliness, strength, affordable cost;
- solid wood. Using an array, you can make an exclusive and original piece of furniture. But keep in mind that working with natural wood requires special tools and experience. The advantages of wood include: mechanical stability, naturalness, and a wide palette of colors. Real furniture makers recommend using solid wood: pine, birch, oak. Solid wood products really look luxurious and noble in any interior.
MDF .
It is environmentally friendly, attractive and easy to use. This material is not afraid of moisture and other negative factors. Thanks to MDF lining with veneer, film and plastic, you can choose any shade and effect;- laminated chipboard. Products made from this material keep their shape for a long time. Laminated chipboard is resistant to high moisture and sudden temperature changes. It is durable and has a long service life. A wide palette of shades opens up endless possibilities for furniture makers. This table can be combined with different shades, and it will become the main decoration of the children's room;
- plywood. This material has been known since ancient times. Modern manufacturers produce plywood from special birch and cherry veneers. This material is not inferior in strength to natural wood. Plywood is in great demand in the manufacture of furniture due to its environmental friendliness, aesthetics and affordable cost.
Advice : if you are a beginner, it is better to opt for chipboard. But for real professionals in this field, you can try making a product from natural solid wood.
What materials are the structures made from?
In addition to the design of the future table, you should decide on the material from which it will be made. We will consider all kinds of options that are chosen by both experienced furniture makers and home craftsmen.
Table 2. Materials used in the manufacture of desks
| View, illustration | Description |
| Natural wood | Expensive, but at the same time safe, environmentally friendly material. There are a huge number of types of wood; they differ from each other not only in shade and structure, but also in rigidity and durability. Therefore, here it is also important to choose the most suitable option, because the table for a schoolchild should be strong. Experienced experts recommend using alder, birch, oak or beech for such purposes. Wood processing plays a big role here. First, it is dried, then impregnated with a special agent to protect it from rotting, and only then covered with stain and varnish. It is worth noting that solid wood structures do not lose their original appearance for decades. |
Chipboard | This material is made by combining shavings with resins, which is why it is not recommended for use in the manufacture of children's furniture. In some cases, these resins release toxic substances, which is extremely dangerous for the health of the child. However, chipboard with a high environmental safety rating can be purchased to reduce the cost of a wooden structure and used in inconspicuous places. |
MDF | This is a more modern and safer material. It is obtained by pressing chips under pressure. This is the option you should choose if you want to replace a natural array and save money. MDF looks aesthetically pleasing, and it can be painted in any color or covered with self-adhesive film. |
Glass | Countertops and other parts of the structure are sometimes made from this material. A glass table will be weightless; it will be ideal for decorating a room in a modern style. The downside is that such a product will be too fragile and not entirely safe, so this type of furniture is unlikely to be suitable for a child. For a high school student, a table made of tempered glass is quite acceptable. |
Plastic | This material is often chosen for the manufacture of countertops and various shelves, because it is low in cost. In addition, manufacturers are now producing environmentally friendly types of plastic. The finished structure will be light, and if necessary, it can be moved to another place. One of the advantages is that it is easy to find plastic in various colors on sale. The main disadvantages are the short operating time and the likelihood of a large number of scratches on the surface. |
Metal | Some parts of the desk are mainly made from this material - the legs or the frame for the table top, and the remaining elements are made from wood or other material. Thanks to this combination, you can get a strong, durable structure, the only disadvantage of which is its heavy weight. It is also not possible to process metal at home, so the workpiece must be ordered or purchased in advance. |
Scheme and drawing
After choosing materials for making furniture, it is worth making a drawing of it. Without a well-designed project, it is impossible to make and assemble a table the first time without making mistakes. To make a table drawing without errors, you need to be a specialist in this field. If you do not have such experience, contact professionals or use special computer programs.
When drawing up a drawing, all the nuances are taken into account: the materials used to manufacture the product, its dimensions, and the features of the product.
Help : with the help of a sketch, it will not only be convenient for you to detail the product, but it will also be much easier to assemble the table.
Simple drawing with dimensions
If ease of manufacture is critical to you, we recommend using the following drawing:
Drawing with boxes
If you value convenience and functionality, take a closer look at this option:
The box itself:
Summing up
Each of us can come up with a lot of options for the location of a desk in a children's room. The optimal, original option is when the desk is in the children's room by the window. Many options for desks can be found in the store https://svoiamebel.ru/category/detskaja-mebel_82/.
To choose a table and install it correctly, use the valuable advice of experienced designers.
- For first-graders of average height, buy a teenage table and a chair with an adjustable leg. This way you optimize costs.
- Computers are afraid of direct sunlight. The equipment can be placed on the edge to avoid breakage; part of the window can be covered with a thick curtain.
- In a room where the table is opposite a window opening, do not use long curtains. They interfere with the student's legs. An excellent option would be Roman, roll models.
- Try to order or buy a table top with a slope. The student’s posture and vision will be healthy.
Feel free to install work areas near the windows, because this makes the room cozy, comfortable and original.
Tools
Tools you will need :
- jigsaw;
- drill;
- hacksaw;
- chisel;
- screwdriver;
- hammer;
- drill.
If you are planning to make a complex model of a table, also prepare:
- milling machine;
- sander;
- clamps.
As for materials , you need to stock up on:
- lumber;
- bolts, nuts, washers;
- self-tapping screws;
- furniture glue;
- dowels;
- paint and brushes;
- liquid nails;
- varnish;
- tape measure;
- pencil;
- building level.
Two tables opposite
Another idea is to place two tables opposite each other, in a square. The advantage of this placement is that the tabletop is quite wide and more work materials can be placed on it. The disadvantage is that such a wide table “eats up” a lot of free space in the room.
How to make and assemble a table for a schoolchild?
Let's start making and assembling a desk for a schoolchild.
Making furniture begins with cutting the necessary parts . This can be done in special companies, or using a jigsaw. If you contact a specialized company, they will make a competent detailing of the product, according to the created drawing. All you have to do is simply assemble the parts in the right order.
After making all the parts, you can start assembling the children's table.
Attention : when assembling furniture, refer to the drawing.
For a rectangular table, the assembly diagram will be as follows:
We prepare the details : table top, sides, back wall. If the parts are already trimmed, you can begin assembly. If not, carefully trim all the PVC parts with an edge and a hair dryer.- Armed with a drill, we make holes on all parts for fastening . Here again you should carefully check the sketch.
- We start assembly from the side parts. Here it is worth aligning the parts using a building level.
- We connect the parts with furniture screws.
- We put the tabletop on top and tighten it with confirmats.
- We seal the screw caps with special furniture stickers or plastic plugs.
We looked at the manufacture and assembly of a simple table for a schoolchild. If you want to make a more complex model, then the manufacturing process will require the following:
We take the drawing and prepare the materials (in this case, furniture board);- We cut out 8 blanks for product supports.
- Each leg will consist of 2 parts. Therefore, we glue the parts together and secure them with a clamp.
- We cut out recesses inside the frame of the product.
- We make a long groove along the inside of the cross member.
- We make a protrusion on top of the supports using a chisel and a hacksaw.
- We drill holes in the sidewalls with a diameter of 8 mm.
- For assembly accuracy, insert pencils into the holes made and apply them to the legs.
Using wood glue and dowels, we connect the base and support .- Using a router, we make grooves for attaching the upper part of the product.
- We cut out the side walls with a jigsaw according to the drawn sketch.
- Carefully sand all cuts.
- We make grooves in them.
- We cut out the parts for the drawers , glue them together and reinforce them with furniture nails.
- We attach the facing board to the front part of the product using self-tapping screws.
- Carefully coat all attachment points with glue and leave the item until completely dry.
- We fasten the tabletop to the base with legs using dowels.
- We select fittings for the drawers.
- We carry out decorative work if the product was made of plywood, wood or MDF.
Important nuances
Children grow very quickly and it is important to think through all the details several years in advance so as not to change, for example, furniture or wallpaper every year.
In addition to the main lighting, be sure to provide several additional options. For example, a table lamp, a night light and a wall sconce. So that when one child goes to bed, the second can continue to do homework or play quiet games.
When there are two children in the house, there are always a lot of toys. In order to avoid quarrels and disagreements, especially in the case of children of different sexes, be sure to provide two storage racks.
Despite the compactness of a bunk bed and a bed with a pull-out extra bed, it is better to abandon them and purchase two full single or 1.5 beds. Since sleeping on the second floor of the bed is quite hot and children very often fall out of habit. And the retractable bottom also causes a lot of inconvenience, because, without properly waking up at night, the child can step on another.
But in order to preserve useful free space, it is better to buy one wardrobe for two. It is enough to allocate an equal number of shelves to each child.
Even if the children are still quite small, it is still better to refuse wallpaper with too childish designs (bears or cars). It is better to choose calm neutral shades that both children like.
To save space and use every centimeter of usable space, designers recommend installing a desk near a window, combining it with a window sill. There, on either side of the window, there are shelves for books and school supplies.
Decoupage
After making and assembling a table with your own hands for a schoolchild, it needs to be decorated . You can do this using:
- coatings with paints and varnishes;
- installing countertops in contrasting shades;
- pasting self-adhesive film;
- decoupage with napkins or wallpaper.
Important : using the decoupage technique you can decorate not only a new piece of furniture, but also an old desk. For decoupage you can use: napkins, wallpaper, drawings, ornaments and pictures.
To give your table an attractive look using decoupage you will need:
- sanding machine or coarse sandpaper;
- brushes for varnish and paint;
- PVA glue;
- acrylic lacquer;
- materials for pasting.
The workflow itself consists of the following sequence:
- Degrease the surface to be treated.
- Cover the table with primer .
- If we are decorating an old table, we cover all its surfaces with the selected tone of paint in two layers. We are waiting for it to dry completely.
- Using glue, we attach the selected pictures and ornaments.
- We cover the product with acrylic varnish . This will keep the table looking attractive for a long time.
Tip : The decoupage technique can also be useful when decorating a laptop table, sand painting, or even a coffee table.
How to arrange a work area for two children?
The key to school success - properly equipped study space at home. A desk for two children should be comfortable for both, giving everyone the opportunity to place their belongings as comfortably as possible. Photos and pictures from the Internet help you choose a desk for two children, and each children's room has its own option.
Simple rules will help you properly organize a learning space for two schoolchildren:
- To ensure that children are not distracted and do not interfere with each other, the tabletop must be of sufficient size. Those sitting next to each other should not push each other with their elbows (recommended length is at least 1 m 20 cm). Or touch your knees under the table, sitting opposite (width about 90 cm).
- Each child needs to have his own shelves, drawers or bedside table for storing notebooks, textbooks, writing and other supplies. To avoid resentment and conflicts between children, the number of additional elements should be equal.
- In addition to natural lighting, it is necessary to provide additional light above each workplace. For right-handed people, the light source is placed on the left, and for left-handed people, on the contrary, on the right.
- Given the constant growth of children, it is advisable to install furniture that grows with them. If it is not possible to purchase ergonomic furniture with a “growth” tabletop, it is enough to use a height-adjustable chair and footrest. A table that does not correspond to height can lead to poor posture and the development of spinal curvature in a child within a few months.
- Children are much more willing and easier to learn from each other. Often, the explanation of a brother or seatmate is clearer and simpler than the teacher’s speech. However, a bookcase or partition between tables will prevent them from being distracted and seeing each other during homework.
You may find information about interior design of a room for two girls useful.
Photo
Regardless of the chosen drawing and material, you can get excellent results:
Demarcation line
Returning to the idea of a single long table for two, consider the option with a dividing line in the middle, which will visually delimit two workspaces. This desktop can be made to order.
Space saving: shelf-table
If there is very little space in the room to accommodate two desks, you can try a very compact option - a narrow wall shelf instead of a table. To effectively serve as a table, the shelf must have durable fasteners. The absence of legs in such a workplace does not take up space from the room and allows you to freely place chairs under it.