Mistake 1. First beauty, then safety
When choosing light in the bathroom, use the principle of safety first, then everything else. No matter how beautiful the sconce is, it is not suitable for the bathroom if its protection index against moisture and dust is 0.
IP index on the packaging, photo example
Index of protection of the lamp against dust and water
The IP index consists of two numbers - IP 44. The first number (from 0 to 6) is the degree of protection against the ingress of solid particles (dust), the second (from 0 to ― protection from the ingress of liquid. The higher the number, the higher the protection. See the value on the packaging, lamp body or in the product characteristics in the online store.
The more IP a bathroom fixture has, the better.
Decoding the IP index for luminaires on the diagrams
Bathroom luminaire placement area based on IP
The choice of IP index for a lamp depends on where you install it - that is, on the location area.
- zone 0 - moisture enters directly by stream (bottom of the shower stall, bath screen, etc.);
- zone 1 - moisture often splashes (the wall of the shower stall, walls near the sides of the bathtub, etc.);
- zone 2 - moisture splashes infrequently (60 cm from the sides of the bathroom, behind the shower doors, etc.);
- zone 3 - moisture enters very rarely or never (near the ceiling, etc.).
From here it becomes clear that the sconce near the mirror should have a min IP index of 44, and the built-in lamp in the bottom of the shower should have a min IP index of 67.
Safe and unsafe zone for placing a lamp in the bathroom, taking into account the IP diagram
Laying electrical wiring on the ceiling
The correct location of light sources depends on the correct installation of electrical wiring. It is necessary to ensure that every corner of the room is equipped. Therefore, the placement of the cable is planned especially carefully. Rational placement of the cable will help save costs on its purchase.
It is recommended to mark the diagram on the ceiling with a marker. For protection, the electrical cable is placed in a corrugated pipe and then fixed to the ceiling. A copper cable with a cross-section of 1.5 mm2 monocore is purchased; the cable for sockets in the bathroom is laid with a cross-section of 2.5 mm2. The cable is run from the common distribution box of the apartment, which is located in the corridor.
It is recommended to connect lamps in groups of 2-3 pieces. This will allow you to turn on the lights in the room by zone, for example, above the shower stall, rather than in the entire bathroom. The fan is connected to one of the groups.
Cabling
On the ceiling, a grinder with a diamond-coated disk is used for scoring. The electric cable is placed in grooves, and a solution of cement and sand is covered on top. Starting and finishing putty levels the surface of the ceiling.
Suspended ceiling
Without gating, the cable is secured to the ceiling with staples. The cores are insulated before connecting the lamps.
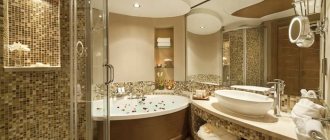
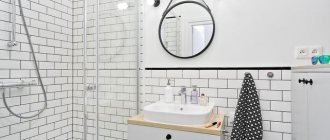
Mistake 2. Not taking into account the furniture arrangement plan and bathroom interior
It doesn’t matter whether you select lighting in the bathroom at the renovation stage (which is best) or in a finished apartment - do it taking into account the arrangement of furniture, total area, layout and color combinations. So, it is immediately clear how much working light is needed, whether there is a risk of dark corners, etc. For example, in a light bathroom with glossy tiles and an area of 8 m2, 4-5 ceiling built-in lamps (main lighting) and two sconces on the right and to the left of the mirror (working lighting). And in a bathroom with dark tiles, an area of 4 m2 and a sink in the corner, you will need more task lighting precisely because of the non-standard layout.
Non-standard bathroom layout with a sloping wall, photo example
Standard small bathroom layout
Before buying bathroom fixtures, think about the following:
- non-standard shape and area of the bathtub;
- interior color, whether there are reflective surfaces or more matte ones;
- and how much work light, main light or decorative lighting is needed;
- personal needs (are there elderly people in the house, a mirror in the bathroom instead of a dressing table, etc.).
Bathroom lighting fixtures must be protected from moisture. This is the main selection criterion; in addition, the type of lamp, its power and color temperature are important.
The number of appliances depends on the size of the bathroom. For a small room, a ceiling lamp and lighting near the mirror will suffice. In a spacious room you can place four or five types of devices.
Set of lamps
ics for a large bathroom could be, for example, like this:
- ceiling: spotlights plus LED strip around the perimeter;
- walls: sconces on both sides of the washbasin;
- furniture: mirrored cabinet with lighting, shelves with LED strip along the bottom edge, miniature lamps with motion sensors inside the cabinets.
The most important point: all lamps must be protected from water vapor, condensation and splashes. Those located on the floor also protect against possible flooding.
Water protection
| The packaging of each lamp must bear the international IP marking. IP is an abbreviation for Ingress Protection, “protection from the outside.” Indicates the level of protection of the device from external influences. The first number after the letters IP indicates how the lamp tolerates exposure to dust, the second - moisture. The higher the numbers, the better the dust and moisture protection. In addition to the letters I and P, you can also find other Latin letters on the packages. They indicate the degree of protection against contact. For example, A means that the device is safe to touch with the back of your hand, B means it is safe to touch with your finger. This information is relevant only for open structures, that is, for lamps that are not covered with shades. |
IP protection classes
| Example. IP68 protection class means that the lamp is not afraid of either dust or water. It can be installed, say, on the ceiling above an open shower stall. Safety requirements for luminaires in different zones. Zone 1. Highest humidity level. The space around the bathtub and shower: ceiling, shelves, niches. On the walls - IP67, on the ceiling - IP45 and higher. It is important that the lamp operates at a voltage no higher than 12V. In the event of an electric shock, such a device will not cause serious harm to health. Zone 2. High humidity. There is a washbasin and a mirror next to it, and nearby shelving, cabinets and shelves. IP44 class. Zone 3. Moderate humidity. Toilet, bidet, area near the washing machine, free space for changing clothes, storage space for towels and other things that need dryness. IP24 and higher. A zero-protection LED light is also acceptable. |
|
Illumination
| The illumination standard for the bathroom (it is prescribed in SNiPs) is 50 Lux. Illumination is measured in lux. 1 lux is 1 lumen per 1 sq.m. Lumen is a luminous flux, this value is indicated on each light bulb. |
| Example. Let's calculate how many light bulbs will be needed to illuminate a bathroom measuring 9 sq.m. We multiply the norm according to SNiP by the area of the room - 50x9, we get 450 Lm. 80-90% of this flow should come from general, ceiling lighting. You can choose, for example, two LED ceiling lights of 2-3 W (about 250 Lm each). For the bathroom, we recommend using two types of light bulbs, LED and halogen. Important: only LEDs can be used for suspended ceilings. The power of halogen lamps in the bathroom should not exceed 35 W and the voltage should not exceed 12 V. |
| |
Approximate ratio of power and luminous flux of lamps
Halogen bulbs themselves are cheaper than LED bulbs, but LEDs are more reliable and more economical to use. For comparison: the working life of a halogen lamp is up to 2000 hours, and an LED lamp is up to 25,000 hours.
Comparison of halogen and LED lamps |
| Advice. When installing a halogen light bulb, hold it with a cloth or gloves. Afterwards, the flask must be thoroughly wiped with a cloth and alcohol. It is important to use a fabric that does not leave lint on the surface, such as microfiber. |
Colorful temperature
Lamps can produce warm, neutral or white light. It is perceived differently: for example, warm light creates comfort, cold light helps to concentrate.
In the area where the bath is installed, we recommend using warm light, it helps to relax. For other areas, lighting of a neutral shade is suitable. Cool white light is also acceptable for illuminating the shower stall.
| Color temperature is measured in Kelvin: |
By the way, you can buy light bulbs that can change color temperature. Such devices are controlled using a remote control or a regular wall switch: the temperature changes every time the key is turned on.
Address tape in the bathroom interior | For illumination, you can use not only white, but also single-color (for example, blue or green), regular or addressable RGB LED strip. Plain and multi-colored tape is used to illuminate the ceiling, shelves and niches. The RGB tape can change color; using the remote control you can choose any shade, be it soft pink or bright purple, or set the color change. Address tape is most often used to illuminate the ceiling; it can be used to create complex color transitions. |
The influence of layout and design on the choice of lamp
The choice of lamps is influenced by at least six factors:
|
For a bathroom with high ceilings, a chandelier or pendant in the center of the ceiling is suitable. For rooms with low ceilings, it is better to use built-in or overhead spots.
Consider the height at which the ceiling lights will be located. The lower they hang, the brighter and more focused light they produce.
Dark surfaces absorb light, light surfaces reflect. A bathroom with walls covered in dark gray matte tiles requires more powerful fixtures than a room with a white glossy finish.
The design of lighting fixtures should either be as neutral as possible or match the overall style of the bathroom.
| Lamps for different interiors styles |
Lighting levels
Ideally, lighting should be three-level:
|
| The following may be responsible for general lighting:
If you have a suspended ceiling, you can install a “star scattering”. These are many LED dots that are installed under the canvas, creating the effect of a sky strewn with stars. |
| The work area is a washbasin and a mirror next to it. The lighting should be bright and at the same time diffused. Use sconces, LED strip, rotating spotlights or wall-ceiling lamps. The mirror needs to be illuminated symmetrically. It is important that the reflection is as natural as possible, without unnecessary shadows. The best option is lamps on the sides or around the perimeter of the mirror. Do not place lamps below face level. You can also choose a mirror or mirror cabinet with built-in lighting. There are heated models - condensation does not form on them. |
|
| Decorative lighting creates an atmosphere and helps set accents. Used to decorate pedestals, niches, steps, shelves and other elements. You can highlight everything, from the internal shelves of cabinets to the washbasin. |
General tips and life hacks
- Lamps in different functional areas should be routed to different keys of the same switch or to separate switches.
- Lamps located opposite the mirror provide almost twice as much light.
- You cannot install sconces above the bathtub - it is unsafe.
- In rooms with glossy tiles/mosaics, light should not be directed perpendicular to reflective surfaces, otherwise unnecessary glare will result.
- Lighting with a motion sensor, mounted inside cabinets, gives +100 to comfort.
- Floor lamps can visually expand the room. For floors, choose devices with a degree of protection IP67 or higher.
The Leroy Merlin team will help you select all the necessary materials - welcome to the Lighting section. On the site you can be inspired by ready-made bathroom interior solutions.
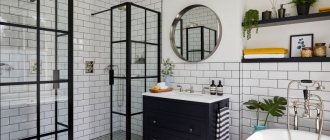
Mistake 3: Using only one light source
Usually the third error follows from the second. They installed a light in the bathroom, but didn’t think about the nuances.
Main and task lighting in the bathroom
Ceiling lighting (chandelier, lamps) provides general diffused light, which is convenient for taking a bath, but it is not suitable for shaving or applying makeup. Look at the picture below. Overhead light creates shadows on the face and highlights imperfections. Two wall lamps on the right and left or above the mirror will correct the situation (read about bathroom sconces here).
Main and task lighting in the bathroom, what is the difference?
General lighting is light that is evenly distributed over the entire area.
Working lighting - light near functional areas.
Power of bathroom fixtures: formula
The power of the lamps in the bathroom is the brightness of the illumination of the entire space. To correctly calculate the power, use the formula - type of light bulb (power consumption from the table below) * room area .
Formula for calculating the power of bathroom fixtures
*Lumen measures how much light you get from a light bulb. The more lumens, the brighter the light. The norm is 300 lumens per square. Read more about light bulbs in the following. point.
In practice it looks like this:
Bathroom area - 8m2
The power consumption of one incandescent lamp is 20 W.
8*20=160W - this is the amount of power needed to create comfortable lighting and 160 W - this is the total power for all lighting fixtures in the bathroom. That is, there are 4 of them, then 160/4 = 40 W - the power of each lighting device, if all of them have incandescent lamps.
Please note that results will vary for halogen, energy saving and LED bulbs. Use the formula we provided and you will quickly determine the necessary indicators.
IMPORTANT: The power calculation formula is suitable for bathrooms with ceiling heights below 3 meters. If the ceilings are higher, multiply the resulting power by 1.5. This is necessary because high ceilings “eat up” the light.
Example of dim lighting in a dark bathroom
An example of bright lighting in a bright bathroom
How to correctly calculate the required number of lamps
Before making the correct selection of the number of lamps for the room, you need to decide on the type of light sources used. Their number will depend on this.
To perform the calculation you will need the following data:
- room area;
- type of lighting sources installed in the room;
- the presence of windows in the room and their installation location;
- methods for zoning room area;
- interior design, as well as the purpose of the room.
An example of calculating the number of light sources is given in the table.
| Room | Standardized quantity for incandescent light bulbs, W/m2 | Normalized number for diode light sources W/m2 |
| Bathroom | about 20 | 2-3 |
| Living room | 22 | 3 |
| Corridor | 12-16 | 1-4 depending on the purpose |
| Bedroom | 15 | 2 |
| Children's | 60 | 6-10 |
For a room with an area of about 20 square meters, you will need approximately 10-13 light sources. To ensure a more convenient arrangement of lamps, it is recommended to select an even number of lamps.
It is better to choose more light sources, since spotlights emit soft lighting, it will not harm a person.
Mistake 4. Not paying attention to the type of light bulbs in the lamp
There are several types of lamps: halogen, incandescent, fluorescent, LED, etc. It is the light bulbs in the lamp that determine how long they will work, how bright the lighting will be, etc.
| Lamp type/criteria | Incandescent* | Halogen** | Luminescent*** | LED**** |
| Safety | — | + | + | + |
| Electricity consumption | — | — | + | + |
| Price | from 42 rubles (+) | from 67 rubles (+) | from 350 rubles (-) | from 260 rubles (-) |
| Life time | up to 1000 hours (1.5 months) (-) | up to 2.5 thousand hours (3 months) (-) | up to 10 thousand hours (more than a year) (+) | more than 50 thousand hours (6 years) (+) |
| Brightness | — | + | + | + |
| Conclusion | + | ++ | +++ | ++++ |
* Incandescent lamps do not like humidity. Being very hot, it will burst if a few drops of water get on it. It flares up quickly, but produces a weak luminous flux. The incandescent lamp is the most power-hungry of all, but also the cheapest.
** Halogen lamps in terms of price/quality ratio are the most affordable and convenient option. They give a warm, diffused glow. They get hot, but not much. And they do not consume as much electricity as incandescent lamps.
*** The fluorescent lamp is completely safe in humid conditions. It produces a powerful luminous flux, but flares up in about 2 minutes, so it works better in combination with other types of lamps. It works silently.
**** LED lamps are the most economical of all. But due to voltage surges, they “clack”, creating unpleasant sounds. The downside is the high price.
A universal option for lighting in the bathroom is a combination of halogen and LED bulbs.
IMPORTANT : Halogen light bulbs for suspended ceilings must be covered with paint or a special coating on the reverse side. Thus, the platforms will not show through and create unsightly shadows in the stretch ceiling (see photo below).
Halogen light bulbs in the bathroom, photo example
LED light bulbs in the bathroom, photo example
TIP: Pay attention to the color of the halogen and LED lamps. Halogen ones give a warm light, while LED ones give a bright, white light.
Glow of halogen and LED light bulbs in the bathroom
Spot location rules
True, in order to squeeze the maximum aesthetic appeal from the mounted panel, you need to know the basic rules for the safe placement of spots on a stretch ceiling. Let's try to list below those that are considered basic:
- if the spots are located along the wall, then maintain the minimum distance required for high-quality light dispersion - 20 cm. If you ignore this recommendation, you will not be able to get the level of illumination you want from the mounted lamps;
- the recommended distance between spots is from 30 centimeters, the optimal one is determined by local need and the type of stretched panel;
- parallel placed spotlights visually lengthen the room - this can be successfully used for rooms that need some visual correction;
- a rectangular arrangement is ideal for small and narrow rooms, but most often requires support in the form of “heavy artillery” - a weighty chandelier in the center;
- if you use spots in connection with stretch ceilings made of ordinary PVC film, then the maximum permissible power for halogen lamps is up to 20 W, for a satin panel a little more - up to 35 W;
- the exact number of lamps is always determined by the type of light pattern in the room, but one spot can illuminate no more than 2 m2 of free area. This figure must be kept in mind when drawing up a plan for the placement of spotlights on a suspended ceiling.
Mistake 5. Choosing bathroom fixtures without taking into account the height and type of ceiling
Recessed ceiling lights for small bathrooms
Such lamps are distinguished by the fact that almost their entire body is located under a suspended or suspended ceiling. Only a decorative trim peeks out from the outside. They look minimalistic and do not press on top, so they are suitable for small bathrooms with low ceilings.
Recessed ceiling lights for small bathrooms
Recessed ceiling lights in the bathroom interior
Surface-mounted lights for medium-sized bathrooms
The overhead model is not built into the ceiling, so it takes up more height than built-in models. But despite this, there are also compact overhead lamps that will fit a standard ceiling and will not take up much space.
Surface-mounted lights for medium-sized bathrooms
Overhead lamps in the bathroom interior
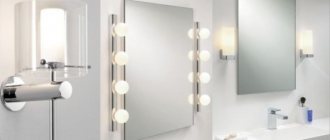
Wall lights for functional areas
For example, wall spotlights above a mirror create accent task lighting. Here, too, it is better to adhere to the principle: small bath - compact lamps, and vice versa.
Wall lamp above the mirror in the bathroom
Wall sconces to the right and left of the mirror in the bathroom
How to choose
Having decided to purchase a ceiling lamp, you need to decide which model is right for you, taking into account the following factors.
- A variety of shapes from which you should choose the one that suits your design style. Some models are decorated with mirror plates that reflect light, colored plastic or glass. Scattering glare of various configurations creates a unique atmosphere of the starry sky.
- Lighting is designed based on the weight and dimensions of the model. Sufficiently heavy lamps can cause the tension fabric to sag, so it is necessary to increase the height of the gap.
- The color range is presented in many shades, which helps to choose the lamp to match the color of the decor. For a variety of lighting effects, you can buy several shades at once.
It is worth taking into account the requirements for bathroom lighting:
- For bathrooms, only moisture-proof equipment with a sealed housing is acceptable;
- the ability to combine different lighting methods, for example, complement spotlights with a classic-style chandelier;
- built-in models must have internal sides, and heating should not exceed 60°C;
- they should be 15-20 cm away from the wall;
- in the ceiling series, fluorescent or LED lamps are used;
- When buying a lamp, you need to find out how to replace failed lamps.
Any lamps are suitable for lighting the toilet. Ceiling lighting involves the use of small chandeliers. For a small toilet, one installed in the center is enough.
Mistake 7. Buy a chandelier/sconce with a dark shade and pattern
The material of the lampshade or floral shades can eat up the light power and convey the color of the light incorrectly. For example, a lampshade made of dark, light-retaining material reduces the level of illumination, which is most inconvenient in the bathroom, while many decorative details leave a shadow. Therefore, check immediately in the store how overly designer and decorative models transmit light.
Unsuccessful sconce for the bathroom, photo example
A successful example of a sconce for a bathroom, photo example
Installation rules
It is not recommended to install spotlights in the immediate vicinity of the bathtub, even if they are ceiling mounted and, it would seem, sufficiently far from the water. The safe zone should be about 60 cm - to the side of it, and at least one and a half meters up. Only low-voltage ceiling models with a high airtightness index (IP no less than 66) are allowed here. But still, choose a rotating spot better, and move it slightly to the side of the bath (at a distance of about 60 cm), pointing the lampshade in the direction you need. In the shower, it is generally more appropriate to use low-voltage lighting systems (the same halogen or LED), since even if a short circuit occurs, the negative consequences for health will be minimal. It should be remembered that all additional components, such as wires, power supply, dimmer, step-down transformer, sensors, must be waterproof. Even taking into account that the ceiling coating mechanically protects them from splashes, the condensation that constantly forms can still lead to oxidation of the contacts, and as a result, to breakdown. If you plan to install the lamps yourself, be sure to lay the wire in a corrugated sleeve. When assembling the chain, it is advisable to solder all the twists, then wrap them with electrical tape or cover the joints with heat-shrink tubing. Better yet, use special clamp terminals. They are much easier to work with, plus, when the need arises to replace one of the bulbs, you simply unfasten the old one and attach a new one. And there is no need to extend the cables and re-solder the circuit.
Mistake 8. Not paying attention to the material of the lamp
Even the most fashionable metal sconce without a protective layer will eventually become covered with red spots. And models made of glass and plastic will last much longer. Such materials are not destroyed by moisture and detergents, and in the long run save time and money. If you still cannot do without metal materials, check the composition for the presence of a reliable powder coating (protective layer).
Unsuitable material for bathroom fixtures
Suitable material for bathroom fixtures
Basic rules for placing spotlights
There is only one rule here - do not place lamps closer than 15 cm to the seam of the stretch ceiling. Because if you do otherwise, there is a high risk of damage to the tension covering during installation.
Otherwise, there is complete freedom of action, but if you want to maintain at least some geometry, then it makes sense to adhere to rule number two - do not place the lamps closer than 20 centimeters to each other.
And, if the exact distance is not your case and you want to depict chaotic chaos on the ceiling, then rely solely on your taste.
And yet, before making holes in the stretch ceiling, it is better to carefully draw circles with chalk on the surface itself, in the place of the intended points. This way you can see it much better than drawing on paper. It’s always the same in the picture, but in reality everything looks completely different, and you can’t fix the hole!
Better spend an extra half hour, draw everything and look carefully at what comes out. As a rule, after such a sketch, the desire to experiment with asymmetry instantly disappears.
Mistake 9. Confusing decorative and main lighting
A sconce with a colored lampshade and an LED strip on a plasterboard ceiling will not replace the main lighting. The light from a colored sconce near the mirror will distort the reflection, and the LED strip will only create a relaxing atmosphere. Therefore, divide all lighting into three groups: basic (chandelier, ceiling lamps) to wash the floor, task (wall lamps near the mirror) to apply makeup and decorative (LED strip on the steps or ceiling) to leisurely take a bath.
Decorative lighting in the bathroom
Decorative lighting in the bathroom
Basic lighting in the bathroom
Main lighting in a spacious bathroom
Where to install?
Waterproof bathroom fixtures can be installed;
- on the ceiling;
- on the wall;
- on the floor.
Each of these options has its own unique features. Bathroom ceiling lights
Bathroom lamp layouts: real examples
Lamps in a dark bathroom with an area of 4 m2 and ceilings of 2.9 m
Project by designer Yulia Chernova
General lighting : 4 built-in spotlights - 2 above the sink, 1 above the bath, 1 above the toilet.
Working lighting : LED lighting around the perimeter of the mirror.
Layout of four lamps in the bathroom, real photo example
Lamps in a bright bathroom with an area of 6.5 m2 and ceilings of 2.9 m
Project "Côte d'Azur", CO:interior
General lighting: 6 spot built-in ceiling lights - 2 of them are accent lighting above the bathtub, 2 above the shelf in the niche, 2 on the sides of the bathroom so that there are no dark corners.
Working Light:
2 accent sconces above the mirror, 2 spotlights on top in the shower stall.
Layout of ten lamps in the bathroom, real example
Layout of ten lamps in the bathroom, real photo example 2