Separate or combined bathrooms are classified as complex rooms in terms of layout and design. A photo of a bathroom after renovation always looks beautiful and is a masterpiece of professionalism of workers and design creativity. When choosing future examples of bathroom decoration for furnishing our premises, we always pay attention to beautiful and convenient layout and design options, since the bathroom should, with its entire appearance, help you relax and physically rest.
Bathroom after renovation
When starting to decorate a bathroom, you need to carefully think through everything down to the last detail, since the location of interior items, plumbing fixtures and design options play a decisive role. Many people cannot imagine what the bathroom will look like after renovation, where it is better to place the plumbing elements, what furniture to use and what design style to choose for this room. This is explained by the lack of spatial and figurative thinking, as well as an insufficient amount of information. You can solve this problem by looking at numerous photographs of bathrooms after renovation, each of which will certainly give food for thought and help create an approximate image of the future room.
Looking through photos of renovated bathrooms, we have the opportunity to observe many unique solutions and can immediately determine which ones are right for us.
Looking at the samples, we evaluate them according to such parameters as:
- room size;
- layout;
- types of plumbing used;
- samples of furniture and decorations;
- color design;
- materials used for finishing.
In this material we will consider options for renovating a bathroom using various finishing materials and with different volumes of the room.
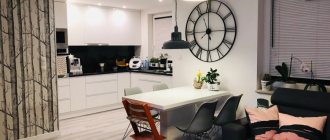
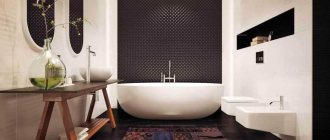
Scandinavian style bathroom
The area of a one-room apartment in a panel house from the 1970s is only 32 square meters.
m. A young girl lives here. The bathroom is small, but due to the new arrangement of plumbing fixtures, the room has become comfortable and more functional. A wall-hung toilet was installed instead of a sink. The pipes were hidden behind a false wall, and a cabinet for storing cosmetics and household chemicals was built to the left of the entrance. White tiles and a large mirror expand the space, and a black and white ornament acts as an accent to the interior.
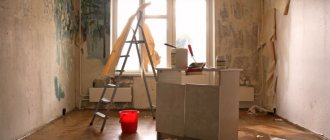
What to consider before starting repair work
As a rule, a bathroom in a typical apartment in a multi-story building occupies a small area. However, even the repair of a small bathtub and toilet, photos of samples of which can be found on our website, requires significant financial investments, since enough material for cladding, adhesive cement and other necessary things must be purchased. It is important to foresee and calculate everything in advance.
Bathroom interior design in light blue tones
The following tools will be useful to you in the process: a pipe cutting knife, a mounting level, a notched trowel and a scraper with a flat surface, and a tile cutter. You should also stock up on a special key for the sink.
It is advisable to strictly follow the stages of repair work. If you approach the process of updating the room correctly, the bathroom after restoration will delight you with functionality and comfort, and the renovation itself will not seem so long and labor-intensive.
Bathroom with a secret
The apartment in Moscow belongs to a business woman who lives with her teenage daughter, loves the loft and the work “Alice in Wonderland.” Instead of old ceramic tiles in pink shades, the designers chose an inexpensive white “hog”, laying it out in a herringbone pattern.
Some of the walls were painted gray, making the interior look complete. The vanity unit is made to order: combined with the mirror frame, it adds a classic touch to the decor. The canvas with an illustration from “Alice in Wonderland” is not just decoration, it masks the inspection hatch.
A bathroom that has become more spacious
The area of this apartment for young spouses is 38 square meters. m. The old bathroom only had room for a sink and a shower, and you could enter it from the bedroom. After the redevelopment, the bathroom was enlarged by adding part of the corridor: now you can get into it without going into the room. The room now has space for a toilet and a spacious cabinet under the sink.
Important tips from the pros
When renovating a bathroom, you should adhere to the following rules:
- You should not decorate the bathroom in white colors. Your guests and loved ones will feel as if they are in a medical facility. At the same time, too dark colors will require more careful care of the room.
- It is better to finish the flooring with tiles. Rough surfaces are difficult to clean.
- It is imperative to make sockets in the bathroom, and protected from moisture.
- To quickly drain the water, it is necessary to place the bathtub at a slight slope. At the same time, the drain hole should be 5 cm higher than the entrance to the sewer pipe.
- The bathroom should be equipped with suspended ceilings. In case of flooding, they will hold the water until specialists arrive, who will quickly correct this deficiency and save your apartment from flooding and damage to furniture.
- An automatic toilet hood is an excellent solution for a family. No one will be bothered by the unpleasant odors that are usually present in this room;
- The space under the bathroom can be used to store plumbing care products, household supplies and other things that often have nowhere to be stored, especially in a large family. Make a bathroom door cabinet that you can open and close as needed.
Following these tips is optional and should only be done as desired. Here we offer practical, time-tested options, so using them will truly be the right decision!
It’s up to you to choose which procedures you want to perform to improve your bathroom, and which you want to ignore!
Bathroom with an airy effect
The new owners chose this apartment because of the magnificent view from the windows, but the dilapidated housing required a lot of investment: the last time renovations were carried out here was 30 years ago.
The designers dismantled the old multi-layer partitions consisting of boards and bricks, thereby increasing the room by 20 cm. They replaced all communications and electrics, tiled the walls and floor with marble tiles, installed a bidet and a lightweight console sink.
They replaced the toilet and sink. Turquoise accents made the bathroom look fresh and airy.
Turquoise and owls
This alteration is simpler than all the others. She proves that you can get the feel of a brand new bathroom by repainting the walls and changing up the decor. In this bathroom, the walls went from white to turquoise - a very noticeable change. Several more shades of green have added variety to the color scheme, which go well with white furniture and fixtures and brown tiles on the floor, which do not need to be replaced.
The main characters in the decor of the new bathroom were owls: bright cartoon characters made the atmosphere of the bathroom very cheerful - there are children in this house, and brushing their teeth in the morning is clearly more fun for them (and for adults, too, by the way).
Photos: architecturaldigest.com, goodhousekeeping.co.uk, thelittlebrownhouse.us, thedomesticfringe.com
Add to favorites1
- Tags
- bathroom
- bathroom
- repair
- before and after
bathroom, bathroom, renovation, before and after
From yellow to elegant gray
A middle-aged couple with a cat live in a three-room apartment in Novosibirsk. The main drawback of the bathroom was the ill-conceived storage systems: a lot of tubes and jars accumulated on the open shelves.
After the redevelopment, the toilet was hidden behind a solid partition, and a cabinet with a water heater was placed above it. The storage area was set up in a niche and disguised with a curtain. It is made of two layers: the inner side is waterproof, and the outer side is textile, with an elegant pattern.
Main options
There are two main types of repairs. In other words, there is simple design and finishing, and there is a major renovation. The first approach involves superficial replacement of some interior elements as necessary. It involves replacing the main parts with newer ones, as well as finishing. In the case of a major overhaul, a more serious and labor-intensive restoration will be required. With this approach, the following work is performed:
- providing waterproofing;
The process of waterproofing a bathroom - construction of partitions;
- installation of new pipes and communications;
- installing the floor, replacing doors, other important attributes, replacing the bathroom itself;
- floor finishing, ventilation installation.
It is necessary to use recommendations, be guided by the experience of professionals who already have knowledge and are also ready to objectively evaluate various redevelopment options. With an illiterate approach, the result will often not justify itself. Among the photographs, you can choose ready-made examples of bathroom renovations that suit you best. You can also find a style solution that will be most relevant for your room.
Bathroom after renovation
After all, when considering examples, you will more clearly understand the overall picture and look forward to a new style for your bathroom, which will be the best and unique for you.
And, in addition, from a variety of options, there is a chance to choose the most suitable solution in terms of money and style.
Bathroom with a masculine character
The owner of an apartment in a panel house built in 1983 was a middle-aged man. After the designers knocked down the walls and combined the bathroom with the toilet, the space began to be used more functionally.
The pale green walls were lined with brutalist tiles with a stone texture. The natural theme was supported by a cabinet and a door with a wood texture. In the niche formed by the box with the installation, there is a sink, and above it there is a cabinet with a mirror door. A glass partition protects it from splashes flying while using the shower.
Bathroom. Before and after renovation
Good afternoon I want to show you a completely completed renovation in the bathroom and toilet.
First of all, many thanks to everyone who posted their ideas for repairs and design, they really helped to avoid many mistakes.
So, our first own apartment is Brezhnevka, separate bathroom, standard.
Although both rooms are very small, there was no talk of combining them - separate toilet and bathroom were fundamentally important to us.
The renovation turned out to be a protracted one, since my husband did all the work himself in the evenings, and it was completely finished. Looking ahead, I will say that everyone is happy, I don’t want to change anything (except for the bathroom screen).
Initially, when buying an apartment, the bathrooms were a terrible sight, because... There has NEVER been any repairs there.
In the bathroom there are partially fallen off blue tiles and oil paint on the walls, in the toilet there is terrible brown wallpaper and layers of the same paint underneath. Because we lived and at the same time were doing renovations in this apartment, it was immediately decided that the tiles would be anything but blue and green))))
bathroom BEFORE
It took a long and tedious time to remove the paint from the walls with a scraper; there was also paint on the floor under the tiles - it was removed using a stripper.
All pipes were replaced and meters were installed.
We spent a long time thinking about the repair plan, because... The tiles were planned to be different in the two rooms, but I wanted them to be combined with each other.
As a result, the “unifying moments” for the two rooms were: - modern, laconic style - single-color tiles, mostly light, large-format - floral panels, without additional decorations in the form of borders - accessories - chrome - gloss, mirror surfaces Wenge doors, black on the outside glass, inside there is also black glass in the toilet, and in the bathroom there is a mirror.
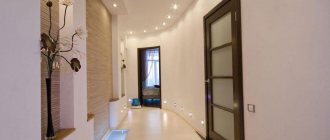
view from the corridor - doors to the bathroom and toilet
First, I’ll tell you more about the smallest room.
general form
After leveling the walls and installing the installation, the internal size of the toilet became 76 by 120 cm.
When replacing the pipes, they were “taken” back, a “step” was formed in the place where they enter the apartment, and the installation had to choose the narrowest one - so that it stood exactly in the middle, despite the pipes - they took Geberit, the flight was normal). I’m very pleased that we chose a white button - fingerprints are still very visible on chrome, but nothing on the white one!
Toilet – Ideal Standard, Playa – comfortable).
The tile is called Mural Patmos - size 25*50, was chosen because of the panel, I wanted it for myself as soon as I saw it. The panel consists of 6 tiles; when we bought it, we thought of putting it on one wall and making the other one, where the paper holder is monochromatic, but along the way we split it into two parts. The panel is textured, the tile itself has pimples, not smooth (there are no problems with maintenance at all).
closer look at the panel
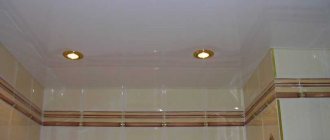
The grout is Ceresite everywhere, it survived the renovation throughout the rest of the apartment and retained its original appearance. The ceiling in the bathroom and toilet is the same - suspended, glossy, but it does not reflect the entire room, only glare of light.
adorable lamps))
There are only 3 lamps here, so it’s not enough for reading, for everything else it’s enough.
By the way, the ledge where the pipes were covered with plasterboard and tiles, and now a pipe cleaner has been registered on it.
We also made a homemade cabinet for household items. accessories thanks to the installation - doors from Leroy, painted many, many times with rosewood stain, the inside of the cabinet was also painted with the same stain. It’s very convenient – there is access to meters and plenty of storage space.
I found a black fan, silent design - by the way, both in the toilet and in the bathroom the fans are turned on separately - we installed a double frame with a double switch for each room - one key for lighting, the other for turning on the fan, so that it does not hum all the time, but only when necessary .
let's go out)
Now let's move on to the bathroom. Size 1.5*1.5 The washing machine is in our kitchen, it wasn’t a major task to cram in something that couldn’t be squeezed in)
It all started with tiles - I couldn’t find something that I definitely liked until I saw IT - Azulejos Alcor, Reims collection. My husband approved, fortunately he has no complexes towards pink tones)) The size of the tile is 20*50, the panel is 20*70, so it had to be laid out from the edge of the bathtub to the ceiling.
go!
The size of the tiles was also convenient for us in the sense that exactly 3 tiles were required for each wall - that is, a minimum of trimming. The tile is glossy, purple - malva, light - rosa - in the store it looked pinkish, but in reality it turned out to be almost white. The panel consists of squares, each with an ornament, a pattern, and in some places mirrored - it looks very interesting up close. Since the room is small, the layout was simple, and the tiles everywhere except the wall opposite the door were light. The tiles do not require any maintenance - although I have seen reviews that the gloss will have to be rubbed constantly - nothing like that! Acrylic bathtub, 150*70, Ravak, Chrome - when we bought it, it had just appeared, and there was a 20 percent discount on the new product. I really like it, it stands stable, it was a revelation to me that it turns out that when installing it you need to drill - I was afraid that we would have a leaky bathtub)))) It came with a very beautiful screen, but unfortunately, we had to abandon it - next to the bathtub We have a hanging cabinet, and in order to remove the screen and get to the pipes we would have to remove the sink. Therefore, we have a sliding screen made of MDF - the quality, frankly, sucks (we will change it over time, for now let it live) but it is convenient because now there is a lot of storage space under the bathroom and easy access - we have a cat litter there for the toilet)).
The joint between the bathtub and the tiles was sealed with white sealant - it didn’t turn yellow, it looks neat. A sealant “pump” is made on the outer edge - this way water does not flow onto the floor.
Because of the squares of the panel, it was decided to select accessories of a clear shape. Grohe eurocube mixers, Ideal Standard shower stand. At first I didn’t want to hang a curtain, but since the sink is close to the bathtub, there would be a lot of splashes from the rain shower. The curtain is convenient - at first we took a fabric one, but it took up a lot of space, and this one, although ordinary, folds up very compactly and does not get in the way. Photo clockwise.
The sink is 37*70, we needed exactly this size in depth so that it would not stick out. The cabinet is VERY roomy, all soap and soap accessories are stored there, and the bottom one is still empty - so everything looks neat, there is no army of tubes in sight - it is always orderly, as in the photo. Mirror with backlight (I rarely turn it on, so I could do without it).
Sunerzha heated towel rail - chosen because of its shape. By the way, I had to fence a plasterboard box for the pipe from the heated towel rail, because... It was difficult to wall it up in the wall, and it was not advisable. We did without plastic corners, but since my husband was afraid that he would ruin a lot of tiles, they also didn’t cut them at 45 degrees.
The ceiling is white gloss, with 5 lamps - as bright as in an operating room.
The cat potty is for two, I didn’t put it away for nice photos - it’s always there, what can you do, it’s not in the kitchen) At first we dreamed of making a door in the door for animals, but we can’t install one in glass, so we keep the door to the bathroom ajar , or open - and because in other rooms - in the living room, kitchen there are also lilac shades, the bathroom goes well with them.
view from the corridor
That's all, I hope the information will help someone when renovating a typical bathroom! We did everything exclusively for ourselves, to our taste, so we enjoy spending time in both rooms))))) An outside perspective is of course interesting, if you have any decorating tips, I’ll be happy to listen, thank you for your attention!
See the original material at https://ideas.vdolevke.ru/posts/21246/pervyy-opyt-remont-razdelnogo-su-chto-to-tipa-minimalizma/
Bathroom, thought out to the smallest detail
The new owner of a “one-room apartment” in Khrushchev with an area of 34 sq.m. - marketing girl. The size of the bathroom is only 150x190 cm. The location of the plumbing had to be partially changed: the toilet was moved closer to the bathroom, the washing machine was placed in a corner, slightly recessed into the wall.
The countertop for the sink is custom-made, as is the mirrored wall cabinet with a depth of 13 cm. To make it easier to lean into the bathroom, the designers have provided a small niche for feet. The walls and floor were decorated with large tiles with a marble texture.
We dismantle the plumbing
In order for your bathroom to really transform and look presentable, like in professional magazines with fashionable designer interiors in the photo, renovation of the bathroom and toilet, you need to start with replacing the old plumbing. We free up the premises for basic work: installing new communications, repairing wiring, laying ceramic tiles. If the bathroom is combined, you need to dismantle the toilet, sink and bathtub.
First, you can remove the bathtub from the room. To do this, remove the fasteners that secure the legs of the bathtub, and then unscrew the drain pipe.
Bath foot mounts
The next step involves dismantling the mixer. Before doing this, do not forget to turn off the hot and cold water supplies.
In the same way we disconnect the sink. Often it is attached to brackets that need to be unscrewed. If you need to cut pipes, use a special knife for this. It is important to do the work carefully so as not to damage the rest of the communications.
Dismantling a toilet usually begins with the tank. It is necessary to drain the water from it and disconnect the hose. The tank is removed first, then the fastenings and the toilet itself are disconnected.
Removing the cistern
Once you have cleared the room of all the old plumbing, you can move on to preparing the walls, ceiling and floor.
The old coating is removed, all remnants of crumbling paint and plaster must be completely removed. To prevent construction waste from complicating the work, it must be removed immediately.
Tiny bathroom with shower
Moscow apartment with an area of 32 sq. m is intended for rent. The size of the bathroom is 120x195 cm. After the renovation, the location of the plumbing was almost not changed, but instead of a small sit-down bathtub, a shower cabin was installed.
The countertop combined the sink and the box to which the toilet is attached. Lockers were placed above them to disguise the counters. The shower area is partially divided by a transparent partition: its size is calculated so that a door is not needed. There was no place for the washing machine - it was installed in the hallway.
Replacing pipes in the bathroom
When dismantling is completed, you can proceed to pipe laying. A major renovation of bathrooms and toilets, photos of which can be found on our website after renovation, is difficult to imagine without replacing old communications. Experienced craftsmen recommend purchasing modern plastic ones instead of steel ones. Such pipes will last quite a long time.
Plastic pipes for the bathroom
They are easier to install and do not become covered with limescale and rust. Such modern types of communications do not require welding. The cost of plastic pipes is low. Old systems need to be cut down and new ones put in their place. Modern pipes are easily installed using special clamps. The choice of metal-plastic products for water supply is by far the most acceptable option. You can probably get some bathroom design ideas by looking at the gallery
On our website there is an approximate repair of a bathtub and toilet, photo. From plastic and other materials, modern technologies make it possible to produce fairly durable pipes that are easy to install.
It is advisable not to embed communications into the wall. However, if they are still hidden, do not forget to remove the drain hose for the washing machine.
It is also recommended to install taps on the hot and cold water pipes. This is a precautionary measure in case of an accident.
Bright bathroom
This is another small apartment (37 sq. m.) for rent. The previous owners delayed repairs for a long time: cracks and holes appeared in the floor. First of all, the workers dismantled all the old finishing and plumbing, then replaced and sewed up the pipes.
The room was also waterproofed and new flooring in the form of hexagon tiles was laid. The shower stall, toilet and sink were replaced to create storage space in the form of a cabinet. The bathroom has become bright, discreet and seems more spacious.
Types of renovations for bathrooms
The following types of restoration work are distinguished:
- Major renovation. It involves large-scale changes, in particular, the dismantling of old plumbing points, pipes, electrical wiring, and the purchase and installation of new equipment. Often in the bathroom, the floor covering, wall cladding, ceiling, and door block are changed.
- Elite renovation, unlike a major one, includes not just replacing old plumbing with new ones, but also the development by a designer of an original bathroom interior project using modern fashionable technologies and materials.
Luxury bathroom renovation with original design development
- Cosmetic renovation of bathrooms and toilets is the easiest of all the listed types of work. In this case, no new communications are required. They only change the appearance of the room, putting in order the worn-out covering of the floor, walls or ceiling. Various examples of such restoration are presented in the gallery of this article. A photo of a bathroom and toilet after renovation can inspire you to interesting ideas for decorating your own home.
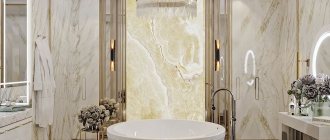
Expansion of the bathroom with a storage room
A spacious apartment in Moscow belongs to the chief accountant and her student son, who often comes to visit. The last time renovations were done was in 1985. After demolishing the walls, a niche appeared in the bathroom where shelves and a linen drawer were placed.
Instead of a bathtub, a shower cabin appeared, and a washing machine was installed under the countertop with a sink. The floor and walls were faced with onyx porcelain stoneware: due to the continuity of the texture, the room appears larger, since the boundaries between the planes are visually blurred.
Thanks to thoughtful designs and design tricks, bathrooms have changed beyond recognition: they have become more spacious, more comfortable and more attractive.
Small bathroom design
There are simple design techniques that can make your bathroom interior comfortable and cozy.
ADVICE! To create a modern design, it is recommended to pay attention to laconic sinks, for example, square, rectangular.
All design projects are not complete without defining the color scheme that will dominate the interior. Experts recommend giving preference to light or white shades, because it has long been known that they allow you to visually expand the space, make it spacious and open. Dark palettes take away natural light and make the bathroom even more compact.
In a small bathroom, dark and bright colors are best used only as accents.
White color creates a sterile effect, so it is better to choose bright decoration elements. They will enliven the space, make it harmonious and stylish.
Stylists do not advise using several tones at once in a small room. This solution minimizes the weight of the bathroom.
The following variations are ideal:
- Light gray color. Cold palettes can give a room austerity and laconicism.
- Beige. The most popular color for bathroom decoration. It is transformed into a bright and comfortable space.
- Classic combination of black and white. The contrasting combination adds originality and style.
- Bright palette. It is possible to visually enlarge the area with a white floor and panel ceiling, and for the walls use original ideas - blue, green, pistachio, yellow, orange.
Beautiful bathroom with white fixtures and bright red tiles
Experts recommend that you familiarize yourself with photos of bathroom renovation designs before starting it. In this way, it becomes possible to implement exclusive elements even with small room sizes.
Glossy surfaces create a play of reflections and add light to the bathroom interior