Classics are eternal, they never grow old or die. This applies to any phenomenon in life. An apron for a classic kitchen is no exception. Do it right, and it will please you in the future with its appearance. This article will help you with this.
The culture of making kitchen aprons has a long tradition. And the reason is simple: the space behind the stove is more susceptible to contamination than any other. Sheathing? Plaster? Painting? Come on! Fat will become very firmly embedded in any of the above, and then it will be difficult to wash it off. Expensive durable materials are also a waste - you will have to spend a lot of money.
But the apron itself is small and relatively cheap, unless it is made of some valuable material (there is such a fashion). If necessary, it can be easily replaced and general repairs are not necessary. It not only protects the walls from all dirt, grease and detergents; the apron is the main decoration of the kitchen. To make it, you can contact designers. But you can do it yourself. We will look at the second option. Not everyone can use the services of a designer unless they are a designer themselves, right?
Classic kitchen style
Smart choice
Which apron is better - you ask? It should emphasize the overall style of the kitchen and serve as a complement to it. A classic kitchen needs a classic apron made from classic materials, and nothing else. Otherwise, the whole kitchen will look ugly, and it cannot be called an eclectic style. All the harmony, all the beauty and attractiveness of the kitchen will be destroyed and upset.
But with our advice, you will choose the right item we are considering. Whether you choose an apron for a red kitchen, for a white one, or your kitchen is of a different color, it doesn’t matter. The main thing is that newfangled materials like glass, plastic, and metal will not work. And cool neon lights are only suitable for high-tech style.
A tiled backsplash is an excellent choice. This decoration method has stood the test of time. It is an ideal option according to experts. Just buy a tile that is marked PEI I, or maybe PEI II, and you will very soon feel the following advantages of the tile:
- It's easy to care for.
- Difficult to break.
- Not afraid of water, steam, fat, chemicals.
- Retains its appearance for a very long time even with constant contact with heat.
Tiled apron in pastel colors for a white kitchen
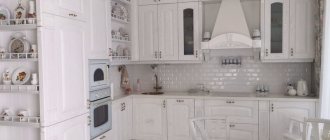
If you have a white kitchen, then an apron made in pastel colors will do. For example, caramel, ivory, sand, beige colors. An apron should decorate the kitchen, and white is not very suitable in such cases - everything turns out too boring and sterile. Therefore, use other colors.
Apron appearance
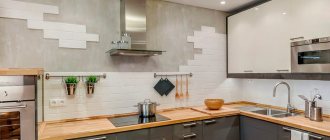
The design of the kitchen apron should be simple, but tasteful - if it is a classic option. Let the tiles be plain. It's good if it's matte and medium in size. Calm, natural colors of backsplash tiles will perfectly decorate your dining area (for example, beige, light gray or completely white). The combination of these colors with oak, alder or cherry wood is what you need. You can use tiles of the same color, without any color experiments - they will look great just the same. Finishing an apron in this style will ultimately decorate it greatly.
Such an apron can be set off by using, for example, curtains, a tablecloth, or napkins that match it for the kitchen interior. This will have a great effect on the overall composition. Does your furniture have gold decorations? I have an idea! Then you can change its design by adding a brass frieze. However, everything must be strict, neat and tasteful. It would not be a shame to invite guests to such a kitchen.
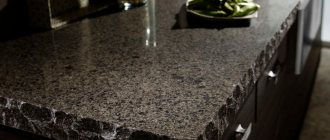
You can add natural stone to the overall picture. However, you will have to spend some time and nerves. The stone itself is expensive, and a light stone is very easily soiled, while a dark one makes the kitchen “heavier” for the eye. Whether you need such pleasure is, of course, up to you to decide.
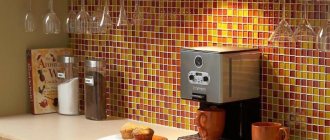
Previously, mosaic was considered an unsuitable option for decorating a kitchen in a classic style. But now new options are appearing - mosaics with restrained, traditional colors. It's modern and acceptable.
DIY tile apron
As mentioned, you can make an apron for the kitchen yourself. First you need to prepare the wall. And to do this you need to find out what area you will be finishing. This work is not the easiest and not the cleanest.
How to calculate an apron in the kitchen? From the height of the table, subtract the height of the tabletop and another 50 millimeters. As a rule, the height of the object we are considering is from 600 to 750 millimeters. But when frying in a frying pan, fat splashes to a height of 800-900 millimeters, respectively, and the kitchen set should hang above the stove at approximately this distance. So you have to choose two options: the first is not to hang any cabinets above the stove, but instead place a splash-catching hood; the second is to choose a set that has hanging compartments of different heights, and let it be located above the slab with a ledge.
Any length of the apron is suitable, the main thing is that the distance from the tiles is 900 millimeters or more in both directions; distance from the kitchen sink – 600 or more. And when the sink and stove are located at a distance of less than 900 millimeters from the left or right wall, then it is necessary to make an overlap on the wall equal to 600 millimeters.
Kitchen renovation
Now we are preparing the wall. You are making a tiled apron for the kitchen, so this has its own specifics. You are making a tiled apron for the kitchen, so this has its own specifics. We knock the plaster down to the meat, and treat the “meat” itself, the base, with a powerful primer until it becomes smooth. “Staratel” or “Plitonit Grunt” are suitable: their surface is rougher than that of foreign primers, but more durable - this is what we need.
The wall is ready, you can lay the tiles. This is more difficult than finishing a kitchen apron made of any other material. The point is that the areas of tiles purchased at a cheap or average price differ by 1 - 1.5 millimeters. When regular cladding is done, this can be hidden by using 3-4 millimeter crosses. They are stuck into the corners of adjacent tiles, and the width of the seams between them becomes relatively equal, and they are removed before grouting.
However, tiles cannot be laid with wide joints. To maintain hygiene in the future in the kitchen, the apron is grouted with special mixtures containing polymer additives. But they require a seam width of no more than 1.5 millimeters, otherwise the result will be unsightly and dirt will accumulate in the seams. Therefore, an apron for a classic kitchen is laid using 1.5 millimeter crosses.
You can lay out tiles with such crosses and see the following picture: the distance between the tiles in all directions is not the same. It will be necessary to bite off the hangers from several crosses. Why? The hangers themselves are wedge-shaped, and you will need this when styling. So, further procedures:
Laying tiles for a kitchen splashback
- A strip is applied to the wall, above the stop below, with a notched trowel; it is as long as the backsplash and as wide as the tile is high.
- after two to five minutes, the stick starts to come off - the first row is laid, leaning on the stop.
- Separate the tiles from the first row with wedges, bitten off from the crosses, along the seams stretching down: two wedges per seam.
- The upper edges of the tiles are leveled, reaching the same level - to do this, wedges are driven under the bottom row.
- the second row is laid after the glue has completely dried, in exactly the same way as the first; the only difference is that the stops are the upper edges of the bottom row of tiles.
- All other rows are laid in the same way; The glue, again, must dry completely.
Then the tiles “walk” only with the upper edges of the seams running horizontally, and this is not very noticeable. And this “festival” does not increase while the subject of our discussion is laid out.
Choose a color to suit your mood
They go well with any shades, but since they themselves are neutral, the chosen range of finishes gives them one or another sound. You just need to determine which palette is more comfortable, and what “mood” the interior is missing.
Calm and elegance
If you want to achieve exactly this effect in the kitchen, then you need an apron of the same white color or one of its shades: ecru, milky, ivory. Such cladding will become a continuation of the headset and will help make a cramped room at least visually more spacious. But to prevent the work area from turning into an operating room, you should choose a different color for the tabletop, depending on the style of the interior. In most cases, imitation light wood or a contrasting black slab will look great in such a setting.
An interior with a lot of white sometimes seems lifeless, so designers recommend adding rich accents. These could be decorative vases and jars, pots with indoor plants or lamps with bright lampshades.
Another effective design technique is playing with texture. On a white field, you don’t have to be afraid to overdo it with its variety, so feel free to combine a blinding varnish shine with matte and embossed surfaces. For painted paneled facades, choose smooth glass panels (skinali), and for a glossy set, select small mosaics or elegant tiles.
Bright glamor
Here color is no longer as important as the texture of the facades themselves and the finishing of the work area. Skins in rich but pure tones: yellow, green, red, blue, purple are ideal for a set with a glossy snow-white surface. The shine of a glass apron and furniture will look especially impressive if you take care of multi-level lighting.
Cool clean
This feeling in a white kitchen is created by the presence of a turquoise apron. It literally drags a neutral color into the zone of cool shades and thereby refreshes the interior. This solution is suitable for owners of hot apartments with windows facing south, where there is always a lot of sun.
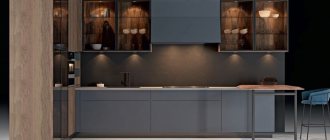
Dynamism
White interiors diluted with black accents have this quality. One of them could be a kitchen apron made of glossy ceramics. Here you are free to experiment by making the cladding not purely black, but by arranging light and dark tiles in a checkerboard pattern. In any case, the desired effect will be achieved. This design fits perfectly into modernist design, but strictly monitor the balance of colors: you need very little black, otherwise it will begin to “pull the blanket over itself.” In a white kitchen with a checkerboard floor, it is undesirable to repeat the same pattern in the decoration of the work area - it will have to be made monochromatic or resort to a different type of layout.
Black tiles in a light kitchen can sometimes seem like just a dirty stripe, standing out from the overall picture. To prevent this from happening, use white grout for the joints when laying tiles. It will look especially impressive on cladding that imitates brick or small mosaics. But do not forget that such a dark apron will have to be taken care of especially carefully - despite its color, it is considered very easily soiled.
Courage and energy
An accurate characterization of white interiors with a bright red splashback taking center stage. As in the case of black, a two-color pattern of tiled rows or a predominance of red is allowed here. But the presence of this shade imposes certain requirements on the design of the rest of the space. In the interior, to balance the aggressive color scheme, small accents of other tones are needed, and the apron itself will need to be supported by at least one of the larger items. This could be a red refrigerator, a set of chairs or curtains on the windows. Choose one thing, because the abundance of aggressive shades is tiring.
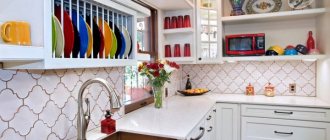
Optimism and spring mood
If the apron or skins in a white kitchen are pleasing to the eye in green or light green, the hostess will always be in a good mood. To support the chosen tone, the interior can be diluted with accessories in pistachio, yellow, turquoise or olive colors. The pattern of natural wood will fit well into this design, complementing the recognizable eco-style palette.
Kindness and devotion to traditions
The motto of a classic interior is perfectly emphasized by an apron in warm brown tones. Moreover, the shade can be anything: from beige to deep chocolate. But the choice of materials is limited - at your disposal you only have tiles or cladding that imitates stone. However, monograms, elegant ornaments and even voluminous miniatures on the decoration more than compensate for this shortcoming.
A glass apron with realistic photo printing is beyond categories. Exotic flowers may be blooming on a white background, fruits may be oozing juice, or waterfalls may be boiling - choose the picture that you like, and you definitely won’t go wrong.
Features of laying a mosaic apron
Which apron for the kitchen is better - tiled or mosaic - is up to you to decide. If you decide to make it mosaic, and you have ready-made fragments, then know that you will have to lay them, in general, like tiles. But it also has its own characteristics. The mosaic is laid using mortar, not glue. You may have to move the mosaic fragments a little while working to make them look better. This is done with a rubber hammer or wedges. If the mosaic is placed on glue, then it quickly secures it to the wall, and even as the fragments move, it may not become so strong. You want to make a good kitchen backsplash, so you better follow these tips.
The solution for mosaics requires a special one. Cement-sand mortar is bad because it is too viscous and nothing can be moved on it. Gypsum or alabaster are also not suitable, they are weak and harden quickly. A gypsum-cement mortar is needed - its fixation time is 2-6 hours.
The following tips apply to both mosaic kitchen backsplash ideas and a regular tile backsplash. Now it is ready, and now it can be sealed with silicone upwards and from the sides along the contour. Sooner or later the table will have to be moved, and then a gap will form. It needs to be covered, and the easiest way to do this is to use a side made of tabletop material. It is glued to the apron, and the gap is sealed tightly with a PVC edging, without unnecessary additional fastening. Now you know all the secrets and can do your own styling without any problems.
Where and how to buy tiles for the kitchen?
You can buy kitchen tiles in all Santa Ceramics showrooms in Moscow. To order, you need to measure the dimensions of the intended apron, and the store will help you calculate the exact number of tiles. If you don’t want to go anywhere, you can call + and we will place an order for you over the phone. In this case, we recommend adding 7-10 percent to the footage of the tiles you calculated for trimming the tiles. You can pay for your purchase by card on the website, in cash or with Visa and Mastercard in stores, or by bank transfer. The transfer can be made from an individual or from a company.