What parameters should you consider when choosing a ceiling?
1. The ceiling must be durable. 2. The ceiling should not be afraid of water, or it could be easily restored after a flood. 3. The ceiling must be in accordance with the design and layout. 4. The ceiling must have an acceptable price per 1 square meter and installation.
The rest is just details. Every place has its own nuances, it all depends on whether you live in a private house or apartment, what your ceiling height is, whether the kitchen is equipped with a gas stove, what kind of lighting you plan, etc.
Also, a lot depends on the area. For example, a cassette ceiling will look good on a large ceiling, but a caricature in a small kitchen. Therefore, you need to know everything, and what is better to choose - decide for yourself when you find out the options.
Whitewashed ceiling
It would seem that in our 21st century, considering a whitewashed ceiling at the renovation planning stage is simply absurd. But this is if you remember the ceilings that are made in adobe huts. They are uneven, the stripes from the “maklovitsa” are clearly visible on them, they give off a bluish color due to the added blue...
Who forces you to apply whitewash exactly this way? If you whiten the ceiling not with a brush, but with the same roller, then the look comes out very nice. And, if you use a spray bottle, a song will come out!
The ceiling will look like it was painted with water-based paint (of course, if you previously leveled the surface with putty). You can add a little snow-white dye to the whitewash for greater effect.
What could be the downsides here? Honestly - none. If we were talking about walls, then yes, whitewashing would be a completely unsuitable option, since it “takes on” your hands and clothes. And who will rub against the ceiling?
Therefore, we can say that this option is quite suitable and working. In operation, this coating is simply ideal. It only needs to be refreshed once a year with a new solution, since soot and smoke in the kitchen will cause the whitewash to turn yellow. But to be fair, gas will turn anything yellow, not just whitewash. And, if an update here costs such pennies that you’re too lazy to even count, then with other materials it will be more expensive.
Drywall - a couple of disadvantages and many advantages
Thanks to the use of plasterboard, there is no need for plastering work. And this saves time and money.
Smooth surface is easy to decorate
The advantage of plasterboard structures is the ability to achieve a smooth surface and decorate it with any material. With their help, all irregularities are perfectly masked, wires and communications are hidden, and almost any shape is created - bulges, curved lines, niches, arches.
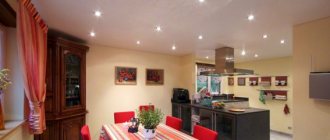
Plus, in the space from the ceiling to the sheets of drywall, you can place a system of original built-in lamps. It will serve as lighting, help to visually increase the verticality of the walls, and serve as an original decoration of the room.
The only negative is the reduction in height
Significant disadvantages of plasterboard shelf covering are the reduction in the height of the space and the complexity of structural work.
Plain painted ceiling in the kitchen
Everything here is the same as in the case of whitewashing. The only thing is that water-based paint costs a little more. Yes, there are expensive paints that can be washed. But to wash is said very loudly, frankly speaking. They can be lightly wiped with a damp cloth, and that’s it. Therefore, you won’t achieve any special cleanliness; you’ll have to repaint everything, and you’ll be wasting your money.
Of even greater importance in practicality is what kind of base the paint is applied to. If it’s directly on the putty, and it’s on concrete, then this is a good option for the kitchen. If it’s on a plasterboard box, the situation is worse if you live in a multi-story building.
Why? But because there are a lot of places in the kitchen where water can leak from a pipe that has burst in the neighbors above. And, if an ordinary ceiling simply has red streaks that can be easily and simply painted over, then plasterboard ceilings will sag and crack. The entire structure will have to be changed.
So, if you are not confident in your neighbors, then you should not make plasterboard boxes in the kitchen, no matter how much you would like to install spots. It’s better to get by with an ordinary chandelier, but protect yourself from the “pleasure” of suddenly having to repair a damaged ceiling. Even if your neighbors pay you for your work, why do you need this unnecessary trouble? And if they don’t pay (and this is what usually happens, the neighbors extend the loan for a year), it’s really a shame. Judging by the reviews, this ceiling is the best choice.
Room design
The design of a summer kitchen in a country house depends on the chosen style. A rustic kitchen features a wood-burning stove as the centerpiece of the design. The main material for finishing is, of course, wood. The floor is made of wood, and the furniture in this kitchen is also made of wood. Light curtains are hung on the windows. The interior is decorated with earthenware and wooden kitchen utensils, a linen tablecloth on the table, embroidered towels, and it is possible that there is a samovar.
If the kitchen has stone trim or a fireplace, then wicker rattan furniture will go well with them. For softness, place cushions on rattan chairs. In a modern-style summer kitchen, a soft corner sofa made of brown leather would be appropriate.
Note! The optimal color combination would be dark furniture and light material for finishing the walls and ceiling. The room will seem more spacious and comfortable, and the furniture will not be too tacky.
In a closed kitchen, you need to take care of lighting, because natural light may not be enough. For a summer kitchen in a country house, pendant lamps in small lampshades located in different parts of the room are suitable.
To summarize, we note that renovating a summer kitchen in a country house is not much different from renovating a kitchen in a house or other premises. The stages of DIY repairs are carried out in approximately the same order. The most important thing is to think through the design, choose the appropriate building material, and then you and your guests will like the result.
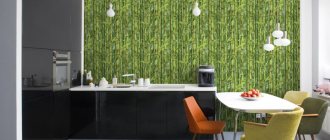
Wallpapered ceiling
What can you say about the wallpaper on the kitchen ceiling? It's not the most brilliant choice. Not only will they darken from soot, but the seams will also crack. Both do not “like” high humidity and warmth. And in the kitchen this will happen, and very often.
And after a couple of years, the seams on your ceiling will be clearly visible, and the wallpaper will “gather” in waves in the corners. No, this is not the best option, even if it is paintable wallpaper. You understand that no amount of fresh paint will save you from seams that have come apart.
And in the event of a flood, you will have to remove the wallpaper and re-clean the surface from any remaining paper. Then, hanging wallpaper well is beyond the power of a non-professional. Painting it yourself is easy, but dealing with wallpaper is not. The joints will still be visible, which is very ugly.
Well, the last argument is that it’s not fashionable, even if you want to hang some extra-new and unusual wallpaper.
Wallpaper - room for creativity
Moisture-resistant wallpaper for easy cleaning
Moisture-resistant fabrics are used for the kitchen. When dirty, they are easy to clean. Paper products in the kitchen will lose their appeal after a couple of months.
The decoration of the ceiling with wallpaper is different:
- price of materials;
- masking minor irregularities and cracks;
- possibility of painting, wet cleaning;
- variety of color, texture, pattern.
Wallpaper is a variety of colors and textures
You should not skimp on the quality of wallpaper to avoid quick repairs. In order to save money, you can cover it with an ornament from leftover material. A cheap composition will add personality to the room, but will not last long. Washable wallpaper is quite heavy, so over time it begins to peel off under the influence of hot, damp vapors.
It is better to use plain models. Light-colored products visually expand the space.
Stretch ceiling
Stretch ceilings in the kitchen are good because:
- They have a lot of design options (color, texture, combination);
- Quickly installed (1 day);
- Create a perfectly smooth and beautiful surface;
- Compared to gypsum plasterboard ceilings, only 3-5 cm of height are hidden;
- Able to withstand (hold) a small flood (but after draining the water, the canvas will have to be replaced).
The disadvantages include (mainly related to ceilings made of PVC film):
- Vulnerability to mechanical impact (sharp objects, champagne cork, blow from a mop or thrown children's toy);
- The need to wash them by hand. Those who sell ceilings, on the contrary, turn this factor into a plus. They say you don’t have to bother and paint, you just have to wash the ceilings and everything is fine, they’re like new! But we believe that this is not a plus at all. Washing them is unpleasant, to put it mildly. Your hands are suspended, water flows down them, you can’t press them too hard (which means it’s unlikely that you’ll be able to properly wash the soot off).
A few more words about leaving. By the way, here is a very useful article about washing suspended ceilings.
A glossy stretch ceiling is much easier to clean than a fabric one, as it is perfectly smooth. But it is difficult to get rid of divorces. But, if you use a special microfiber cloth, then anything is possible. There is also a glossy ceiling, 100% not afraid of floods.
Fabric stretch ceilings are good because they look expensive and solid. They cannot be distinguished from a perfectly plastered and painted surface. But otherwise, from a practical point of view, they have no advantages for the kitchen. They allow water to pass through, since the rubber coating is extremely thin and it becomes covered with microcracks if it experiences high pressure (which it will in the event of a flood).
So, as you can see, there should be no questions left whether to choose a matte ceiling or a glossy one. People praise these same ceilings and according to reviews, this is quite a worthy choice.
How to make a kitchen ceiling in a studio apartment
There are no hard partitions or doors in such housing. The designer’s task is to visually divide the space into functional zones. One solution is to properly design the ceiling.
In a large studio kitchen, zoning is often organized through level transitions. But the reception visually reduces the room. The space will add gloss with spotlights around the perimeter. Reflection will create the illusion of more volume.
You can separate the kitchen by decorating the ceiling with a small pattern. In small rooms this design looks neat and beautiful. The ceiling is also zoned using a combination of different colors, textures and combinations of materials. Lighting helps enhance accents. For example, a chandelier is hung in the living room, and spotlights are installed in the kitchen. This division helps not only to visually highlight the functional areas in the room, but also to select the most suitable lighting for each room.
Ceiling made of PVC panels
Plastic is a thing of the past, to be honest. Yes, it is quite practical and very suitable for the kitchen. And it is convenient to wash and in case of a flood it does not deteriorate. But what to do with the appearance?
His appearance is unpresentable and even burst! No, maybe you can find a plastic that doesn’t look like a public toilet, maybe. If yes, then this is just an ideal option for the kitchen.
Covering the ceiling surface with panels and lamellas
For a kitchen ceiling this is the most practical and budget solution. The finishing is made from polyvinyl chloride or polyurethane foam, produced in the form of lamellas - long strips, and panels - rectangular and square fragments.
The principle of covering is the same: clean the ceiling, make markings and glue decorative material to the surface. In some cases, a complete absence of seams is achieved in order to obtain a single surface; in others, the seams serve as a decorative element.
This choice has many advantages:
- ease of installation - requires only care and good glue;
- decorative - both panels and lamellas can imitate any artificial and natural material from stone and fabrics to colored mirrors and wood;
- ease of cleaning - plastic can be washed with just one swipe of a sponge;
- hygiene - does not absorb dirt or grease, and therefore does not contribute to the growth of bacteria;
- not afraid of moisture in any form.
Disadvantages of a kitchen ceiling made of panels:
- plastic does not tolerate high temperatures; the area above the slab becomes deformed over time;
- it is a flammable material;
- low vapor permeability, which is fraught with the appearance of condensation.
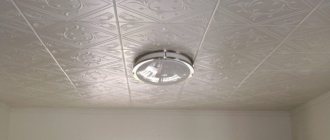
Ceiling made of polystyrene foam boards
What are the benefits of polystyrene foam boards? The fact that they are very inexpensive, you don’t need to perfectly level the ceiling for them, you can glue them yourself and the ceiling looks good. Even good.
The only thing you should not forget about is that they must be painted on top. Water-based paint is best suited for these purposes. This ceiling smokes just like others, but you don’t have to wash it, it’s enough to refresh it with paint once every couple of years.
If a flood happens, then nothing will happen to the tiles if they are glued with “Dragon” glue and not “planted” on the putty mixture. If they were glued to putty, then they would fall off, of course. But then you can glue them with glue and everything will be fine.
By the way, now there are already slabs that, when fastened, do not have seams. The ceiling looks cast and not made of pieces.
Choice of insulation
For the place where the stove will stand and food will be prepared, it is better to choose a material that can easily withstand humidity, high temperatures and, of course, be fireproof - it is in this part of the house that there is a high probability of fire. These criteria meet:
- Mineral wool. It can be used for both internal and external insulation.
- Expanded polystyrene or polystyrene foam. It is best to use them only for outdoor work, since when heated they can release harmful substances.
- Expanded clay and other bulk materials. Suitable only for external work and can create an impressive load on floors.
- Sprayed polyurethane foam. Creates a light and thin heat-insulating layer with excellent heat-saving characteristics.
- Ecowool. One of the most modern insulation materials, characterized by good heat conservation and low weight.
Wooden lining ceiling
Now this is a very fashionable option. For example, ceilings in the Provence style are entirely made of lining, painted white. It’s beautiful, they can be tinted when they become smoky...
But if your neighbors flood you, the lining will simply warp, it will lose its shape, and cracks will become visible. Replacing such a ceiling is very expensive. Therefore, think.
Plastering
Plastering a kitchen ceiling couldn't be easier. This decorative finishing option is the cheapest; the work uses a building mixture, which is applied to the surface with an iron spatula. However, this method has lost its relevance in recent years; it is rarely chosen for interior design, since doing it with your own hands is quite difficult, it requires skills and certain knowledge.
In addition, the plaster absorbs moisture well, ensuring a steam effect in the room. A plastered ceiling requires special care; it cannot be cleaned or washed with water; only re-application of the building mixture will help return it to its original appearance.
The main advantage of this coating is that it does not ignite. After applying the putty and using the correct processing technique, the surface looks smooth, fresh and neat. Using the mixture, it is possible to hide all unevenness and defects, it is environmentally friendly, safe for humans, and has a long service life. It is also important that after such decorative finishing the useful space is not reduced; in white or beige it even increases.
Disadvantages of technology:
- labor-intensive, painstaking work;
- the need to contact specialists.
To plaster a kitchen ceiling, giving the surface a perfectly smooth and even texture, a special mesh is often required. Only a professional master can realize his goals.
Aluminum slatted ceiling
In the kitchen, such ceilings look good if the appliances, work apron or furniture are also steel-colored. In terms of cost, such a ceiling is not cheap, but it is eternal. It is not afraid of water, it is easy to wash (unlike stretch ceilings), and nothing will happen to it if you catch it with a sharp object.
On the other hand, the design is somewhat aggressive, which means it will quickly become boring. Therefore, if you are not sure that aluminum slats on the ceiling are the ultimate of your dreams, it is better to refrain from such finishing. It will quickly get boring, and it will be a pity to throw it away.
No. 4. Drywall
Today, drywall is used everywhere, and the scope of its application is only growing every year. The material has been used for kitchen ceilings for a long time and has proven itself to be excellent. This is one of the best options for finishing the ceiling in this room, as it has many advantages:
- there is no need to carry out labor-intensive preliminary work to level the surface. Drywall saves even in cases where the surface of the ceiling is very uneven, has cracks and other flaws, because all of them will hide under the perfectly flat and smooth surface of the plasterboard;
- under the plasterboard you can install additional sound or heat insulation and lay communications;
- plasterboard can be mounted in such a way as to obtain a multi-level and even curved structure , which will add zest to the interior and help create a truly unique kitchen design, zone it, and provide spot lighting;
- moisture-resistant plasterboard , and this is exactly what is needed for the kitchen, perfectly tolerates high humidity and direct contact with moisture, and in addition, it is not afraid of fire and has high sound insulation rates;
- relatively quick and easy installation ;
- environmental friendliness;
- low price of material.
But with all these advantages, plasterboard, like all suspended structures, has a significant drawback - it reduces the height of the room . If the kitchen is already not high enough, then you should think twice before deciding on this type of finishing. It is also worth noting that drywall itself does not have high decorative qualities, but it can be easily painted or plastered. You can create a whole picture with the help of paint, add the right lighting - and your kitchen will become a stylish, bright and cozy room in which it is pleasant not only to cook and dine, but also to simply gather with the whole family. For painting, it is better to choose acrylic paint , which performs much better in terms of performance, because it is very easy to wash. Drywall can also have one more drawback - its inability to retain moisture if the neighbors above you suddenly flood it.
Cassette ceilings (Armstrong type)
No, don’t think that we mean the most ordinary, gray Armstrong, which is used in all supermarkets and offices in the world. A cassette ceiling is exactly the same technology, only the cassettes themselves can be any color you like.
There are some with drawings, some in silver, some in bronze... You name it! The option is not bad, but it all depends on what the cassettes are made of. If they are made of thin plaster, then the option is bad (remember about floods), but if they are made of plastic, you can take them.
The only negative here is that they “eat up” 10 - 15 cm of the wall height. This means that if you have a Khrushchev-era building with a ceiling height of 2.20 meters, then a suspended ceiling is definitely not suitable for you.
How to choose a material and not make a mistake
When choosing what is best to make kitchen ceilings from, you need to consider the following finishing requirements:
- immunity to high humidity;
- easy to maintain, washable or deep cleanable;
- minimal absorption of odors;
- long service life;
- Fire safety.
For convenience, we provide a brief comparative table of the described materials according to these characteristics.
| Type of finish | Moisture resistance | Odor absorption | Fire safety | the washing up | Service life, years |
| Whitewash | — | — | + | — | 2–3 |
| Painting | + | — | + | + | 2–3 |
| Decorative plaster | + | — | + | + | 10 |
| Wallpaper and photo wallpaper (vinyl/non-woven) | -/+ | + | + | + | 10 |
| Liquid wallpaper (varnished) | — | + | + | — | 10 |
| Plastic panels | + | — | + | + | 15–20 |
| Foam tiles (injection) | + | — | + | + | 15 |
| Wooden lining | — | + | + (with impregnation) | — | 15–20 |
| Laminated MDF panels | — | — | + | + | 10 |
| Aluminum slatted ceiling | + | — | + | + | 20 |
| Cassette ceiling with plastic slabs | + | — | + | + | 15–20 |
| Grilyato | + | — | + | + | from 15 |
| Tension fabrics (PVC) | + | — | + | + | 15 |
| Stretch fabric ceiling | — | + | + | — | 10 |
| Drywall (GKLVO) | + | + | + | Depends on finishing | from 10 |
| Glass | + | — | + | + | from 15 |
| Mirror (glass) | + | — | + | + | from 15 |
| Natural coverings (bamboo, cork) | + | — | + | — | from 10 |
In addition to performance characteristics, it is worth paying attention to color. So, in Khrushchev-era buildings, dark, bright and dull shades are undesirable - this makes the room seem cramped. For the same reason, the drawing should not be too large. But white, beige, milky, creamy, turquoise, lilac and other light shades are welcome.
Ceilings made of MDF panels
They do this too... But, in the end, the ceiling looks not like a kitchen, but like a bath (because the main design of MDF panels is wood-like).
This is a rough look and there is absolutely no practicality in it. MDF will swell from the flood, become smoky, it will need to be scrubbed hard, and it is afraid of abrasives... No, we cannot recommend such a ceiling.
Wood surface – ecology and naturalness
Wood is a fashion trend in the interior
The roots of using natural wood for decoration go back to the distant past. The following is used as cladding:
- “lining” - planks of the same size, connected tongue and groove;
- panels made of two layers, the front side of which is covered with valuable wood;
- slabs impregnated with wax, which protects against moisture, cracking and lamination;
- plywood treated with a special compound.
The lining is easily installed using the tongue-and-groove system
This cladding retains heat well, has breathability, sound insulation, and is low maintenance. However, it absorbs odors and moisture, is a fire hazard, and reduces the height of the room.
Ceilings "Grigliato" (lattice)
Very nice and unusual ceilings. Yes, it is very original and modern. But a kitchen is a kitchen, and soot is soot. Not even the best hood will save you from a sticky ceiling.
Can you imagine what it’s like to wash these wonderful-looking “honeycombs”? Imagine and discard the idea. Grilyato is not at all for the kitchen, but for those rooms where there is and never will be soot.
Measuring operations
It is necessary to begin the process of wallpapering the ceiling by correctly measuring the required length of wallpaper and the number of rolls.
The main rule for the direction of gluing is the coincidence of the lines of wallpaper joints with the direction of sunlight in the kitchen coming from the windows. Here we decide how we will glue the wallpaper. Either along the length of the room, or along its width. By measuring the original width or length dimensions, we can calculate the desired continuous length of wallpaper in one roll. Correct calculation will allow you to minimize financial costs.
Important! When measuring the length of a strip of wallpaper, it is necessary to take into account an additional 3–5 centimeters on each side for the permissible error that may arise from uneven surfaces of the ceiling and walls.
Manufacturers produce wallpaper in rolls from 10 meters to 25 meters and a width of 0.75 meters. For ease of gluing the ceiling, it is recommended to take wallpaper 0.75 - 0.9 meters wide.
The measurement procedure will be more complicated if you have to combine the relief pattern of the wallpaper with lighting elements. In this case, the calculation begins with the main strip, in which the lighting devices will be located and the amount of wallpaper required for the ceiling design may increase.
Tiled ceiling
Some people make the ceiling out of tiles. What motivates these people is not very clear to us. But the view is very frightening and strange. Maybe they just had extra tiles and decided to use them? But, in any case, let's tell you about the disadvantages.
The tiles are the kind of thing that can fall off if the neighbors above start walking on the floor (for example, drilling something, also laying flooring or baseboards). And a tile that fell from the ceiling and landed right on your head... You yourself understand what it is.
Exotic - unusual, but impractical
The moisture-absorbing laminate surface is easily susceptible to mold and mildew.
In addition to the common ones, there are unusual designs. For example, from laminate. But such a coating is irrational, because the material has the property of moisture absorption and low resistance to mold and fungal formations.
Laminate ceilings are quite expensive
In addition, this finishing option is quite expensive. The only pro is to emphasize the atmosphere of creativity. You can create an exclusive coating using polystyrene foam.
Rack and pinion look great in the interior
Rack and pinion ones are assembled from individual elements. The design can be either closed or open. They are moisture resistant, thanks to the treatment of the “lining” with special impregnations, they look great in a rustic style interior, but they interfere with the height of the room and exclude partial dismantling.
Mirror ceiling
Also a stupid idea. This is both expensive and impractical. There is always something squealing and splashing in the kitchen, and no matter how you close the lid on the dishes, something will still end up on the ceiling.
And, if microspatters of grease are not visible at all on the painted ceiling, then everything is perfectly visible on the mirror. Therefore, if you do not plan to constantly jump under the ceiling and scrub it, it is better not to pursue beauty. Moreover, there is nothing really beautiful about a mirrored ceiling; there are more interesting options.
The cheapest and fastest DIY finishing methods
Most homeowners do the decoration of economical housing on their own, without the involvement of specialists.
Painting
The easiest way to repair is painting. The work consists of the following stages:
- Remove the old coating.
- The uneven surfaces are filled with putty (first the starting one, then the finishing one), after priming them. When the composition dries, sand it with fine sandpaper.
- Remove dust from the working surface.
- Prime the ceiling.
- Painting is being done. Use a roller with a long handle or a spray gun. The composition is applied in 2-3 layers, each subsequent one is performed perpendicular to the previous one.
Foam tiles
Pre-level the ceiling. Sometimes masters believe that this stage can be skipped. But then the material will lie unevenly, making the flaws more visible. Then a laying diagram is drawn up. It is better to stick from the middle. If there will be a suite or mezzanine near a wall, then start from the opposite side.
The work consists of the following stages:
- The ceiling is treated with a primer.
- Markings are applied. Two perpendicular lines are drawn from the middle of the walls to determine the center of the room. If a chandelier is used as the main light source, gluing begins from there.
- Apply adhesive to the edges and center of the panel, then press it to the ceiling. The setting time depends on the glue used and is indicated on the packaging.
- Next, in accordance with the chosen pattern, tiles are laid over the entire ceiling area. The outer elements are cut to the required size.
- The cracks formed at the joints are masked with acrylic sealant.
Wallpaper
For work you will need: glue, a roller, a plastic spatula, scissors and a stationery knife. At the preparatory stage, the old coating is removed. The wall is cleaned of dust and primed.
Pasting is performed in the following sequence:
- Dilute the glue according to the instructions.
- Cut the roll into strips with a margin of 20 cm.
- Apply the adhesive to the ceiling and/or wallpaper (indicated in the annotation). The edges and corners are especially carefully coated.
- Glue the strip and level it with a clean pressure roller (wide for the panel, narrow for the joints). The seams are placed parallel to the window, and not across, so that they are less noticeable.
- The wallpaper is placed end to end without overlap. Near the walls, excess material is pressed with a wide spatula and cut off with a stationery knife. It turns out to be a perfect joint. Small flaws will be covered with ceiling plinth.
PVC panels
To line the ceiling with plastic panels in the kitchen, a metal frame is required. Sometimes craftsmen use wooden slats as a base. But this should not be done, such sheathing is afraid of hot air, moisture and temperature changes.
Installation is carried out as follows:
- First, the frame is assembled. A guide profile is attached to the walls under the ceiling along the perimeter of the room. A ceiling profile is installed across the planned direction of the panels into the grooves of the previous design. Hangers are attached to the base slab and connected to the overhanging reinforcement.
- Next, install three pieces of plastic trim profile: one on the wall from which installation begins, two on the sides. Attach the parts to metal guides around the perimeter of the room.
- Then the panels are inserted into them and screwed to the ceiling profile with self-tapping screws and a press washer. In this way, plastic slats are installed up to the opposite wall.
- The last element is trimmed if necessary. Put on the trim profile. The lamella is inserted, the profile is attached to the wall using silicone glue.
Seamless tiles
To decorate the kitchen ceiling, you can also use seamless panels, which look very impressive and original from the outside. The main thing in the installation process is to place one tile so close to another that the joints are not noticeable. The softness of the material and perfectly smooth edges allow you to create a visually monolithic ceiling surface.
In the manufacture of tiles, we use environmentally friendly, completely safe polystyrene foam material, on which, in most cases, a relief pattern is applied, reminiscent of decorative stucco. Attaching tiles to the ceiling base is quick and easy, using quick-drying glue.
Advantages of the material:
- allows you to update the interior with minimal material and time expenses;
- has excellent soundproofing qualities and good thermal insulation;
- tiles are lightweight and small in size, installation is quick and does not require special knowledge and skills;
- various options for relief patterns allow you to complement or combine several styles at the same time;
- by lowering the slabs a little, it is possible to hide all the defects and unevenness of the ceiling;
- After yellowing, polystyrene foam can be painted in any color.
The disadvantages include the short service life of the material; over time, stains appear on it. In addition, it is highly flammable, which is why lighting fixtures are installed from the ceiling at a distance of at least 25 centimeters.
This method of decorative finishing is suitable when you need to independently and quickly update the interior of the room. When purchasing a finishing material, it is important to pay attention to its strength, structure and pattern.
Expert advice
The choice of ceiling for the kitchen depends on many factors. Before choosing a kitchen ceiling design, it is important to determine the maximum height of the structure, its color scheme, texture and ergonomics.
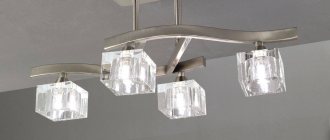
Ceiling lights should illuminate those areas that are used most often. There is no point in lighting a space where no one is cooking or sitting. It is important to immediately determine the location of the main chandelier and auxiliary elements.
Life hack from experts: The ceiling, which has become part of the wall decoration, looks original. To do this, designers apply to the ceiling some of the wallpaper or decorative panels used to decorate the walls.
In addition, lamps can be a continuation of the kitchen set, matching in style and color scheme.
- The design of the kitchen ceiling begins with zoning the entire room. The work area, as a rule, is illuminated by small lamps, and the dining set is highlighted by large and bright chandeliers, giving the space a solemn look.
- The color of the kitchen ceiling depends on the preferences of the home owners: conservatives do not see the ceiling in bright colors, preferring traditional milky and white shades. It is considered more modern to highlight the ceiling in the color of the flooring.
If we talk about kitchens with low ceilings (Khrushchev), designers advise choosing lighter shades for the design of the ceiling canvas. Then the space visually becomes larger, the height of the ceilings increases.
If the height of the ceilings allows, multi-level structures of varying complexity are created, combining plasterboard and PVC ceilings.
Stucco and monograms
For a kitchen in a classic style, wide moldings, high baseboards and a variety of monograms on the ceiling are perfect. Ceiling stucco will create a unique design, giving the room sublimity and solemnity.
Summarizing
In order to decide which ceiling is best for the kitchen, you must first correlate the existing aesthetic needs with your material capabilities and extrapolate the resulting compromise to materials with the best performance characteristics.
The widespread availability of various options turns any renovation today into an amazing journey, the end point of which is the individuality of your kitchen and the undisguised comfort of the room. Look for your option, and we are always ready to offer you an ocean of incredible ideas, each of which can potentially lead you to a successful solution! Photo: vk.com
How to make a ceiling from plastic panels yourself: instructional article - 40 photos
Painting and whitewashing
Although whitewashing is an archaic method of ceiling treatment, new technologies do not replace these types of coatings. This is appropriate in private houses in country or Provence style and in dachas built in the traditional way (clay instead of plaster). Whitewashing with lime diluted with chalk is a “friendly” finishing coating outside and inside, but these components are not always on sale.
The cost-effectiveness and practicality of such repairs are beyond doubt. The whitewash is first “washed off” with whitewash brushes, dipped in water, then whitewashed with a lime-chalk solution. Dazzling whiteness is the main advantage of such a surface, which will be an excellent backdrop for the design of any room.
Lime whitewash was replaced by water-based paint, and it was replaced by oil and acrylic-based interior paint. This is the most economical option for repairs without help. Any painted coating is easy to clean and has a long service life. If desired, you can change the color of the ceiling during the next repainting.
Attention! If whitewashing or painting is applied to ceilings for the first time, starting plaster and preliminary primer are needed. You can whitewash on a damp surface, paint only on a dry one!
There are a lot of ceiling design options
Ceiling lighting will enliven the kitchen interior
See alsoHow to create a beautiful kitchen design