The interior of any room consists of many details that should harmoniously complement each other. In the kitchen, one of the important elements is the apron. It is not only designed to beautifully decorate the workplace, but also protects the wall from dirt and other influences.
Boar tiles are increasingly being used for backsplashes. What it is and what interior it fits into, we will find out further.
What is a hog tile
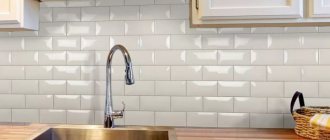
This tile is a type of ceramic small-format rectangular tile. It is laid like a brick. It was originally intended as building facades and was called clinker.
Further, her path went through underground passages, mainly in the subway. That is why in the USA and Great Britain, where they first began to use it for this purpose, they began to call it “subway” tiles. But information about when and who began to use it at home has not been preserved.
Boar tiles quickly gained popularity due to their good quality and amazing similarity to the original - brick. However, it remains a mystery why in Russia it received such a name? All because of the resemblance to a pig's snout. The end, although rectangular in shape, has two holes. At the construction site, they informally began to call her the pig. So the new name for clinker took root among the people and continues to exist.
Preparing the wall surface
In order to stick the tiles efficiently, preparation of the base is required. It is carried out especially carefully when it comes to wild boar.
- This is due to the sufficient thickness and weight of the tile material, despite the fact that the plates themselves are very compact in size.
- Therefore, in practice, the wall is usually leveled and then thoroughly dried.
- Does not impede the degreasing process, as well as subsequent priming.
- Thus, the quality of the characteristics responsible for adhesion will increase significantly.
The presence of a chamfer does not allow the use of tile material without preliminary trimming. It is not easy to trim, especially when both corners and joints must be smooth. The cutting angle should be forty-five degrees.
When laying out a corner, trimming is done in the usual way. Simply after this you have to lay the tiles in such a way that the edge after the cut is turned into the inner part of the row. When there is no chamfer, trimming it will not be difficult.
The advantages of such material
Boar tiles are perfect for a kitchen backsplash. This is due to many advantages of the material:
- Excellent sanitary and hygienic qualities. There is no accumulation or development of microorganisms, and thanks to the solid structure without pores, the tiles do not accumulate dirt, which makes them easy to clean.
- A varied selection of colors and pattern textures. In addition, it can be produced to order, decorated with an individual drawing or photograph. Therefore, the hog fits most interior styles.
- High temperature resistance. When making it, firing is used at about 1000 °C, so the tile is definitely not afraid of elevated temperatures from the stove.
- Simple installation technology that does not require expensive tools.
- The material is harmless and environmentally friendly , does not emit gases and does not cause allergies.
Boar tiles have almost no disadvantages. The only thing that can be noted is the relatively high price and low impact resistance.
Suitable interior styles
Most often, such tiles are used in modern interior styles, because they fit perfectly with them.
- For example, white hog tiles are very popular in minimalism and high-tech.
- In styles such as Scandinavian and modern, tiles are also very popular due to their characteristics.
It is worth noting that in some styles, not only the apron is laid from this tile, but also individual walls. As a rule, work walls in the kitchen, near which they prepare food, are excellent for this.
However, you should not get too carried away with this material, because it can simply spoil the main idea of the style and interior as a whole.
What style does a hog tile apron go with?
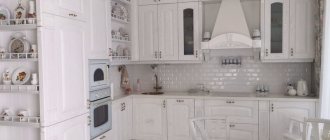
These tiles are perfect for most styles, especially if they are white or beige. It will be ideal for country, Provence and classics. The first two styles are rustic, characterized by simplicity and naturalness. A small brick will only add originality to the design and complement it with the spectacular appearance of the apron.
The classic is the presence of massive wooden furniture. The entire interior is filled with nobility, with clear, simple lines and images. The boar will only add even more aristocracy, especially when choosing light colors.
The tiles will be an ideal solution for Scandinavian or loft style. It is also often used in art deco. An unusual layout is relevant here, contrast is allowed. Including bricks can be black and white and placed in a checkerboard pattern.
It is worth taking into account all the features of the chosen style. A glossy surface is not always suitable. Most often they use matte, which will fit even more into the interior of the above design directions.
Advice! If you want to make your apron bright, then you should take a closer look at Spanish manufacturers who present a wide variety of rich shades to the market.
Color solutions
The family spends a lot of time in the kitchen; they gather here in the morning and evening. The choice of color determines the mood of the room, and therefore the state of the household. It has been proven that surrounding shades affect the psyche and even physical health.
Natural colors (sand, coffee)
An apron with a pattern of brickwork in natural shades - sand, coffee, baked milk - creates a cozy homely atmosphere.
Natural colors make the kitchen more cozy and comfortable
The technique of artificial aging of such tiles fits perfectly into the “retro” style. Tiles with a floral pattern will complement the Provence interior. The white bricks of the kitchen apron will fit perfectly into a room decorated in Total White.
Brown
Masonry or imitation of a brown brick pattern is chosen for a classic interior. Color creates a feeling of order, reliability, strength of the present and future. This design calms and gives confidence. Brown of varying intensity is combined with a set of various shades - white, red, black. The final option depends on the chosen furniture and style.
Red
A red apron with a brick pattern often becomes the central element of the kitchen space. Suitable for different styles - for example, country, hi-tech. Its combination with white furniture and marble elements looks stylish and bright. The commonality of the interior is given by wooden floors, indoor plants, decorative jars and other details.
A red apron looks bright and original, but is not suitable for every style
Layout options
- Horizontally in a running start. This is a traditional brick-like layout. It is the most versatile and easiest to implement. The main task here is to position it in a perfectly even horizontal line.
- Horizontal stackable. The main thing here are the vertical seams, which must coincide with each other. This is an ideal proposal for the Scandinavian style. Moreover, you can choose a grout of a different color from the tile.
- Herringbone. This arrangement is at an angle of 45 or 90 degrees. It looks original and will not taste trivial.
- Diagonally. This option is also quite unusual and is suitable for small kitchens. Here it is important to choose a grout that matches the tone of the tile.
- Vertical with offset. This option is suitable for spacious rooms. The tiles should be chosen in a small size.
- Vertical stackable. In this case, the installation must be done as perfectly as possible, then the look will be very stylish and original.
How to choose grout
Just like tiles, the variety of grout colors gives you something to think about. You can choose white, black, gray, beige, or you can match it to the tone of the tile itself. In any case, the most important thing is that it is of high quality, otherwise it will quickly darken.
The water resistance of the material is important, since the apron often gets dirty and needs to be washed, and resistance to temperature changes is also necessary.
Advice! To avoid darkening of the seams, it is recommended to purchase a mixture based on epoxy resin. It does not absorb water and dirt, but hardens very quickly. Therefore, in this case, the laying should be done by a professional who will do it as quickly as possible.
Advantages
Boar tiles are just perfect for a kitchen backsplash. This is due to a number of its advantages:
- resistance to frequent washing;
- wear resistance;
- aesthetics;
- ease of cleaning;
- variety of color and texture variations;
- resistance to high temperatures;
- ease of installation;
- safety and environmental friendliness.
This material has practically no disadvantages. We can only highlight the relative high cost and low impact resistance.
Styling tools
The hog finishing tiles are installed according to the principle of conventional ceramic tiles. To do this you will need the following tools and materials:
- Drill with kneading attachment and container;
- Rubber or plastic spatula, preferably flexible;
- Rubber mallet;
- Small construction float;
- Spatulas with teeth;
- Soft sponges and rags;
- Sharpening machine, tile cutter;
- Marking tool;
- Screws for fastening the profile;
- Metal or wooden profile;
- Tile adhesive, grout, water.
Original or imitation
The cost and the above-mentioned features of laying boar tiles make it possible to search for alternative methods of finishing the apron.
PVC panels, stylized as brickwork, are the most economical option. This has its own specifics. They cannot boast of durability. In addition, their appearance is far from the original.
The complexity of the preparatory stage and fastening of rather heavy elements may be a reason to prefer standard ceramic tiles without a chamfer. Modern manufacturers also offer ready-made tile carpets to match brickwork.
Boar tiles are not a temporary, but a permanent interior phenomenon. The high cost makes this finishing material a “forever” choice. Therefore, before going to the store, you should carefully study the possible colors, textures, sizes, and carefully consider the installation method.
Preparatory work
Before you begin installing the tiles, you must carefully prepare the surface so that it is smooth and free of flaws. First of all, you need to get rid of the old surface, such as wallpaper, paint, and remove all dirt. Next you should apply putty and level the walls with it. It must dry, after which a primer is used.
The next step is marking. Here a marker, upholstery cord, plumb line, and building level will come to the rescue. First, the lower horizontal line is applied, the height of which depends on the height of the furniture. Depending on the installation method, the remaining lines are applied horizontally, vertically or at an angle. Finally, the profiles are attached to the wall.
Apron installation
Installation work begins with mixing tile adhesive. This is done immediately before laying. The volume of glue should be such that it can be used for no more than 40-50 minutes. It is applied both to the wall and to the tiles themselves using a spatula.
Next, you need to make stripes with a notched trowel. There is no need to apply all the glue to the wall at once. There is enough volume for 2-3 slabs so that it does not start to dry out.
Immediately after application, work moves on to laying the first row. You should start from the far corner in relation to the entrance to the kitchen. The bottom edge of the tile should rest against the profile. It must be pressed against the wall. Crosses are placed between the elements, which serve as a separator and ensure an equal distance between each hog. Remaining glue is removed no earlier than an hour later. This also applies to crosses.
Marking
Another important step (they all are). Using a level, we outline the upper and lower boundaries. We draw the left and right lines, as well as additional auxiliary vertical lines, along a plumb line. Along the lower border we install a barrier made of a bar or aluminum profile. It will support the tile until the glue sets and will prevent it from slipping. After completing the marking, we evaluate it again by eye from a distance. If any lines are in doubt, they need to be double-checked for level and plumb, and, if necessary, corrected.
Grouting joints
The glue must dry completely and only then, approximately the next day, the seams are sealed. Apply it with a soft plastic spatula. Black rubber is not suitable in this situation, as it leaves marks on the ends.
Excess material can be removed after 30-40 minutes. A sponge is used for this. After complete drying, the apron is completely washed and polished, and the profile that was intended for supports is removed.
Useful tips
Tiles must be purchased with a reserve. It is about 10%. It always requires pruning, as a result of which part of it gets damaged. Before laying it is very important to level the wall, otherwise due to unevenness it will be difficult to lay out the tiles without flaws.
In addition, the service life of the hog directly depends on this preparation. The seams must be perfect, so it is better to trust a professional, especially if the layout is unusual.
It must be remembered that convex tiles are thicker and therefore heavier. Therefore, it must be attached more carefully, applying a larger layer of glue for standard material. The seams should be between 2 and 5 mm thick. Of course, the thicker it is, the better the look, but in this situation the complexity of the work increases.
Thus, boar tiles have won their rightful place in the kitchen interior. An apron made of this material has an attractive appearance, the originality of which depends on the laying of these bricks.
In addition, the material is very easy to wash. It is interesting that the seemingly soiled white color in this case, on the contrary, will be advantageous. This is because stains, possible drips and drops of water are invisible on such tiles. They are very easy to wipe with a regular damp cloth.
Regarding design, it is important that for any style it is possible to choose suitable hogs that will complement it and give the desired atmosphere. Manufacturers provide a wide selection of colors and patterns that are sure to suit any kitchen.
Varieties
Today, boar tiles are a separate type of piece cladding with elongated elements.
There are different types on sale:
with a smooth and embossed surface;
with glossy and matte finish;
with smooth and beveled edges (chamfered).
Beveled tiles are one of the most popular types of cladding. The coating has high decorative qualities and is distinguished by expressiveness, attractiveness and special charm. For finishing a kitchen apron, such tiles are considered the most preferable option, since they practically do not depend on its size. When laying, the top row usually has to be trimmed, but this does not spoil the overall appearance of the cladding.
However, chamfered tiles also have disadvantages. These are the need for careful and precise installation, the difficulty of designing corners and some problems with installing sockets. You have to hit the gap between the chamfers, otherwise the socket body partially hangs above the cladding, which looks sloppy. If there are ready-made nests in the wall, the probability of accurately fitting the tile shape is extremely low.