Recently, shower stalls have become especially popular. Many people want to install them in their bathroom. However, not everyone can afford it because of their high cost. A do-it-yourself tiled shower cabin will help you save money.
A shower stall is often used instead of a bathtub
Pros and cons of a tile shower
A tile shower has a number of advantages and disadvantages that you should definitely familiarize yourself with before making it. The main advantages include:
- Reliability. The design with ceramic lining is many times stronger than its plastic counterparts.
- Unique design. People can independently develop various design options for the shower to make it different from other stalls.
- Safety. Ceramic cabins, like glass ones, do not emit odors and do not conduct electricity.
Disadvantages include poor sound insulation. However, this problem can be solved by installing a tray.
Advantages and disadvantages of a separate bathroom
Most designers advise installing a combined bathroom in small apartments. However, there are some factors to consider in this matter. For example, in a large family it is better to have a separate toilet, as it has the following advantages:
- the ability to simultaneously use amenities by different residents;
- unpleasant odors from the toilet do not interfere with bathing;
- lovers of original design have more opportunities to realize their fantasies.
Also, a separate bathroom is suitable for families with small children.
Advice!
It should be borne in mind that the presence of a massive partition between rooms significantly reduces the available space.
As a result, family members have nowhere to place bedside tables and shelves. Moreover, using the toilet becomes difficult for obese people.
Many people have found a rather unconventional solution to this problem. They don't build a partition in the bathroom, but move the toilet into the pantry. As a result, there is more space in the bathroom, and all family members have the opportunity to use a separate toilet.
Arrangement options
A DIY shower made from tiles has two main options.
With a homemade pallet
Residents of private houses and apartments with spacious bathrooms may want to consider installing cabins with an additional tray. It can be purchased at most plumbing supply stores. When choosing a shower tray, you need to pay attention to the dimensions of the product and its design.
It is worth noting that some decide to make such a design themselves. To do this, you will need to create a concrete foundation under which all sewer pipes are placed. Then it is covered with ceramic tiles.
Before making a tray, you need to think in advance about how the drain will be organized and water will be supplied to the booth.
With gangway
A shower cabin with a drain is an ideal option for small rooms.
If a shower with a tile tray is not suitable for the bathroom, you can install a structure with a drain. In this case, a small single-level cabin is installed without additional podiums. This is an ideal option for small rooms where there is little free space.
Most often, such showers are located in the corner. They are equipped with glass partitions and doors. The floor can be tiled.
Preparatory work
Before starting the task, you need to find a suitable sketch, calculate the dimensions and select facing materials. Preparatory work requires care so that the process of creating a shower does not require additional purchases of tools or cladding.
Optimal size
With your own hands you can assemble any structure in terms of volume and shape :
- rectangular;
- square;
- triangular;
- round;
- corner;
- non-standard.
Valera
The voice of the construction guru
Ask a Question
In small rooms, the size of the booth does not exceed 80*80 cm. Designs with transparent glass side walls are suitable for them, which will make them invisible when located in a corner. For large spaces, spacious products with eye-catching fittings, panels on the back wall and additional lighting are suitable.
Tools and materials for work
A shower stall with a glass door or curtains requires certain tools:
- trowel, chisel, trowel, spatula;
- plaster beacons;
- profile PN 27*28;
- building level;
- electric drill with attachments;
- brush, roller;
- glass cutting tool.
List of required building materials:
sewer and water pipes, drain ladder, mixer, watering can;- wooden slats;
- white waterproof glue for ceramics;
- bitumen mastic, waterproofing material;
- brick, sand, cement;
- floor and wall coverings, plexiglass.
Before starting work, you must make sure that all of the above tools and materials are in stock and purchase the missing ones.
Preparing the base
The stage depends on the degree of preparation of the floor for the installation of a new structure. If refurbishment is required, the process begins with the dismantling of the outdated covering. The concrete screed is created again and soundproofing material is laid. In the standard, the arrangement looks like this:
- the first layer is a concrete slab;
- the second is a layer of mineral wool or glass wool;
- the third is a waterproofing section made of polyethylene, glassine or roofing felt;
- the last step is concrete screed.
A special polymer membrane can be used to muffle the sound.
Main types of pallets
There are five main types of pallets, differing in the material of manufacture:
- Acrylic. These are the most common and cheapest pallets. Suitable for people on a limited budget.
- Cast iron. They are considered the highest quality and most durable. They will last 2-3 times longer than acrylic pallets.
- Ceramic. Universal designs that fit perfectly into any design. Ceramic products do not cope well with mechanical damage, so they must be treated with care.
- Quarilov. Wear-resistant pallets, which are in no way inferior in quality to cast iron.
- Made from natural stone. To decorate your shower stall, you can buy a stone tray. These are the most attractive designs that will decorate any bathroom.
Products made from natural stone are used least often, as they are the most expensive.
The chosen style boils down to minimalism
There are excellent collections of photos of a bathroom without a bathtub in a room where everything comes down to a minimum number of objects in the form of illuminated photodiodes, a laconic form of sinks that look like a small parallelepiped or a flying saucer surrounded by completely flat surfaces.
How to make a similar bathroom without a bathtub:
- For such rooms you will not need either a bathtub or a cubicle itself. There is only an almost invisible partition with a channel for draining water into the floor. The only convenience is heated floors. Only such a system will help moisture evaporate quickly, and this is an important condition for easier maintenance of cleanliness;
- The presence of a drainage channel will help to properly drain the water. Such a system must be prepared with specialists. The drain must be on a slope, which will require raising the floors by fifteen or twenty centimeters;
- By arranging a shower without purchasing a cabin, you can fully enjoy water treatments. For example, equip the room with combined options, rather than a standard watering can. Then it will be possible to use various jet settings, such as “massage shower” or “tropical rain”;
- It’s a good idea to leave only the control valves, hiding the mixing fittings, and build the hydromassage nozzles into the wall;
- By using a factory-made pallet, you can save both time and your own effort. The height of some models is insignificant, and some can be mounted flush with the floors. For those who find it more profitable to save money, you can take advantage of the advice of professional craftsmen on how to independently arrange a cozy shower room on your own;
- In such cases, you should not choose plastic products. Stone finishing, as well as mosaic or marble, will help maintain the style. Porcelain products look good. They are attractive both in cost and in appearance;
If a door is simply necessary, then it is best to use a glass model, which will not require complex maintenance. In this case, the space will not be “heavier”. Despite the relative high cost, it will last for many years without repair or replacement.
How to assemble the frame and finish it
Before making a shower with or without a tile tray, you need to familiarize yourself with the features of assembling the frame and further finishing.
Selection of materials and tools
Bitumen solution is suitable for waterproofing the installation area
. To install a tiled shower, you will need tools that almost everyone has:
- roulette;
- level;
- pencil;
- Master OK;
- putty knife.
Materials that may be useful:
- ceramic tile;
- moisture-resistant bricks;
- screed mortar;
- adhesive for fixing tiles;
- reinforcing mesh.
You may also need parts for arranging a drain. Therefore, it is better to buy a siphon, pipes and drain in advance.
Waterproofing the installation area
Before making a tile shower with a drain in the floor, you need to take care of waterproofing. The area where the structure will be installed is treated with waterproofing agents. A bitumen solution is ideal for the bathroom. If you don’t have it, you can use liquid glass. With its help it will be possible to prevent the appearance of fungus and mold.
Liquid waterproofing is applied not only to the floor. It is necessary to treat walls, sides, valves and even pipes.
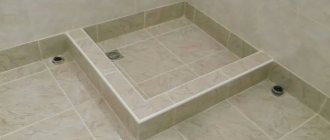
Construction of a foundation with a ladder
The cabin with the pallet must stand on a solid foundation.
First, you need to lay out the foundation on which the structure will be installed. It shouldn't be too high. 10-15 centimeters is enough. A drain with a siphon to drain water must be built under the foundation.
The base is laid out from moisture-resistant red bricks. When the foundation is laid, it is necessary to make a side the width of one brick. It is recommended to make its outer corner slightly beveled.
A brick frame is built on top of the foundation, which will be tiled. Its height should be 19-20 cm.
Waterproofing the pallet
After the tiled shower tray has been installed, it is necessary to waterproof it. In this case, it is necessary to process the entire device without touching the area near the ladder. The waterproofing material must not be allowed to flow into it.
Alignment
Shower tiles must be laid on a perfectly flat surface. Therefore, before you start laying it, you need to plaster the brick frame. Cement mortar is used for plastering. It must be applied with a large spatula to reduce unevenness.
When the plaster hardens, it will have to be sanded down with sandpaper. This will help get rid of minor roughness on the surface.
Laying tiles
For tiling the cabin, you must use tiles that match the interior of the bathroom.
Before you begin laying the tiles, you need to prepare an adhesive solution. It must be chopped in advance so that it is not too thick.
When choosing tiles for the shower, special attention should be paid to its size. It is recommended to use medium-sized ceramics 10x10 cm. You should not use tiles that are too large, as they will have to be cut frequently. In addition, it is easier to cladding the side with small tiles.
When the glue is ready, you can start working. Laying must begin from the far corner. The solution is applied to the tile around the perimeter, after which it is immediately applied to the surface. To make it stick better, you need to press it firmly and hold it for about 20-30 seconds.
Grout
After all the tiles in the shower have been laid, you need to start grouting the joints. For this purpose, moisture-resistant grout mixtures are used. If light-colored tiles were used, it is recommended to choose white grout. It will match perfectly with the tiles.
The grout must be applied with a special rubberized spatula. If you don't have one, you can use a sponge. The mixture must be thoroughly rubbed into the joints so that they do not stand out against the background of the tiles. Excess solution should be wiped off immediately with a rag.
Design Features
If you decide to build a shower stall yourself, it is worth noting that there are only 3 possible options that you should rely on. The first, most obvious, is to purchase a ready-made pallet, on the basis of which to continue building the shower stall. You can also make the structure on a ladder, or on a homemade pallet.
The choice of a particular option depends entirely on construction skills and knowledge; we will consider each of them separately.
Ready pallet
If you just want to add some variety to your bathroom design, but don’t have a lot of time to do everything yourself, a ready-made pallet is ideal.
Construction stores offer a wide selection of this shower element. You can choose the classic white version, or give preference to brick or stone styling, whatever you like.
The pallet is installed on a pre-prepared foundation. It is also worth understanding that all communications must be located under the pallet, so measurements and markings must be made in advance in order to select a pallet based on exact conditions.
Drain ladder
The peculiarity of this design is that the shower area is in no way separated from the rest of the bathroom. In fact, the shower stall is located in the corner of the room and does not have any separate podium.
You can fence it off in several ways; the most optimal and aesthetically pleasing is the installation of transparent glass doors.
- A drain ladder is installed through which water will flow out while taking a shower.
- Such a design should be planned at the stage of renovation of the entire room, because due to the lack of a pallet, the floor in the entire bathroom will have to be raised by 15 cm so that all communications can be placed under the concrete layer.
- In addition, it is necessary to leave room for prompt repair in the event of a leak.
This option is ideal for small bathrooms, in which zoning should be light and almost invisible.
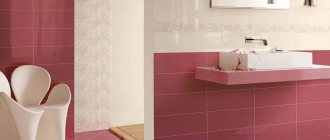
Choosing a color
Mosaic tiles are suitable for covering a pallet.
People who want to make a booth from tiles should familiarize themselves with the recommendations for choosing tiles in advance.
You need to select a material that matches the color of the walls and floor of the bathroom. If the room is decorated in light colors, the tiles for finishing the cabin should also be chosen in the same style. However, sometimes you can use tiles of the opposite tone. For example, white and black colors go well together.
You should not buy tiles that are painted in too bright a color. Often such multi-colored tiles do not fit into the interior of the bathroom.
Shower stall - disadvantages.
- If you are not ready to give up the pleasure of soaking in a bath, then a shower stall is definitely not for you. It makes sense to look for other ways to save space.
- Installing a shower stall is more difficult than installing a bathtub. It needs to be assembled, communications installed and connected. And this takes time and, possibly, the help of a specialist.
- Taking care of a shower stall is more difficult. It is necessary not only to clean the tray, but also to wash the walls and doors. After each bath, drops of water remain on them. If you do not wipe them in a timely manner, the shower stall will look untidy.
- The price of the cheapest cabin is higher than the price of an acrylic bathtub.
- Showers require good water pressure.
In the photo: Verbier Sand In S
Is a shower stall what you need? It's time to choose the best option for your bathroom.
Design style
There are two main types of tiles, differing in design style:
- Mosaic. With the help of such tiles it will be possible to create a special atmosphere in the booth. Most often it is used for flooring.
- Porcelain stoneware. This material is very slippery and therefore is used only for wall cladding. Can be combined with mosaic tiles.
When creating a booth, it is not necessary to use tiles. Glass can be used instead. It should be durable, no thinner than 5-7 mm.
Construction and design tips
Many people want to create a unique stall design to make it different from other showers. To do this, it is recommended to combine materials with different designs. Don't be afraid to experiment. For example, you can use several types of tiles with different colors. The main thing is that they fit well together.
You can combine several materials. The floor can be tiled, and the walls can be made partially glass or covered with a curtain. It is not necessary to use ordinary transparent glass. There are special glass panels that are decorated with various designs or patterns.
Shower cabin - advantages.
- Will help save space in a small room.
- Will reduce water consumption. Taking a shower uses much less water than taking a bath.
- Suitable for the elderly and disabled. It is much easier to climb into a low shower tray than into a tall bathtub.
- The shower cabin is safer, since the trays in the shower cabin are covered with an anti-slip coating, and the walls of the tray are almost vertical.
- Comfort, variety of options, ability to choose a shower mode. You can purchase a cabin with a steam generator for a sauna effect, or a cabin with a built-in radio or TV.
In the photo: Rodano
Pallet design
Shower cabins are often equipped with a special curtain.
People who make the shower tray themselves will have to think about its design. You can look at photos of examples of various design options and choose the one you like the most.
To make the pallet look unusual, it is recommended to combine different types of tiles. You can cover it with glossy and matte tiles with various patterns. A mosaic covering would look good. Especially if such tiles were also used to decorate the walls of the bathroom.
Showers are often installed in small bathrooms. People who want to make it themselves should determine in advance the optimal dimensions of a tile shower stall and read the step-by-step instructions for creating it.
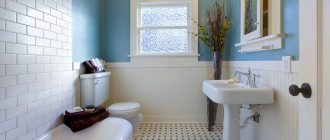
Photo of a combined bathroom
Sometimes, in order to expand the room, a partition is removed between the bathroom and the toilet. Together with the shower stall, there is enough space for a washing machine.
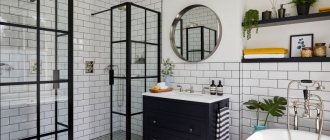
The photo shows a luxurious bathroom with a shower, decorated with black tiles with a pattern and patina.
To make a bathroom with a shower look more spacious and tidy, designers recommend using a wall-hung cabinet under the sink and a wall-mounted toilet.