The kitchen in an apartment is often small and causes design difficulties. But you don't have to have a specific space, you just need to pay more attention to functionality. Sometimes it is enough to pay attention to a few “details” and the interior becomes perfect.
The kitchen is the center of the house and the room where you usually spend a lot of time. It's nice when you can prepare food in an ergonomic and stylish interior. Kitchen arrangement and kitchen renovation take more time, if only because it is necessary to select the necessary equipment. Remember that a small kitchen also has big possibilities.
In this article, we suggest how to organize, what to look for, and how to create the perfect renovation step by step. Get ready for a transformation in your kitchen!
What kitchen interiors are in fashion? What techniques can be used to visually increase the available surface? You can read about all this in our article. Let's start!
If you are planning or doing renovations in the kitchen, and don’t know who to turn to, then stoleshnica-fasad.ru are professionals in the field of replacing countertops and kitchen facades. The company also provides a number of in-demand services that help customers combine quality, convenience and a modern approach to kitchen design.
Style selection
One of the important components of a harmonious project is a harmonious combination of the renovation itself and the style of the future kitchen set.
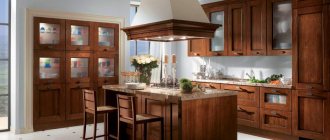
The most popular directions chosen for the interiors of the kitchen area for many years have been Provence or rustic style, traditional classic, loft and modern style.
Renovation in Provence style
To understand in what style a kitchen renovation should be carried out, the design that Provence implies, you need to understand what is its key basis.
This trend came to us from France, where it was common in the villages. Therefore, it uses natural materials, usually wood, natural fabrics such as linen.
Natural stone or clay can also be used. On the one hand, this style looks very homely and cozy; here you will definitely want to eat delicious pastries and drink a cup of tea in the evening.
On the other hand, the materials used in the renovation are all environmentally tested, which makes being in such a kitchen safe for health.
And if you plan to renovate the kitchen yourself, then you should pay attention to various decorative elements. Various wicker baskets look interesting in such kitchens.
Ceiling repair. Step-by-step instruction
Initially, in any room, it is the ceiling that is repaired. Various decorative mixtures may crumble or drip from it, which will ruin the rest of the repair, if it has already been completed. To work, you will need a stepladder so that you can comfortably reach every corner.
Before starting repairs, preparatory work is carried out:
- The old coating is removed. It is advisable to do this carefully so as not to damage the base layer of plaster. This will significantly simplify all further work.
- The plaster is leveled with a special compound.
- Drying of leveled surfaces.
- Final alignment. It is better that the surface is perfectly flat, so the plaster is applied in a thin layer.
All further ceiling repair work depends on what kind of finishing coating was chosen.
Dye. Step-by-step instruction
Before painting, it is necessary to clarify what paint was used before. If these were oil varieties, then only a similar option can be used. Or you will need to completely erase all the old coating without leaving a single trace.
The painting process itself is carried out according to the instructions:
- The corners and joints of the ceiling and walls are painted.
- While working, the brush must be pressed down, since you will have to interact with the upper part of the room. Accordingly, if you do not wring out the brush well, the paint will drip onto the walls, floor and the painter himself.
- The plane of the ceiling is painted perpendicular to the location of the windows.
- The ceiling plane is painted in at least three layers. The process is performed with a roller.
- The joints will need to be walked several times to make a smooth and imperceptible color transition.
Stretch ceiling. Step-by-step instruction
You can choose a suspended ceiling for arranging a kitchen if you have a sufficient budget. This option looks very attractive, and when the right lighting is selected, it will not be inferior in style to professional designer ideas. Making a suspended ceiling with your own hands is difficult, but if you still decide to do it, it is recommended to follow the instructions:
- Fastening the baguette to the walls. You need to buy or order it in advance. The quality of future repairs directly depends on its quality.
- Installation of fixtures for lamps. They will be fixed through the suspended ceiling, so their location must be thought out in advance.
- Fixing one side of the stretch ceiling. Primary fastening is performed in 3 places.
- Fastening the parallel side of the stretch ceiling. It is also possible to attach only in 3 places.
- Perform a similar procedure with the other 2 parties.
- Ceiling tension. Performed counterclockwise. The canvas must be tucked tightly into the baguette, otherwise the ceiling will lie unevenly or will sag.
- Installation of chandeliers and lamps.
If the installation of a stretch ceiling is carried out in the cold season, then you need to give the canvas a day so that it warms up and is completely ready for work. If you act immediately, then as the canvas warms up, it will further expand, which is why sagging occurs.
Kitchen renovation in classic style
A classic kitchen renovation in an apartment includes the following basic details:
- The colors are usually calm, mostly monochrome, which is present both on the walls and on the headset itself
- Parquet is sometimes chosen as a floor covering, although it is less practical, or any other material that imitates wood is also suitable
- The ceiling can additionally be supplemented with stucco molding
This style is not suitable for renovating a small kitchen, so it should be chosen for kitchens with a surface area of more than 15 sq. m.
Small kitchen with island and living room. When will this work?
The first step in expanding space in a small apartment is to combine the kitchen with the living room. An open kitchen is a very good solution because by creating a living room with a kitchen corner, you get more space. The easiest way to achieve this is to completely or partially demolish the wall connecting the two rooms.
In the space where the wall was, you can put a folding table or build a slightly smaller kitchen island or peninsula that connects to the rest of the L-shaped kitchen cabinets. You can also create an island with an optional convertible top at the same time. This allows you to adapt the space depending on your current needs.
The most commonly used solution is to place additional cabinets and drawers under the top of the island or peninsula, which will allow you to place all the most important equipment and utensils, also within reach, at all times. As an addition, consider folding chairs for additional seating in the kitchen.
Floor covering
It doesn’t matter whether you are planning to renovate a 3 by 3 kitchen or it is a large project, you should especially carefully select materials for future changes.
You should start by choosing a floor covering, which must be resistant not only to moisture, but also to other possible external damage. For the floor in the kitchen, tiles can be used, which are not only a durable material, but also something that will last a long time.
The cheapest type of coating used for flooring is linoleum. But it has a service life, which, as a rule, does not exceed 15 years. Some kitchen renovation options involve parquet as a covering; it looks very beautiful, but, unfortunately, is not practical.
Curtains
There is no need to buy expensive and luxury curtains for the kitchen. It is better if these are practical and functional products that will protect from sunlight or dust if windows are opened on a hot day. Such curtains will need to be washed and changed frequently, so it is better to give preference to reliable materials.
But don't forget about beauty. Curtains are an important component of the overall style concept, and design cannot be abandoned while paying full attention to practicality. And in some kitchens, mostly small ones, located in old-style houses, curtains are not required at all, because... there are no windows here.
Electrician in the kitchen
A beautiful kitchen renovation requires, in addition to high-quality finishing materials, a convenient location of sockets. Their number should not be limited to two or three pieces, since in any kitchen there is always a lot of equipment, which means that with a small number of sockets there will be many different wires that will at least get in the way.
It is important to take them into account at the planning stage, so as not to damage the renovation of the walls in the kitchen later.
Ceiling finishing
For the ceiling in the kitchen, suspended ceilings, either plasterboard, or simply painting are suitable. Ceiling boards can also be used.
When painting the ceiling, it is better to use moisture-resistant materials. Water emulsion is suitable here. For a smooth ceiling you won't need anything other than a roller and paint. Painting must be done at least 2 times: lengthwise and crosswise.
If the ceiling is uneven, then you can level it in the following way: rinse it thoroughly, apply a primer, and then putty. Walk over the dry surface with sandpaper.
Light in the kitchen
It is important here that there is as much of it as possible and that it is different. The work area should be illuminated, and there should also be dim lighting for intimate family evenings.
Some lamps are mounted directly on the kitchen unit, while others, on the contrary, must be provided at the renovation stage. Even an inexpensive kitchen renovation will look much more advantageous if there are different lighting options.
Finishing the work area
This Provence style area can be finished with frosted glass. This is an expensive option and it's best not to do the installation yourself. Another option for finishing the work area is tiles.
You can finish the tiles yourself if you have 3 tools: an angle grinder, a glass cutter and a hydraulic level. Wall tiles and floor tiles are different from each other, so tiles for the work area are easy to cut yourself.
Repair and ventilation
Not all craftsmen take a responsible approach to the issue of ventilation outlets, giving primacy to the headset project. If you close the exit, then, firstly, the hood will not be able to work fully, and, secondly, all repairs will become unusable in a short time.
It is also worthwhile to correctly install the hood itself, otherwise it will not be able to work at the full power offered by the manufacturer.
Work triangle in the kitchen
They will definitely ask about this at the company where they plan to order kitchen furniture. This territory means the area where the sink, stove or panel and, of course, the refrigerator will be located.
The ease of use of the entire kitchen depends on how correctly this zone is distributed, so it is worth paying special attention to this.
It is also worth noting that even if a cheap project is chosen, it is extremely important to choose a high-quality countertop, since it is largely responsible for the life of the kitchen.
Repair plan
Of course, a plan is simply necessary in order not to miss details, and the result of the repair ultimately satisfied everyone who took part in it. Moreover, it does not matter whether it will be carried out on its own or, for example, specialists were hired for it.
It is worth noting that not only the most expensive materials are suitable in all cases, since it is more important that they are resistant to moisture and other damage.
Materials must be as environmentally friendly and safe as possible in terms of their use. It is recommended to plan all electrical wiring in advance.
Additional recommendations and general conclusions
Even if there is a lack of space, you can use it to maximum advantage with proper design. Small rooms are “expanded” with horizontal lines in the decoration. They use light shades, install compact furniture and carefully select technical equipment. To store and place things, retractable structures, niches in the walls, drawers under the seats, and a window sill are used. To check different options without delays, specialized software or standard graphic editors are used.
Selecting a headset
Kitchen renovations often involve installing the main piece of furniture, which is considered a kitchen unit. Choosing it can be the most difficult in the entire kitchen renovation, so they often turn to specialists with this question.
Since often a person without relevant experience will not be able to measure correctly, space that involves uneven walls and various protrusions is especially difficult.
And depending on how correctly the measurements are taken, the entire area will be used more efficiently. The same applies to the installation of a finished project; it is also best done by professionals who will assemble all the door closers and fittings with high quality.
Sequence of work
The order of work should be carried out in the following sequence:
- Removal of kitchen furniture.
- Removing old finishes.
- Plastering walls and ceilings.
- Leveling the floor.
- Electrical wiring, installation of sockets.
- Ceiling covering.
- Wall decoration.
- Floor finishing.
Features of kitchen renovation
Often, delving into the choice of a project or decor for the kitchen, you can lose attention to the features of the walls. As a rule, especially if the renovation was done a long time ago, the walls may turn out to be uneven, and, accordingly, it is not possible to fix the kitchen set on them. Therefore, when making repairs, you should not only be puzzled by the number of sockets, but also pay attention to the walls.
It is also worth checking the ventilation outlet itself in advance, namely how well the air moves. Since it often happens that it needs to be cleaned, for example. And this is clearly recommended to be done before the set has already been installed and it will be necessary to directly attach the hood itself.
If the kitchen is corner, then it is worth taking into account the fact that additional space for the pipe will be required. This means that it must be provided for. Sometimes the pipe is covered with cabinets, cutting out special holes.
Wall repair. Step-by-step instruction
Repairing walls is the easiest when compared to other surfaces in the room. Therefore, usually, when there are plans to renovate only one room, residents do it themselves. Guidelines for wall repairs depend on the material that was chosen for finishing. But the preparatory work is always done the same way:
- Dismantling old finishing. You need to clean everything down to the main plaster. If major renovations are planned, the wall is cleaned to the ground.
- Insulation and waterproofing. They are performed on walls, the reverse side of which protrudes onto the street or into the entrance. If the kitchen is located in the center of the apartment, insulation is not required.
- Leveling the surface. This stage is performed using a special solution and a spatula. For wallpaper, the walls should be perfectly smooth, but for drywall, you can leave a surface with minor defects.
Drywall. Step-by-step instruction
Drywall is chosen if the walls are uneven and you don’t want to level them yourself. This is due to the fact that it can be installed on any surface, no matter how smooth it is. Drywall is often placed on the ceiling, but it began to be used for installation on walls relatively recently. Installation instructions:
- Buy the required amount of material.
- Prepare tools for work (hammer or drill, grinder, screwdriver).
- Preparing the frame. If the wall is perfectly flat, a frame will not be required.
- Glue preparation. It is kneaded according to the instructions on the package.
- Applying glue to drywall sheets.
- Installation of the first slab. You need to choose a convenient corner from which to start working. Next, all other slabs are installed, focusing on the first slab, so it must be mounted perfectly level.
If there is a frame, the sheets of drywall are secured to the frame with screws; no adhesive is required here.
Wallpaper. Step-by-step instruction
Wallpaper for the kitchen is not the best option. But if you decide to opt for them, it is recommended to give preference to high-quality products that are immune to negative external influences. It must be washable wallpaper. Pasting instructions:
- Prepare materials and glue for wallpaper.
- Select a wall. It makes no difference where exactly the work starts.
- Dilute the glue. The packaging offers instructions on how to dilute it correctly, and you must strictly adhere to it.
- Having placed the stepladder, the first strip of the roll is glued close to the ceiling border so that 1-2 cm protrude beyond it.
- Glue is applied to the inside.
- Use a soft roller to smooth out the strip of wallpaper.
- The next strip is glued overlapping.
- The process continues until all the walls are filled with wallpaper.
When it is necessary to isolate an outlet or switch, precise measurements are first taken. After this, you need to cut a hole with a special sharp knife. A "try-in" is then done to ensure that the hole is actually cut correctly. And only after that they start gluing the strip.
Making the kitchen spacious
In small apartments, it is sometimes possible to combine a kitchen and an adjacent room. Such a combination will not only increase the area of the kitchen, but will also make it more functional, since you will no longer have to think about where to put the table and chairs.
It’s worth thinking about making the most of the built-in appliances, which will eliminate unnecessary clutter and allow you to rationally distribute space.
For small areas, it is recommended to use a modern style, which does not require any special restrictions in decor.
Nuances of kitchen renovation
Repairs should begin with installing the required number of sockets, and then proceed to the walls. If the project involves a floor that is considered warm, then it is recommended to install it immediately after the necessary electrical work has been carried out.
Such currently popular suspended ceilings are not suitable for all kitchens, as they visually reduce the space even more, so it is better to think about other materials that are also used for the ceiling.
When choosing a cabinet, you should pay attention to how they will open, or rather, whether they will interfere with each other, since in this case they will be difficult to use, which means they will quickly become unusable, and, accordingly, they will need to be replaced .
Good lighting is key
Good lighting is very important in small kitchens. It is important to make optimal use of daylight, so it is not recommended to cover windows with heavy and patterned curtains. It is worth using thin materials to cover windows.
Also, choose well-designed artificial lighting. Using interesting points of light that highlight just certain surfaces allows for even more space. And spotlights, which are decorations, for example, with the ability to change colors, will bring modernity to the interior.
A hanging mirror or the use of reflective plastic surfaces can also be an attractive accent. For example, placing PVC panels as wall protection next to the worktop will make the countertop space appear larger, giving you more freedom to move around in the kitchen.