When decorating an interior, designers often rely on the most unexpected solutions, including the design of a door opening. This technique has remained relevant and popular for a long time. Regardless of the chosen style, doorways remain indispensable, so their correct design will not only emphasize the chosen style, but will also add zest to it.
Another plus in favor of the feasibility of designing an opening is the ability to implement it in different types of premises - in apartments and private houses of any size and layout, penthouses, attics, basements. The opening can be designed either with or without doors. We will talk about this further.
The need to arrange open doorways
Designing an opening without a door is successfully implemented both in spacious mansions and in apartments with a small area.
- This solution visually unites adjacent rooms - kitchen and dining room, hallway and hall, hall and living room.
- In large houses it will emphasize the spaciousness, and in small apartments it will increase the usable area.
- In some buildings, load-bearing walls can be in the most unexpected places, sometimes where you want to remove the wall.
- You can beat this problem by making a spacious doorway.
- An open opening can be made of a non-standard shape and decorated effectively using a wide variety of finishing materials and even textiles.
The disadvantages of this solution include the possibility of not implementing it in all premises. For example, you should not make an open opening between the kitchen and the bedroom, as foreign smells and fumes will enter the room. An opening without doors will not give a feeling of privacy and will not clearly separate the space.
When are doors needed?
Doors are needed in rooms that provide privacy - a bedroom, a children's room, a study, a dressing room, a kitchen, a bathroom. From a psychological point of view, closed doors, especially in combination with closed curtains in a cozy room, promote relaxation, privacy and the desire to be alone with oneself.
Doors to the kitchen and bathroom will prevent the spread and settling of moisture and fumes, which adversely affect the finishing in residential areas.
Methods for designing an open doorway
- Curtains or drapery.
This solution can serve as a design for the opening to the loggia from the bedroom. Choose expensive and dense textiles that will block the sun's rays when you need to rest, and shimmer effectively in sunlight and artificial light.
Decorating the doorway with curtains can be made not only from textiles, but also from beads, seed beads and glass pebbles. This is a good solution for zoning the kitchen and dining room, living room and hallway.
Vertical blinds can be chosen the same as those on the windows. Since there is a wide selection of colors of different saturations, there will be no problems with selection.
- Wood paneling or gypsum board.
This is a good solution to highlight the structure and make an edging. Drywall, due to its good adhesion, can be covered with any facing material, but it is problematic to make decor of complex shapes from it. For such purposes, wood is more suitable, as it allows you to create complex forms of decoration - floral patterns, geometric shapes, animal figures, etc.
Decorating the openings with stucco molding will make the room elegant. The stucco does not have to be left white. It is covered with patina, silver or gilding.
In this way you can create the most incredible patterns and shapes in styles such as Gothic, Baroque, Rococo, Classical, Renaissance.
The name refers to the decorative panel that protrudes above the opening. It may include decor - columns, stucco, wood carvings, etc.
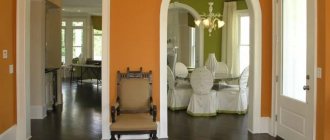
One of the most popular types of openings. Decorating a doorway with arches will make a large room more comfortable, and a small one more spacious.
Arches can be classic, pointed or asymmetrical. Most often, classic arches are found in oriental interiors. Sometimes they are left without decoration, or the area inside the arch can be highlighted with a different color.
If you want to decorate, you can use decorative brick, wood, or decorate the opening with decorative stone
Options for designing an opening with a door
- Glass door.
This option is applicable when visual isolation is not needed, but you need to protect yourself from extraneous odors and noise. Glass can be transparent or frosted, with a beautiful texture and decor. When it's not just transparent, the risk of injury is reduced.
Depending on the selected materials and decoration, sliding doors can be selected to suit different interior styles. For example, a barn type with rough wood will fit into rustic, country and similar trends. A lightweight sliding door made of smooth wood without decoration will suit the loft or minimalist style.
It is suitable for small apartments as it folds compactly. Often modern solutions involve a combination of wood and glass fragments.
You can apply wallpaper with a 3D effect to the door. For example, in the kitchen it could be a picturesque Provençal landscape, in a children’s room – a plot from a fairy tale, in the living room – a view of a European city. Just imagine, every day you will open a window (in our case, a door) to Europe. The design of a doorway with wallpaper can be chosen to suit different styles, thanks to a wide selection of themes, colors and textures. Decoupage will look no less impressive, especially with a convex decor coated with varnish for reliability. These can be the stems and petals of fragrant flowers, fluttering butterflies and flying birds.
- School or magnetic board.
How to separate a corridor and rooms with a partition
The zoning of an apartment contains a very important meaning of human existence. Everyone wants to enjoy peace and quiet in the bedroom, be focused in the office, and relax in their favorite corner. But it is not always possible to redesign an apartment on a large scale and divide it into the necessary rooms according to your wishes.
The exit is in the interior partitions, which are an excellent alternative to a complete renovation of the home. Read more about the types of partitions and their design: https://homeli.ru/remont-i-otdelka/peregorodka-dlya-zonirovaniya-komnaty-iz-gipsokartona.
After demolishing the main wall between the corridor and the room and installing a movable partition, it becomes possible to increase and decrease the space. Narrow passages and unnecessary doors disappear, and when the partition doors move, the boundaries are restored.
The material of the partition can be different:
- Wooden;
- Glass;
- Made from acrylic raw materials;
- From plasterboard;
- Made from polycarbonate;
- Brick;
- Made from foam concrete blocks;
- Combined - a frame made of metal and metal-plastic with glass, bamboo, textile and other inserts.
Plasterboard partitions completely imitate a wall. They will help create a perfectly flat and smooth surface of the partition, and are also easy to install. They can be curved if such a gypsum plasterboard structure fits into the design of the room. If you don’t want to act radically, you can visually separate the corridor from the room: with a shelving unit, flower pots, a closet, an aquarium on a cabinet, etc. Such zoning visually separates the residential area from the entrance area.
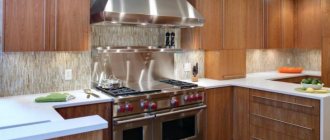
Choosing furniture
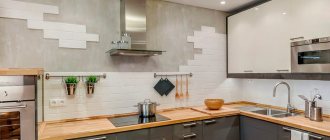
The issue of selecting furniture for a kitchen combined with a corridor needs to be approached thoughtfully. Since most of the load on the room will come from the cooking process, the number of wardrobes and shoe cabinets should be reasonable.
To organize a hallway, a set consisting of a tightly closing chest of drawers and a wardrobe with sliding doors, as well as a shoe cabinet, will be sufficient. The optimal section depth for the hallway is no more than 40 cm.
Large mirrors and well-placed lamps will help to visually enlarge the corridor.
To protect food and dishes from street dust, purchase a mini-kitchen: a set of hanging cabinets and floor cabinets with hinged doors. If the layout of the apartment allows, use niche kitchens - they are convenient and compact.
Three-tier sets have also proven themselves well, making it possible to fill the entire space along the wall from floor to ceiling and find a place for almost all kitchen utensils. A bulky dining table can easily be replaced by a compact bar counter.
Remember: light shades of furniture make the kitchen interior visually light and airy, creating the impression of a large space.
Advantages of sliding partitions: we separate rooms from a corridor
Partitions allow you to most comfortably separate one space from another, while fitting into any interior design.
Regardless of the material, sliding partitions have a number of advantages:
- They help solve various planning problems during repairs that do not require major work.
- They do not require large financial outlays.
- In the shortest period of time they change the appearance of any room. For such a small apartment as a Khrushchev building, an interior partition becomes an excellent building material for solving interior issues.
- They move apart in different directions and, if necessary, become part of the room.
Such partitions became widespread in society after the need arose to partition the kitchen from the hallway, children's and parent's bedrooms. See interesting options for partitions in the interior here: https://homeli.ru/remont-i-otdelka/steny/peregorodki-iz-gipsokartona-foto-dizajn-interera.
Lighting Features
A hallway kitchen can often be dark and cramped, so lighting is important to consider when planning your design. Ceiling lights are an ideal option because they do not take up space in the room. Place a row of recessed lights along the hallway to ensure the entire space is well lit.
Natural light is also a central feature of almost any open plan space, helping the area feel brighter and more spacious.
In a combined kitchen, the soft light from LED lighting should be compensated by a large amount of natural light coming through the windows. It also seamlessly connects the indoors to the adjacent outdoor space, bringing those inside the kitchen closer to the space outside.
Partition in a public corridor: advice and the issue of legality of construction
Very often the common corridor is large and the apartment has a recess that ends with the front door. Many people fence off this part with various (usually metal) partitions. But is it legal? The corridor is part of the property of all owners of apartments in a given building. Such an inter-apartment staircase is not the property of the residents of one apartment. Permission to erect a partition can only be obtained during a general meeting of residents.
What to pay attention to
The arrangement of combined parts of housing should be carried out by assessing the practicality of the selected finishes and furniture. The following recommendations will help with this:
- Combining different types of finishes in light colors. Light finishing will make the combination of different parts of the home smooth and will increase the space. Using materials of different types, you can visually separate zones.
- Choosing custom furniture and creating a safe layout. It is not recommended to choose a set with open shelves or many raised protrusions. Dust will constantly accumulate on it. The presence of cabinets and floor cabinets with increased depth will ensure ease of installation of the sink. When arranging furniture, you must ensure a free passage of at least 120 cm.
- Maximum use of walls, minimum decor. Choosing a tall cabinet installed near the entrance and hanging cabinets for the cooking area will ensure minimal use of space. But the decor should be small and take up minimal space.
Corridor zoning
Zoning is the most optimal option for corridors in panel houses. Such a small space is quite difficult to divide into zones, but in the end such a solution will visually make it wider and its functionality will increase.
Arched partitions are suitable for small corridors. They will divide the space into 2-3 zones. The first will serve for removing clothes and shoes, the other will serve for storage, the third will become a transition between the kitchen and another living room. Read more about creating stylish arches here: https://homeli.ru/remont-i-otdelka/arki-iz-gipsokartona.
Zones can be distinguished:
- Furniture. On one side there is a clothes hanger and bedside tables for shoes, on the other side there are built-in wardrobes for various things. The cabinets should be a different color than the hanger.
- Wall decoration. Different areas are covered with different wallpapers or painted in different colors. They should be in harmony, but not too different. Wood paneling will look great.
- Various floor coverings, but it is worth choosing wear-resistant materials. The floor can be at different levels.
- Emphasizing the entrance area and hallway area.
Pros and cons of sliding structures
Large sliding doors between the kitchen and living room are superior to standard swing doors in many respects, even when it comes to double-leaf models.
- Space saving - they do not need space to open. Some methods of moving apart do not even interfere with the surrounding environment.
- The functions of partitions are to separate one or two rooms and at the same time serve as a door. With their help, you can play with layouts, freeing or blocking space.
- Durable, easy to use.
- With the selection of high-quality fittings and proper care, these models will last a long time.
- Variety of materials used and styles to fit into.
Choosing wallpaper for the kitchen
Since in the place where food is prepared, the walls get most dirty from grease, drops of water and other types of dirt, when choosing wallpaper you should take this fact into account. Modern industry offers a large assortment of washable wallpapers with different patterns or plain ones. The kitchen is always divided into two zones - this is the place where they cook and the eating area or dining area. If you hang two types of wallpaper, you can zone the space and highlight each zone separately. This method helps with zoning the studio kitchen, as well as if the room has a good square footage.
In old-built houses, the so-called Stalin buildings, kitchens are not only large in size, but also with high ceilings, so you can use a horizontal division of the room using two different types of wallpaper.
In small apartments built in the late 60s and early 70s of the last century with a kitchen of 5-6 meters, the location of the dining table is marked out with a strip of two or three panels or attention is focused on this wall using narrow photo wallpapers.
Don't forget about the color and texture of the clothes for the walls. Dark colors visually reduce the area, while light colors increase it. But you shouldn’t take very light, stainable colors for the food preparation area; in this place it’s better to choose wallpaper with a small pattern, so that drops or some blots are not very noticeable.
In the dining area, you can hang wallpaper in lighter colors than on the rest of the walls, since this space is less easily soiled.
Interior solutions during transfer
The kitchen, moved to the corridor, automatically becomes part of the public space - even if it is not connected to the living room, its purpose is no longer limited to work functionality. If your family and guests find themselves in the kitchen right away, think about how to create a relaxing and at the same time dynamic atmosphere for communication and relaxation.
1.
The proximity of the front door carries with it echoes of the metropolis and suggests a choice of objects and textures from the exterior. Use brickwork or trendy concrete, photographs of city streets and industrial-inspired lamps.
2.
Combine brutal motifs in wall decoration and decor with the warmth of wood and colorful ceramic patterns - these traditional materials always give comfort and set the mood for relaxation.
3.
Usually moving the kitchen into the hallway means organizing the space very compactly. Use the L-shaped layout of the set, which can easily be “completed” with a bar counter - even if a sofa, TV and dining table do not fit into the room, you will create a corner for communication right at the “hot shop”.
4.
Choose built-in appliances - hide all the necessary devices behind identical facades. Let the color of the kitchen be slightly different from the color of the walls - this will make the room seem larger.
5.
If there is a seating area or dining area in the space, highlight it with color and light. A light sofa with bright pillows or a beautiful chandelier above the table will distract attention from the kitchen and allow you to successfully zone even the smallest space.
Source: www.inmyroom.ru
The advantages of decorating a kitchen with two types of wallpaper
In addition to the visual zoning of the kitchen, there are a number of positive aspects that come from combining two types of wallpaper.
Main advantages:
- Kitchens in old-style apartments are either very small or elongated in panel houses from the 90s. Walls are not always smooth, and the correct selection will help hide defects in imperfect walls or visually change the size of the room.
- Highlighting one of the walls with wallpaper of a different type allows you to focus attention on this area and distract from the rest of the room.
- Having made the transition from the corridor to the kitchen, a beautiful combination of wallpaper will allow you to visually unite the two rooms, but at the same time each of them will remain with its own individual functionality.
- Adding some zest to the kitchen interior makes the room not boring and monotonous.
Proper design of even a small kitchen will increase the space and the walls will not put too much pressure, creating the effect of a closed, minimized space.
When doors are needed
It would be inappropriate to have no door when exiting the kitchen to the bedroom, nursery, bathroom, pantry, or study.
It would be more appropriate to separate and limit any rooms where recreation or personal hygiene of family members is organized from other rooms. In such places a person should feel calm and protected. Open space will prevent this.
If you intend to work at home in a specially equipped room, combining it with a kitchen is not the best idea. The noises and smells of cooking food will not allow you to concentrate and will constantly distract you.
You can’t do without a door in the kitchen with a permanent sleeping place. Such a room serves not only as a kitchen, but also as a bedroom.
If more than two adults live in a one-room apartment, it is also better to leave the kitchen door - sometimes privacy is vital.
Note! Combining the kitchen with living rooms contributes to the spread of odors of cooking food, fumes and humidity throughout the apartment.
Wallpaper companions: 6 design tricks
Companion wallpaper can make the kitchen area cozy and attractive; the correct selection of patterns and colors, as well as methods of wallpapering will create an unforgettable effect. What options are currently recommended by many interior designers?
Vertical stripes
There are several design options for vertical panels. This is the alternation of one or two stripes of one type with one or two stripes of another type of wallpaper. In this case, companion wallpapers should have the same structure and color combination, for example, paper wallpapers of a light marsh color look good with light beige wallpapers with the same color as plain ones. There is also an option with highlighting part of the wall with one type of covering, with a parallel edging with wallpaper of a different color.
Horizontal division of walls
The panels on the lower part of the wall are made darker, and the top is decorated with light wallpaper in the same color scheme. In this case, the joint must be covered with a decorative border or polyurethane molding. A good combination is striped or checkered wallpaper on the bottom with plain colors on top. A classic combination is used - dark plain ones in the lower part, and light ones with a rare pattern in the upper part.
Horizontal division can be at different levels:
- On the windowsill;
- 1:2, where the upper part is twice as large as the lower;
- The lower part is much smaller than the upper - gives the effect of high baseboards;
- The top part is much smaller than the bottom, which allows you to visually increase the height and size of the room if the top wallpaper is the same color as the ceiling.
Mandatory partners in this option are decorative ribbons, moldings, and original curly inserts to combine the two types.
Accent wall
When the kitchen is elongated, the effect of a carriage is created, but if you decorate the wall opposite to the entrance with wallpaper with an unconventional pattern or photo wallpaper, the wall will be visually closer. An accent on the wall next to the kitchen table looks good. Bright wallpaper in this part will create a joyful mood at the time of eating.
Inserts
If the size of the kitchen does not allow you to separate out the dining area, then you can place inserts of panels of a different color or wallpaper with a pattern above the table and decorate them with moldings around the perimeter. The effect of several paintings will appear.
patchwork quilt
In this case, companion wallpapers of two or more types should be completely combined. Gluing this option is a labor-intensive and difficult task, since it is necessary to choose the right type and structure of clothing for the wall, carefully arrange and stick small canvases on the kitchen wall so that the joints are not conspicuous.
Companions in different colors
Glue two types of companions with the same pattern on different backgrounds. You can choose not only two background colors, but also three or four, the main thing is that the color smoothly transitions from one to another.
Design options
When designing the interior of a kitchen combined with a hallway, use the following recommendations from professional designers:
- The distance from the kitchen-hallway area to the far wall of the adjacent room or furniture in it should be at least 1.5 m.
- The optimal tabletop width for this type of room is 70-80 cm.
- The built-in hob should be located next to the inner wall at a distance of 10-15 cm from the edge of the countertop.
- The recommended distance from the edge of the countertop to the sink is at least 5 cm.
These tips can be used both to create a kitchen combined with a hallway in a private house, and for combined “corridor-kitchen” areas in a small apartment.
To visually separate the kitchen and corridor space from each other, zoning is used. It can be done using partitions, various finishing materials, furniture, household appliances, etc.
For example, a partition can be permanent (made of brick or plasterboard) or mobile (in the form of a dense screen mounted on guide rails that are fixed to the ceiling and floor).
If you want to zone the room using decoration, then the hallway should be decorated in muted colors, and the kitchen interior should be bright and light - such shades will make the room visually more spacious and create a positive atmosphere in it.
The floor in the kitchen area can be made of floor tiles, and in the hallway - from laminate, and vice versa. Also ideal for zoning are stretch ceilings that visually delimit space and a lighting system.
Please note: when choosing flooring for a combined area, give preference to practical and moisture-resistant materials. They must withstand heavy loads and frequent wet cleaning.
A kitchen together with a long and narrow hallway does not leave many design options, however, even in this case, you can find the optimal solution.
The most popular types of layouts are L-shaped, two-row and single-row.
In the first case, all kitchen furniture and accessories are located along adjacent (not opposite) walls, which leaves enough space for maneuver.
In a two-row layout, also called a galley, furniture, stove, sink, refrigerator and wardrobe are arranged along opposite walls.
If the rule for the width of the passage is observed (1-1.2 m), then two people will be able to pass each other, but there will not be enough space for a dining room.
A single-row layout is used in long corridors: all furniture - both kitchen and dressing room - along with large household appliances, a stove and a sink are lined up along one wall, leaving the opposite wall free.
How to properly design the transition of wallpaper from the kitchen to the hallway
In an apartment with a large square footage, wide corridors and huge studio kitchens, you can easily install additional doors. But there are also old Khrushchev buildings, as well as houses from the Brezhnev period, when the entrance to a small kitchen appears from a narrow dark corridor. Such a small corridor needs to be decorated, as well as the kitchen walls adjacent to it. Glue a smooth continuation of the kitchen panels, thereby increasing the area of the kitchen space. In this case, it will be necessary to remove the doorway from the corridor, as it will limit the space.
If there is no desire to extend the dining space at the expense of the corridor, then the former location of the door can be decorated in the form of an irregularly shaped arch with light, almost white wallpaper. But arches are currently going out of fashion.
In large apartments, the transition from the corridor or hallway to the kitchen is decorated with wallpaper similar in color to the color of the walls of the smallest room or made in contrast to the main color.
In any apartment, correct zoning and design of smooth transitions will create the integrity of the room and indicate the good taste of the owners.
Preparatory stage
- Before you begin any renovations, contact your housing office to find out what the requirements are for building permits and inspections, including any electrical and plumbing permits.
- Then measure the kitchen and draw a simple plan for the hallway layout.
- Determine which walls need to be knocked down to create more space. You should also check what type of walls you are cleaning. If they are load-bearing, removing them will change the structural stability of the entire home.
Arch installation procedure
Let's look at the stages of installing an arch using the example of a classic design:
- We cut out a sheet of drywall according to a pre-made drawing. We cut out the part with an electric jigsaw along the marking lines. We cut out the second part of the body according to the finished template. We take measurements and cut out the end half, which will connect to the side parts of the structure. Then cut out another half.
- We cut the metal profile. We cut out 8 parts from the slats, two of which should be equal to the width of the opening, four to the height of the arched structure. Two more are cut out according to the template. They are used to secure the end strip. To correctly bend the metal profile, shallow cuts are made along its edges every 5 cm.
- We assemble the frame. To do this, we attach long profiles to the surface of the walls, and fix wide guides on the ceiling parallel to each other. The result is a double frame. To create a rigid and reliable frame, you need to install several additional jumpers.
- We install the housing; to do this, we screw two side parts on both edges of the frame. Drywall products are fixed using screws.
- We make the end strip. We cut out a piece of ceiling plasterboard of the required size, moisten it with water and go over the paper with a needle roller. We bend the product to the required curvature.
- We attach the end halves to the arched strip. We screw self-tapping screws into the profile every 10 cm.
At the final stage of the work, we cover the corners of the drywall sheets with a perforated corner or sickle. After this, you can begin finishing work.
How to hang two types of wallpaper (video)
Walls: Wallpaper
Ceiling: -
Closet: -
18 149
The interior of the hallway is not always given a lot of time and materials. Therefore, even the simplest combination of wallpaper in the hallway looks unusual and stylish.
Combining wallpaper in different textures and colors is a simple and universal solution; it will visually add space to a small hallway, and emphasize and divide the room into several functional parts in a large one. It is not necessary that the texture and colors be evenly distributed; in any case, it will look harmonious.
Arch installation procedure
Let's look at the stages of installing an arch using the example of a classic design:
- We cut out a sheet of drywall according to a pre-made drawing. We cut out the part with an electric jigsaw along the marking lines. We cut out the second part of the body according to the finished template. We take measurements and cut out the end half, which will connect to the side parts of the structure. Then cut out another half.
- We cut the metal profile. We cut out 8 parts from the slats, two of which should be equal to the width of the opening, four to the height of the arched structure. Two more are cut out according to the template. They are used to secure the end strip. To correctly bend the metal profile, shallow cuts are made along its edges every 5 cm.
- We assemble the frame. To do this, we attach long profiles to the surface of the walls, and fix wide guides on the ceiling parallel to each other. The result is a double frame. To create a rigid and reliable frame, you need to install several additional jumpers.
- We install the housing; to do this, we screw two side parts on both edges of the frame. Drywall products are fixed using screws.
- We make the end strip. We cut out a piece of ceiling plasterboard of the required size, moisten it with water and go over the paper with a needle roller. We bend the product to the required curvature.
- We attach the end halves to the arched strip. We screw self-tapping screws into the profile every 10 cm.