The interior is the internal space of an architectural structure. Interior drawing aims to develop three-dimensional thinking, to enable students to acquire skills in depicting internal space of varying degrees of complexity, to consolidate and deepen knowledge of the practical application of the laws of observational perspective, and to expand the compositional concept.
The entire internal structure of the interior is determined by human life. Components such as lighting, decor, color scheme, on the one hand, and internal equipment (furniture, its arrangement, etc.) on the other, make it possible to create a comfortable living environment for a person. All interior elements are subordinated and meet the functional needs of a person, his aesthetic and spiritual needs.
The interior is, first of all, a closed internal space, which includes various spatial plans and lighting sources that create one or another original light environment that characterizes the premises. The use of different colors, textures of materials and objects included in the interior creates certain difficulties in its depiction.
In interior drawing, the method of linear constructive image construction and knowledge of the laws of observational perspective are of particular importance. The linear-constructive method of depiction and linear perspective allow you to clearly monitor the progress of constructing the image of objects in the drawing.
Based on the features of the practical application of interior design in the profession of an architect, it is more logical to divide acquaintance with this section into two stages. The first stage is drawing the interior from life, the second - from the imagination.
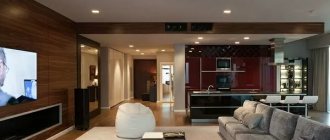
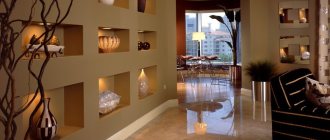
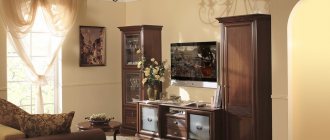
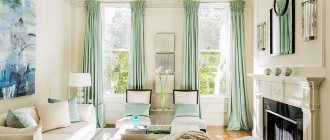
Geometry in the living room
living room interior
This style never ceases to be popular. Simple lines, lots of colors and straight shading. It may be simple, but it always looks beautiful and interesting. Moreover, such painting of the living room will cost only 1,500 rubles per m2 . For example, if your wall is 5 meters long, then the entire wall will cost 20,250 rubles .
How the work is done
This work is done using tape using rollers and pre-tinted paint. We use Dulux Diamond. On the official website you can immediately select the colors you need and tint them in the store.
tinting
Geometry sketch
We also make any sketches for painting the walls in the living room, including geometric ones. The price for such a sketch is 3,000 rubles. The price for materials for such work is 4,000 rubles.
sketch
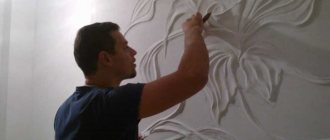
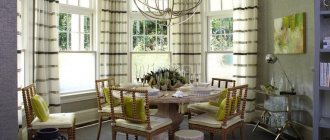
Pencil drawing of the interior from life
Drawing an interior from life helps students gain visual experience necessary when constructing the interior space of premises, identify the main characteristics of the volume and patterns of the light and shadow solution of the drawing.
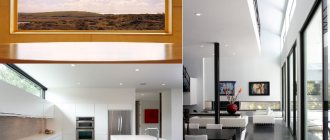
No matter how complex the configuration of the interior, it can always be reduced to ordinary geometric volumes, which have a square, rectangle, circle, hexagon, etc. in plan, so the ability to draw simple geometric shapes in perspective will greatly facilitate drawing interiors from life. By this time, the student should know how angular and frontal perspectives are constructed. The main types of perspective were previously used when drawing various forms, but when drawing interiors it is necessary to introduce adjustments to the perspective construction in accordance with the visual perception of the depicted room.
You may be interested in: Brush drawings
First of all, the successful execution of an interior drawing from life depends on the correct choice of point of view, horizon line and vanishing points of parallel lines. When drawing a room, the horizon lines will be located at eye level of a person sitting or standing at the easel. Depending on the location of the drawer, the perspective of his drawing will be angular or frontal.
When constructing a linear drawing of the interior of a room, special attention should be paid to the quality of the graphic construction of the work. The lines in the foreground should be significantly brighter than the lines in the background. This will allow you to show the depth and space of the room already at the initial stage of the drawing and will facilitate the work on the light and shadow solution of the interior.
Marker drawing on the living room wall
flowers on the living room wall
This is a very detailed work, everything is drawn with markers of different thicknesses. With markers you can draw objects in real size and paint the entire wall from floor to ceiling. The price of the work is as in the picture from 3,500 per m2. That is, with a wall length of 5 meters, such work will cost 47,200 rubles
graffiti marker
You need to draw with a graffiti marker. This is a professional tool for painting walls, it covers well, when the paint runs out, the marker can be refilled. There are also many markers to choose from, so there is also freedom in the colors. We even know how to make our own marker refill (paint) and thus make any color.
This is sometimes necessary when the color of the marker needs to match the color of the paint in the can.
How to draw with a marker using a projector
A projector is a handy thing to use for painting. By turning off the light and pointing the sketch at the wall, you can safely transfer the drawing to the living room. It is enough just to darken the room by hanging bags on the windows.
Painting with marker and additional color
drawing with a marker on the wall
To liven up the painting with markers a little, you can add an additional color. This way the painting will no longer be monotonous, but will sparkle with new colors. You can add multiple colors, but be sure to explore color combinations.
Stencil drawings - fun and fashionable
Original mirror design using color
You can make a stencil with your own hands, or even easier - buy it at a hardware store. There is now a small selection of interesting patterns and designs on sale, so hand-made ones are more interesting in terms of design.
Elegant and simple composition
Or you can make a simple but beautiful stencil yourself:
- As a basis for the stencil, we take any design you like, for example, a maple leaf. You can also download interesting drawings from the Internet and print them on a printer.
- The starting material is a durable and flexible transparent material. A transparent paper folder (thick) or a sheet of transparent thin plastic will do.
DIY stencils are exclusive!
Everything ingenious is simple!
- You can limit yourself to thick cardboard, but you need to treat it along the edges with PVA glue so that the paint does not smear during application and does not soak the outline. Or you can laminate it, which is much more reliable.
Simple drawing for beginners
- Fix the stencil on the wall using special glue, tape or tape. It is necessary to stick it carefully so as not to damage the plaster.
The graphics always look great
- After applying the paint using an aerosol, brush or roller, move the stencil further along the previously applied markings.
It is important to follow the basic rule - everything should be in moderation. You shouldn't do a lot of drawings. One is enough, but beautiful and stylish. You can place the decor in the corners of the room or create an original composition on one wall.
Contrasting colors are the trend for the 2022 season
- After the paint has dried, you can additionally coat the design with a matte or glossy water-based varnish, then the walls can be easily washed.
For example, I really like drawings in a graphic style. In this case, instead of paint, you can create pencil drawings on the walls. Any pencils and crayons will do, but I would like to share my impressions of pastels and wax crayons.
Pastels will help you realize your most vivid fantasies.
Pastel is a chalk consisting of coloring pigment, chalk and binding components.
- Soft (dry) pastel - available in more than 110 shades, mixes beautifully and allows you to create soft, smooth, “velvety” drawings.
Asian fantasies in lilac tones
- Oil pastel – this pastel is based on wax and mineral oil with the addition of dyes. This option is brighter and richer. Great for drawing on a simple stencil.
Decor for beginning artists
- Waxy - consists of wax and pigments. This is the most abrasion-resistant version of pastel, but a smooth plastered surface is required for drawing. The colors are bright and intense. Pairs beautifully with dry pastels.
Stained glass made with wax and regular stylus
Wax pencils - consist of natural wax, these are more expensive and are suitable for decorating children's rooms, as they are absolutely safe. There are pencils made of synthetic wax, the price of which is two times lower, and can be used in the decor of any room.
This decor in two colors with flow can be easily done with wax crayons
Unlike pastels, pencils can be used to create drawings in any technique (graphics, landscape, still life, shading).
Pastel and wax crayon – elegant sakura
Wax pencil drawings on the wall are very interesting, but how to work with these materials:
- The tip, end or side of a wax pencil allows you to make lines of varying thickness and saturation.
- The strokes can be shaded with a swab or just with your hands.
- When shading, you get an interesting “blur” effect that will hide some of the flaws in the drawing.
Liquid wallpaper and central composition with pastel and wax
- You can paint using mixed media - you can apply water-based paint over the lines drawn with a wax pencil - only those places where there is no wax will be painted over.
- It is convenient to sharpen a wax pencil with a paring knife or hold it under running hot water before sharpening.
Abstract patterns are not limited by strict lines
- If you want to draw with both dry pastel and wax, then first apply the pastel, and then the wax lines. Dry pastels simply won’t stick to wax.
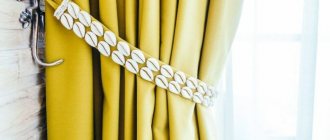
Exquisite and delicate bedroom
- You can erase some lines or correct the drawing with a regular school eraser or a roll of white bread.
A melamine sponge is very convenient for any drawings - it removes almost all paint without a trace, helps to create a beautiful and clear outline.
Modern style graphics
Smooth lines graphics
Using a stencil and a set of simple pencils of varying degrees of hardness, you can also decorate a room or corridor in an original way. A drawing on the wall in a graphic style perfectly emphasizes the interior in the spirit of modern minimalism or in a consistent Asian style.
The child will be delighted
When starting to create, you need to take into account that a hard pencil (H) gives a thin light line, and a soft lead (M) gives a thicker and richer line. For shading and shading, it is better to use a pencil marked HM (hard-soft version of the lead).
Subtle monochrome design
This technique is convenient because the drawing can always be erased with a regular eraser or washed off with a sponge. Regular clear varnish will help fix the pattern on the wall. Interestingly, even ordinary hairspray also fixes drawings made with a simple pencil well.
Avoid small details in composition
An interesting idea for graphic drawings is to trace the outline of the shadow cast by a regular film strip projector. In principle, a lamp with a narrow shade would also be suitable. We need a directional beam of light to which we can attach a sketch of the drawing.
The pattern we need is displayed on the wall, and we simply outline it with a pencil and decorate it at our discretion.
Some features of painting on plaster
Complex stencil for acrylic paints
The stencil is ready, the colors have been selected and purchased. It's time to start decorating.
At this stage it is important to follow a certain sequence:
- The wall should be clean, ideally recently plastered. But you can also draw on light-colored wallpaper, as long as it is clean.
Don’t get carried away by the abundance of details in the composition, the simpler the better
- Using a ruler and level, apply markings, marking the edges of the stencil with a pencil. It must be positioned clearly vertically and horizontally, without distortion.
- Before applying paint, it is better to practice on a sheet of paper and choose the appropriate color and application technique.
Transfer the drawing to the wall
- Glue the stencil to the wall and begin applying paint. Acrylic dyes are suitable for any type of finish (they are universal and can be applied to any cladding), but it will be more difficult to wash them off the surface than pastel or wax.
A sponge is convenient for making shadows and transitions from one color to another.
- It is important that there are no drips. Therefore, we apply the paint in small portions with a brush, or better yet, with a sponge.
- We hold the brush straight, perpendicular to the wall and, as it were, drive the paint into the wall.
It is convenient to use aerosol paints when finishing, but in this case you need to protect the wall from accidental drops of paint. Plain paper or film will do.
Cheerful composition
Anti-stencils look beautiful. If we make the pattern ourselves, we don’t throw away the cut out inner part; it will be useful for anti-stenciling.
With this technique, paint is applied around the pattern, forming a kind of halo around the element, as can be seen in the photo. An interesting decor is obtained by alternating patterns with external and internal coloring.
Tree in the living room
lemons on the wall
A common solution in decorating a living room is a pattern of wood, leaves and flowers. The tree is interesting because branches can be placed on other walls, creating an interesting effect of a living tree.
The price for a drawing of a lemon tree with a width of 2.5 meters will be 27,000 rubles at a tariff of 4,000 rubles per m2
Now we need to take a bolder approach to paintings and not be afraid to use bright colors. By the way, I would choose a drawing of trees that have fruits. This is definitely more interesting than ordinary leaves