Small kitchens with a window sill are a godsend for the designer. The window sill in this case acts as a platform for bringing to life the most daring ideas. In practice, housewives use free space to store dishes, flower pots, and cookbooks.
However, such an approach cannot be called rational. Photos of a window sill in the kitchen in various variations can be found in practical design magazines.
Brief overview of the article
Advantages of window sill finishing
Taking on kitchen design is a bold and practical decision. The master will need a little creativity and ingenuity for further work.
The advantages of finishing the window sill in the kitchen will be the following aspects:
- Maximum use of free space.
- Save space for other interior details. This issue is especially relevant for miniature kitchens.
- A beautiful, unique design created according to the master's own ideas.
- Creative activity when decorating a window sill is an exciting activity that is interesting for the whole family.
- If necessary, you can use ready-made kitchen design projects.
The window sill is a full-fledged area for design ideas, both decorative and functional solutions.
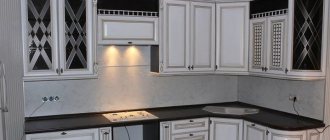
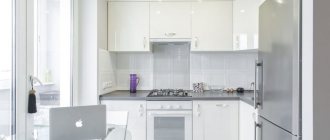
White kitchen countertops
The kitchen is the heart of the home. You can spend time cooking, drinking coffee and even enjoying your free time with a glass of wine. Therefore, it is important that the kitchen arrangement is conducive to both work and relaxation. Kitchen furniture should be functional and spacious so that it can accommodate all the necessary accessories. Countertops are also an important element. They are considered one of the most used surfaces in the home, giving the kitchen character and completing the composition of the furniture. White kitchen countertops are extremely efficient. They can be inserted into almost any interior. Thanks to their unusual color, they will become a design addition that will satisfy the tastes of even the most demanding people.
White kitchen countertops will work in any arrangement.
Advantages of choice
White kitchen countertops are a great solution for every style. They look very impressive in a kitchen where there is a dark floor or other elements, because then an original contrast is created. A countertop that stands out in color from the cabinets will be more noticeable. You don't have to choose kitchen furniture and countertops from the same material. Some are afraid that the dirt will become more visible. Not true! No matter the color, dirt is always visible on countertops and cabinets, so you should take care to keep them clean regularly.
Designer white kitchen countertops
White kitchen countertops add character to the room. Ideal for Scandinavian-style interiors in which white, gray and black reign. In addition, white, wooden, rough countertops will fit into the Scandinavian austerity. In the Provençal style, white surfaces will perfectly match the cozy atmosphere of the interior and complement the wooden elements with their lightness. In lofts, these elements are perfectly combined with brick, raw accessories and a modern direction. As you can see, they can be placed in any kitchen. They are elegant, modern and timeless. Kitchen accessories on a white countertop create an eye-catching contrast.
Cleanliness is the basis in the white countertop option. In this case, hygiene is extremely important because food is prepared on the countertop and often has direct contact with food. It is worth cleaning these surfaces with natural rather than chemical substances, because they are safer for health. The easiest way to remove dirt from laminate, stone and white glass. For countertops, pay attention to placing hot items such as pots or pans on them. Glass, granite, and stainless steel will withstand high temperatures, but for other countertop options, you should purchase pads that keep your cookware off the surface.
Interesting ideas for a window sill
The most original ideas for using a window sill:
- Dinner table.
- Stylish bar counter.
- Flower garden.
- Platform for installing a sink.
- A place to read.
The choice of finishing option depends on the size of the free area, the depth of the cornice, the condition of the window frame and glass, the style of the kitchen interior, and the wishes of the owner. Beautiful kitchens with a window sill can be achieved using only your own ingenuity and creativity.
Bar counter for the kitchen: stages, manufacturing methods, photo reports
The simplest option to implement is the classic one: a tabletop attached with one edge to a wall or furniture, and the other resting on a pipe. There are options with the tabletop:
- Make it from a wide board, preferably not coniferous - their wood is too soft.
- Order from the same company that made the kitchen set. If you bought a ready-made one, you will have to look for similar material from a photo or carry a small spare part with you to workshops to demonstrate what you need.
- Make it out of thick plywood, then decorate it with something - stick on plastic, tiles, mosaics.
Everything else is better to choose in a store that sells furniture fittings. The choice is very wide, and the range of prices is absolutely amazing. For example, a pipe of the same diameter can cost three times more. But this difference is not without reason. With cheap Chinese pipes/grids/baskets, the chrome plating begins to flake off after some time. German fittings have a very high price tag, but have a lifetime guarantee; Poles are in the middle in both price and quality. The choice is yours.
Homemade bar counter for the kitchen from a board
The photo above shows a homemade bar counter made from a thick board. It rests on one side on a shelf attached to the wall (also made of inch boards). The second support is a traditional pipe. A hole of suitable diameter is drilled in the body of the tabletop for the pipe. A “fastening ring” stop attachment is installed on the pipe under the table top, and the hole is closed on top with a decorative ring. There is also a “thrust bearing” or universal fastening of the pipe to the floor and ceiling, as well as various holders and shelves for it.
If the tabletop is attached directly to the wall, corners are usually used for these purposes. You can take reinforced ones, and choose the color based on the finish. But this type of fastener is installed so that it is not visible - stepping back a few centimeters from the edge. You can put several small corners, or one solid one.
Shelf holders can be placed under the tabletop
If you decide to make a bar counter in the kitchen along the wall, you can use decorative brackets for shelves. Their load-bearing capacity should be enough for a tabletop, especially since you can put several of them. An example of assembling a bar counter of a simple design with a pipe in the photo below.
Photo report No. 1: homemade stand made from tabletop and pipe
The tabletop was cut out from a window sill (solid wood), the edge was rounded, sanded, tinted and varnished. Spare parts - bar leg, brackets and a fixation to the floor - were purchased in the furniture fittings department.
This is the original data
We screw the stop to the tabletop and the corners to the edge. Everything sits on self-tapping screws with a flat head. The work takes about 7 minutes.
The main part is assembled
Having placed the assembled stand against the wall, mark on the wall the places where dowels need to be installed. We trace the pipe on the floor with a marker: we will set the thrust bearing according to this mark. Using the marks, we mount the support for the rack and install dowels in the wall.
Preparatory part
We put the stand in place and secure it with screws. All. Ready.
A simple bar counter assembled with your own hands
Bar counters with shelves
If you don’t like the design with the pipe, you can do without it, but you will have to remove the upper part, which is located under the ceiling. Instead of a leg, for example, you can make the same shelf as near the wall. The look will immediately become more dynamic and modern.
Sketches of easy-to-make bar counters
And in general, the entire structure can be assembled from wide boards, joining them at right angles. Looking at the photo below, you will understand what we are talking about.
Bar counter for a kitchen in a modern style (for minimalism and high-tech too)
Broken lines generally fit better into modern interiors. If the kitchen is in the style of minimalism or high-tech, then it is difficult to fit the classics there, but something consisting of broken lines will look very good (several sketches in the picture below).
Bar counters for kitchens in modern style
A slightly more traditional version is shown in the photo. This didn't make him any less interesting. A non-standard approach, even in small doses, significantly changes perception.
Bar drain-table option
Bar counter on base
We considered all these options without reason. But the tabletop can be attached to some kind of cabinet. If the tabletop is located exactly above the table surface, we take a pipe and standard fasteners to horizontal surfaces. If, as in this case, the surface of the bar counter is offset, there is a special inclined fastener.
Attaching the tabletop to the cabinet is easy and simple
You can make a cabinet yourself. Actually, the main thing is to assemble the frame. It can be covered with furniture plywood or some other finishing material - it depends on the style of your kitchen. The frame can be made from wooden (dry) slats, or you can weld a metal corner.
You can dance on this stand
An alternative is to assemble it from plasterboard profiles and sheathe it with it or with gypsum plasterboard. Another option is to build a brick base. But this is if the load-bearing capacity of the floor allows.
Loft style
With a plasterboard base: photo report No. 2
Often a plasterboard base is chosen. The material is inexpensive, the technology has been tested, the mechanics are familiar, and the result is at least good. There is no news regarding the order of work: we are assembling the frame. In this case, wooden blocks were used, but the same can be done using profiles.
Assembled frame
The main thing is to maintain vertical and horizontal planes, place the racks exactly at 90°. Everything is checked with a good building level; it is better to monitor verticality with a plumb line: it has no error. When the frame is assembled, it is sheathed on both sides with plasterboard or gypsum board.
Plasterboard sheets mounted
We fill the marks from the screws, corners and joints with putty. Then it depends on the chosen type of finish: some require putty (painting with water-based emulsion), others do not. In our case, textured paint was chosen; it is applied in a thick layer, and can be applied directly to drywall.
Covered with textured paint
All that remains is to install the tabletop on the bar counter. Choose which one matches the rest of the furniture in your kitchen.
Photo report No. 3: Bar counter with sink
This was the first experience in creating furniture (and anything worthwhile in general) with my own hands; as a result, some design flaws were made. The design was not the most successful, although there is no arguing about tastes.
Source materials:
- inexpensive countertops bought on sale;
- remnants of a laminated chipboard cabinet;
- bars;
- a couple of additional doors purchased;
- plumbing filling: sink, siphon, mixer and the required pipes, hoses, fittings.
The countertops are folded in an “L” shape, connected by steel plates, and the sides are attached.
Installing and replacing a faucet in the kitchen is described here.
Tabletops are laid out face down on the floor. They are connected in the shape of the letter “L” using glue, which coats the ends and a steel strip with perforations into which the screws are screwed. The strip, of course, is fixed at the bottom.
The sides were supposed to be refined (presumably with laminate), so the remains available on the farm were used - an old door and a piece of a cabinet. They are screwed using corners, aligned along the edge of the tabletops. And this is the first mistake. And visually such a cabinet looks heavy, and it’s uncomfortable to sit on. The sides must be moved from the edge by at least 10 cm.
After the sides were installed, the cabinet was turned over and placed in its permanent place. All other work was carried out on site. A hole for the sink was cut, the plumbing was installed and connected.
Front and back view
Slats are nailed along the floor - along the walls and slightly retreating from the outer edge (an indentation of 5 cm is made, 10 cm is more convenient), shelves are made. The cabinet on the sink side is closed with a door, the shelves on the left remain open. The space is partially finished with wooden slats.
At first they thought of putting several different “bells and whistles” on the pipe, but semicircular edges remained from the tabletops. It was decided to use them on the pipe. Panels for decorating balconies (purchased in Leroy) were used as the exterior decoration of the cabinet. They almost fit, and the remaining gaps were closed with a twisted cord. See the photo below for what a homemade bar counter with a sink cabinet looks like as a result.
Bar counter for the kitchen with a DIY sink
There are also some comments on finishing. First, the cord will soon be saturated with various liquids, will have a pale appearance and a strong “aroma”. To delay the appearance of the smell, you can cover it with something, even the same PVA glue. Secondly, the tabletops are simply joined together. Water will get into the gap and various small debris will accumulate. Even at the “joining” stage, the edges must be coated with sealant (transparent, silicone, not acrylic). You can and should also process the edges of the cutout for the sink. Then the tabletop will not swell. The joints of the countertops can be finished with furniture pads, and the same or similar ones can be used instead of a cord. Another budget option is plastic corners and the same T-shaped strips.
Bar counter for the kitchen on the remains of the wall
If the kitchen is combined with a balcony, a piece of the wall remains. The place where the window used to be. If you don’t want to destroy it, you can make a bar counter.
The rest of the wall when combining a kitchen and a balcony can be turned into a bar counter
There are two options:
- Place the tabletop at the existing height. This will be another work surface or shelf. Above it, on the pipes at a height of about 1.1-1.2 m, secure another plane, which will actually be the bar counter.
- Add/raise the wall to the required height and install a countertop.
How you can decorate a counter on the rest of the wall
Both options are not bad, but the one in the photo on the right is more practical: two surfaces in the kitchen are always better than one. Please note that the dimensions of the tabletop are larger than the width of the “leg”. This is no coincidence: this way you can sit more or less comfortably without turning sideways.
And if you’re not too lazy to remove this wall, you can make something more convenient - so that you can put your feet up. An example is in the photo.
It will be more comfortable to sit this way
Dinner table
A sufficiently wide window sill can become a full-fledged place for eating. It can also simply be a work area for preparing food. A window sill-countertop is especially relevant in a small kitchen.
In the free space you can install open shelves, a drying rack for dishes, sets of boards for cutting vegetables, and organizers for cutlery. Along the window sill, the master can place an additional panel under which chairs will be located.
Mini flower garden
If there are several windows in the kitchen (sufficient level of natural light), the owner has the opportunity to use one of the window sills as a platform for a miniature garden. This could be a Japanese ornamental garden, a cascade of beautiful pots with conifers, an original shelf with saxifrage, or systems for climbing tradescantia.
This idea also has a practical meaning: a green fence protects the room from direct sunlight, street noise, absorbs unpleasant odors and increases the level of oxygen in the room.
Sink area
For optimal functioning of the sink, you will need some skill or the help of a specialist, because it is necessary to properly install communications to the sink.
This idea will be a pleasant bonus for owners of Khrushchev-era apartments or other old-built apartments, where the area of the kitchen area sometimes does not exceed 6 square meters.
Possible decor options
Window sill design options:
- Decoration with built-in spotlights. Can be used to decorate a bar counter or seating area.
- Stencil painting, which allows you to create beautiful oriental ornaments, animal figures, and fairy-tale characters.
- Decoration with PVC films imitating various materials (brick or stone masonry).
For decoration, you can create collections of figurines from polymer clay, epoxy resin, and salt dough. An original set of dishes made in papier-mâché technology will become a real decoration of the kitchen.
What other nuances need to be taken into account?
Once you have figured out the main points, you need to take care of the nuances. The quality of the installation may depend on them:
- A serious difference between the furniture tabletop and the window sill can be hidden using the same material with which the apron is lined.
- When the window sill is lower than the level of the furniture countertop in the kitchen, then its height is increased and the window frame is reduced. This option is only available for private homes.
- You can install a deep sink in the windowsill. This method of organization is considered more expensive. With this approach, make sure that at least one window sash will open unhindered. The mixer should not interfere with it.
- If you are setting up a work area in the kitchen, then the window sill from the countertop can be expanded behind the slopes. To do this, you can use homemade supports made of foam blocks. You just need to lay out masonry from them along the edges of the tabletop. There will be a deep niche inside. There will be enough space for one or two chairs.
On a note! A tabletop by the window can act as a seat. This design will require three sheets of material. The finished attribute is decorated with decorative pillows, and decor, herbarium or amulets are placed on the windowsill itself.
Practical care tips
For optimal functioning, careful and constant care of the surface of the window sill will be required. A number of practical care tips will help owners:
- The surface must be constantly cleaned from accumulations of dirt and dust, paying close attention to seams and joints.
- When organizing a work area, washing area and mini-garden, it is worth protecting the window sill from moisture. To do this, it is not necessary to cover the surface with moisture-resistant solutions. It will be enough to use special PVC films with a beautiful ornament or plot image.
- When arranging a recreation area, maximum attention should be paid to the safety of the site: the strength of the frame, opening the sash only in a vertical position (especially if there are children and pets), the absence of sharp corners, cuts, and notches.
A rational approach to the arrangement and constant care of the surface will allow you to get a comfortable place to relax or additional work space.
Traditional rules for converting a window sill into a functional tabletop and recommendations from practitioners
When starting to redevelop the area under the window, do not forget to use several rules:
- According to the standard, heating radiators are installed under the window. It is important that after installing the countertop-window sill, air can circulate freely here. That is, the minimum distance from the edge of the battery is 5-8 cm. If the surface will play the role of a full-fledged table, then it is better to make small round holes in it closer to the edge from the window. This way, warm air will freely pass to the slopes and double-glazed windows. This will protect them from the formation of dampness and mold.
- When trying to organize cabinets under the windowsill, do not forget that their doors should be perforated, ideally lattice. This will prevent disruption of the heating function. Moreover, the inside cannot be heavily loaded with dishes.
- With a countertop and built-in cabinets, the temperature in the kitchen will drop by 2-3 degrees during the heating season. This situation can be circumvented by installing an additional radiator or underfloor heating system. Sometimes the expended temperature is compensated by the operation of household appliances: refrigerator, washing machine, dishwasher. They will transfer some of the heat to the room.
- If you are organizing a work area under the window or even a sink with a countertop, then paint the window slopes with moisture-resistant smooth paint. Splashes that fly during cooking can be easily removed with a damp sponge.
- You should not install the stove on the work surface near the window. This is prohibited by sanitary standards and is inconvenient.
- The material for the countertop must be wear-resistant. After all, it will be subject to vibrations, shocks, moisture and regular temperature changes. For this purpose, try to choose natural stone. It has a seamless surface and is resistant to culinary work.
- The space near the window in the tabletop area should be well lit. Additional light sources are not required if the opening faces the bright side, where nothing blocks the sunlight.
- From time to time (for example, in sunny weather), you can close the window opening with roller blinds or curtains. Just remember that the latter get dirty quickly and are more difficult to wash.
- In the window area, you can narrow the tabletop and make it curved. After all, if the window is far away, the additionally organized space will look impractical.
Photo of window sills in her kitchen
Note!
Kitchen in light colors - overview of interiors in loft, hi-tech, minimalism and Scandinavian styles (photo + video)Photo wallpaper for a children's room: rules for choosing, recommendations for combination, photo and video tips for a boy's and girl's room
How to choose the right washable wallpaper for the kitchen: video instructions, tips and recommendations from craftsmen and designers