The range of modern finishing materials stores is stunning. Just 20 years ago, our compatriots chose the method of finishing surfaces in their homes between painting, whitewashing and wallpaper. Currently, there are many options for decorating walls and ceilings in rooms with a wide variety of purposes. Not least popular is finishing material such as wall panels. In this publication, we would like to highlight options for finishing surfaces using wall panels, types and methods of installation, and combination with other finishing materials.
Advantages and disadvantages of wall paneling
Before you start choosing finishing materials, you need to find out all the pros and cons of specific options. In the case of wall panels, the advantages will be:
- wide selection of panels in the budget segment;
- durability and strength of most options;
- ease of installation and replacement of damaged fragments with new ones;
- ease of care without the use of special products;
- heat and sound insulation properties (especially in combination with additional insulating materials);
- Possibility of installation without preliminary leveling of the surface;
- the ability to hide various wires, pipes, etc. behind panels.
Of the disadvantages of panels for wall decoration, repair specialists note only one - their ability to reduce the footage of the room by several centimeters. The fact is that in addition to the thickness of the material itself, it is necessary to take into account the depth of the sheathing for its fastening, especially in cases where the walls initially have significant unevenness. For a balcony or loggia, corridor or storage room, this nuance can be a decisive factor when choosing a finish.
Rules of care
It is not difficult to care for wall panels made of any material; you just need to follow simple recommendations:
- waterproof boards can be washed and wiped with a cloth or brush using mild detergents;
- Do not use abrasive or chemically aggressive substances for cleaning, which can damage the top decorative layer;
- Dry cleaning with a cloth or vacuum cleaner is allowed;
- After showering, the panels should be wiped dry.
Such wide possibilities for decorating rooms and premises of various purposes and styles are provided by finishing with wall panels. The room is transformed before your eyes, the walls look neat and luxurious. The wealth of textures will satisfy the most demanding and daring designer.
Types of panels for interior decoration
One of the main advantages of wall panels is the large selection of models made from different materials and with different appearances. This makes it possible to use an inexpensive finishing option even for modern design projects. Let's take a closer look at what types of wall panels exist, what their features are, and in what cases it is best to use them.
Some types of panels are made to imitate various natural materials: stone or brickwork, wood. These types include PVC, MDF, gypsum boards.
PVC panels
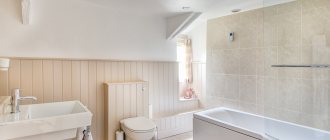
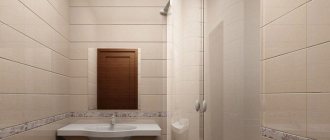
Plastic panels are perhaps the most popular option for quick and inexpensive finishing. They are used for non-residential and residential premises. Of course, such material is not suitable for a bedroom or kitchen, but it is just right for finishing a balcony, corridor, or bathroom.
Advantages of plastic panels:
- durability;
- moisture resistance;
- ease of installation;
- environmental friendliness;
- low cost.
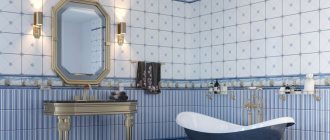
Such panels can imitate any surface - stone, brick, wood. The color palette of most manufacturers is also wide.
One of the disadvantages is that over time the paint of such material can fade. This is especially true for panels that are constantly exposed to direct sunlight - on a balcony or loggia, veranda.
It is worth clarifying that there are several types of plastic panels: lining, panels themselves, sheets. Each of them is used in accordance with the characteristics of the room.
PVC lining 10x100x3000
Current prices for your city:
MDF panels
MDF is a board made from wood chips pressed under high temperatures. A special manufacturing technology helps eliminate some toxic substances such as phenol and epoxy resin from the material. This means that MDF panels can be used even in residential premises.
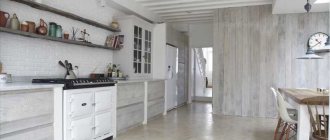
Decorating the hallway with MDF panels
Lamination adds aesthetic appeal to such panels. Most often, the film pattern imitates the structure of natural wood or stone, but some manufacturers also have more original color options.
Wood-effect MDF wall panels
Advantages of MDF panels:
- strength and durability;
- moisture resistance;
- ease of care;
- relatively low cost;
- ease of installation.
General recommendations
In addition to installation with glue and lathing, there are several other methods that professional workers use. But they have not become widespread. In conclusion, we can give some general advice:
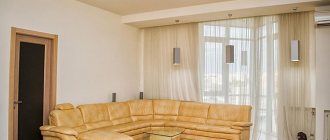
- The panels are recommended for finishing balconies, loggias, bathrooms, hallways and living rooms. For bedrooms and children's rooms, you should pay attention to more breathable materials.
- It is best to use seamless plastic in rooms with air conditioning or a forced ventilation system.
- In a bedroom for adults, it is permissible to use the material for certain sections of the walls.
- It is not acceptable to use the elements in the kitchen. In this case, grease and other substances will settle on the surface of the panels, which will become an excellent breeding ground for bacteria.
Methods of fastening wall panels
There are different ways to attach panels to walls. Some of them are suitable for almost all varieties. Namely:
- For adhesive composition - this method is suitable for light-weight panels and a more or less flat wall surface;
- Gluing to the sheathing - this method is rarely used and is suitable as a temporary measure (it is better to use more durable methods of fastening);
- Fastening with self-tapping screws - for this method, the sheathing is also mounted. The downside is that due to the natural expansion process of the material and the rigidity of the fastener, the panels may unexpectedly crack;
- Using clamps - such fasteners are first mounted on the sheathing using self-tapping screws or nails, and then the panels are secured to them. The connection is aesthetic and durable.
What tools will you need?
It is worth preparing to work with PVC panels. First of all, you will need to find a special tool:
- Circular Saw. If you can’t find it, you can use a jigsaw. The file or disk must have fine teeth (“clean cut”). It is preferable to use a saw. The jigsaw file is highly flexible, so the cut can turn out wavy.
- Jigsaw cutter with angles of 45 and 90 degrees.
- Construction stapler for cladding on wooden sheathing.
- Rubber mallet with a hook rule. The same tool is used for installing laminate flooring. Needed to “rip out” jammed panels. Doing this with your hands can easily damage the panel or sheathing.
- A plaster spatula used to bend the finishing profile when installing the last plank. Spatula length 80-120 cm.
Also when performing work you will need:
- pencil and tape measure;
- building level;
- square;
- fastening elements (self-tapping screws, dowel-nails, clamps);
- screwdriver;
- perforator;
- sealant;
- antiseptic.
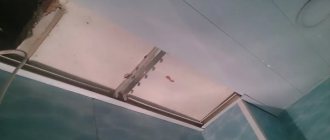
Ceiling methods
Installation of panels on a rough ceiling
The rough ceiling does not require special preparation. The finishing elements are laid as follows:
- Treat the surface. Antiseptic compounds are applied to the base and left until dry. It is recommended to install a waterproofing material, such as polyethylene film. The joints are taped.
- Measure the distances between walls located opposite each other. The skirting boards are cut so that when two parts are combined, an angle of 45° is formed. It is not recommended to fasten the part with self-tapping screws. When installed on an uneven surface, the additional element will sag. Liquid nails are used for fixation. At this stage, only 3 skirting boards are installed, the fourth is installed after laying the cladding.
- Panels are cut. The element fits into the plinth by 2 cm. Having measured the distance between the walls, add 1.5 cm to the resulting value. The remaining 0.5 cm makes installation easier.
- Re-measure the ceiling. If there are minor errors, they are eliminated by changing the size of the gaps between the lamellas. It is recommended to align the panels in hidden places. Open areas must have smooth joints.
- The end of the lamella is inserted into one plinth. The element is slightly bent and the second end is inserted into the opposite profile. The long side is inserted into the third plinth.
- Pressing the lamellas tightly against each other, they are fixed with staples. The more tightly the elements are installed, the stronger the connections will be. When fixing on an uneven ceiling, pieces of plastic are placed under the end of the panel. This will help prevent cracks from appearing.
- After installing the entire elements, measure the width of the uncovered part of the ceiling. Taking into account the obtained value, the material is cut using the previously selected method.
- The lamella is inserted into 2 skirting boards. One edge is connected into a lock, the second is secured separately. The element is fixed with liquid nails or self-tapping screws.
- The fourth plinth is removed from the base part. The remaining part is treated with glue and installed on the wall.
Installation of panels to the ceiling on a metal frame
This method is used when finishing an uneven ceiling yourself. The work is carried out as follows:
- Mark the installation locations of the supporting profiles. The parts are placed in increments of 0.5 m. If there are pronounced irregularities, hangers are used. They are mounted in the same way as on the walls.
- 3 skirting boards are glued using liquid nails. If there are no right angles, the cuts will have to be adjusted. The plinth is attached both to the wall and to the metal frame. After applying the plastic element, it is removed for 2-3 minutes. After reinstallation, the correct position is checked with a level. The corners are sealed with sealant.
- The ends of the lamellas are inserted into the baseboards. The finishing material is laid along the long side of the ceiling. This reduces the number of cuts and waste. The plastic sheathing is attached to the profiles with self-tapping screws. To prevent the screwdriver bit from coming off from damaging the finish, place a metal spatula on the ceiling when screwing.
- The finishing panel is cut, taking into account the dimensions of the uncovered part of the ceiling. The back side of the fourth plinth is removed. The remaining parts are lubricated with glue and pressed to the base. After the glue has dried, they proceed to placing the lighting fixtures.
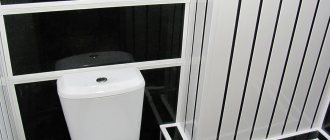
Fastening plastic panels to the ceiling in the bathtub.
How to install panels when mounted on a ceiling diagonally
This idea is difficult to implement. Installing the frame and adjusting the cladding elements is a labor-intensive process. The work is carried out as follows:
- Determine the area of the base and the longest length of the lamella. To do this you need to measure the diagonal of the ceiling. The volume of waste when using this installation method increases, so the material is purchased with a reserve.
- 3 skirting boards are installed in the standard way. When the glue dries, the height of the additional elements should not change.
- The end of the panel is cut at an angle of 45°. The second end of the lamella is cut off at the same slope. The result will be a starting element with the shortest length. It is installed in the corner.
- Measure the length of most of the installed part. This is how the length of the shorter side of the second element is determined. Markings are applied to the panel and cuts are made. Use the same method to cut and fasten the remaining parts. You can see what the ceiling will look like in the photo.