The kitchen is one of the most important rooms in any apartment. Every housewife, entering her kitchen, wants to feel comfortable and therefore, during renovation, she needs to carefully consider how to make something better. For yourself, you must decide what the ceiling should be? Since during cooking all the vapors settle on the surface. The ceiling should not only be beautiful, practical and visually enlarge the room, but also easy to clean. In this article we will talk about ceilings made of plastic panels.
Ceiling panels for kitchen
Advantages of ceiling panels in the kitchen
The main advantages of plastic ceiling covering for the kitchen arise from the properties of this material, for example:
- Plastic is a non-hygroscopic material and will not absorb water, the advantage of this in the kitchen is that the steam will not be absorbed by the upper part of the room. So, unlike a traditional plaster ceiling, which can become moldy from absorbing steam, plastic structures will not deteriorate;
- Plastic structures are easy to clean using any household cleaner or a damp/dry cloth;
Ceilings in the kitchen
- They do not require painting. Plastic ceilings in the kitchen are supplied in the chosen color, ready for installation;
- Easy to install. Plastic ceilings are easy to install with limited tools. A competent worker can install a plastic kitchen ceiling in a few hours with just a hand saw, screw drill or staple and a glue gun. It can be installed over an existing plaster ceiling;
Plastic in the kitchen
- Plastic panels can be installed with ceiling lights and also serve as a way to hide wiring. Recessed lights, also known as spot lights, are one of the popular new fixtures in bathrooms and kitchens, but require additional wiring and holes to drill. They will hide various damage to the existing top covering caused by installing a ceiling light, so you don't even need the previous covering to be removed;
Ceiling with spotlights
- Plastic ceilings in the kitchen can be installed on a wooden or metal frame;
- This ceiling can be used as a suspended ceiling (to hide some elements of the room’s design).
Why plastic material?
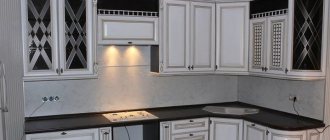
Plastic is optimal as a ceiling material for the kitchen. Installation is extremely simple and accessible to everyone. The kitchen will be transformed immediately. Look at the photo and make sure that PVC looks harmonious in the interior, looks neat and aesthetically pleasing.
Plastic panels for the ceiling
Advantages of PVC panels:
- Reasonable price. Plastic material is inexpensive, so anyone can design such a ceiling.
- The ability to obtain an extremely quickly finished surface.
- Easy installation. It involves constructing a frame on which PVC panels are mounted. Installation is completed in a day.
- Possibility to choose a frame made of wood or metal.
- Resistance to high humidity. The material is not afraid of water and interacts with it for a long time without problems.
- Ease of care. It’s easy to keep clean using a damp cloth and your usual detergents.
Ceiling made of plastic panels
These advantages make plastic ceilings popular, and photos will help you verify its aesthetics. The material also has disadvantages. These include loss of color over time and the appearance of seams. Some people believe that the appearance of plastic is far from homemade.
Attention!
Give preference to high-quality panels that do not look cheap and will last longer.
PVC panels suitable for installation on kitchen ceilings
Disadvantages of ceiling panels
Like any product, it has its positive and negative sides. A person chooses what is best for him. The quality of materials plays a very important role. Let's take a closer look at what the disadvantages are when choosing plastic strips for the ceiling:
- Due to their design and material, heat can damage the top. This means lighting must be energy efficient and not produce more heat than required. LED bulbs etc. must be installed;
- Due to the fact that plastic parts are installed, the connecting lines between each board may be visible;
- When plastic ceiling strips are new and installed, static charge can build up on the surface of the boards. This charge is not enough to cause harm, but is enough to attract dust and dirt. This is easy to clean, but may take a day or two for the static charge to dissipate;
- Once a plastic ceiling is installed, you cannot change its color; if you want to change the shade, a new cladding will need to be installed.
How to recognize quality material
First of all, focus your attention on the PVC ceiling panels. Wall panels are thicker, denser, but not light enough to finish the ceiling. A high-quality panel does not deform when pressed or bent, quickly restoring its shape - check this by squeezing the end cut with your fingers.
Also try to bend the edge of the panel - it should not crack, much less break off.
If you notice unevenness, nicks, unclear coating on the panel, a violation of the correct geometric shapes, or feel an unpleasant and pungent odor emanating from it, immediately move on to another type. The presence of each of these points indicates the low quality of the material.
Important: purchase several more panels than you need according to your calculations. They can be useful both during installation and when it is necessary to replace the panel.
Plastic ceiling: installation features
Plastic boards are a type of suspended ceiling. Suitable for this material is a metal strip, which is assembled from profiles. If desired, the frame can be made of solid wood.
Installation on wooden planks
Before installation, calculate the amount of materials needed. To do this, you need to calculate the surface area of the ceiling.
How to calculate the number of ceiling panels for a kitchen
Repair is definitely not an easy time for every person. In order for everything to work out perfectly the first time, you need to carefully measure the entire surface on which the ceiling panel will be installed.
It all starts with calculating the area of your room. First, determine whether your room is level. If it resembles an even rectangle, then simply multiply its width by its length. If the room is of an unusual shape, you need to divide the ceiling into several simple shapes, calculate their areas and add them together.
For example, in this case the space has a diagonal wall. To calculate area:
- Let's decompose it into a rectangle measuring 2 x 4 m, and a right triangle with legs 1 m and 2 m;
- the area of the rectangle is 2*4=8 m2;
- the area of a right triangle is equal to half the product of the legs: 0.5*(1*2)=1 m2;
- we add up: 8+1=9 m2 – this is the area of our room (and, accordingly, the ceiling).
Sequence of installation of plastic plates
- Start with the starter profile design. Make sure it is level. Use a level.
- Attach the cross-section elements. To fix it, use special hooks.
- Attach one strip to the drawer. To do this, use self-tapping screws.
- Install the remaining panels in the same way.
Installation of a plastic plate
Selecting panels and calculating the amount of materials
Among the wide range of PVC panels on the construction market, it is easy to choose the right finish. The slabs come in one color or with a pattern. They can be smooth, embossed, matte and glossy. The surface can imitate wood and other materials.
In addition to the color and surface texture, the cladding should be selected according to overall dimensions. The width of the slabs ranges from 25-37 cm (there are sheets 60 cm wide). The length varies from 270 to 300 cm. The thickness of the material ranges from 0.5-1 cm. Thickened elements are best used for wall decoration, and thinner sheets are suitable for ceiling cladding.
To calculate the required amount of material, do the following:
- Calculate the ceiling area. Then divide the resulting value by the area of one panel. Increase this number by 15%. This reserve is needed for trimming the material.
- Since the suspended ceiling is attached to a supporting frame, materials for its manufacture will be needed. The frame can be made of wooden blocks or metal profiles. The load-bearing elements are installed in 60 cm increments, so it is easy to calculate the total number of slats.
- Along the perimeter of the kitchen, you need to attach a guide profile or supporting beam to the walls. The length of this element is determined based on the perimeter of the room.
- You will also need a plastic baseboard. The need for skirting boards depends on the perimeter of the kitchen.
To attach the frame to the ceiling, you need perforated hangers. One hanger is installed for every 0.6 meters of sheathing. In addition, to attach the panels you will need self-tapping screws or staples for a construction stapler.
Types of plastic for ceiling finishing
What types of plastic plates are there:
- Rack panels. Their thickness ranges from 5 to 10 millimeters and width from 10 to 40 centimeters. The length ranges from 2.5 to 6 meters. Rack panels are cheaper than most;
- Tile panels. They have a square shape with a side of 30-100 centimeters. Along the perimeter of the tile there is a mounting flange through which the panel is attached;
- Leaf stripes. The width is usually 0.8-2 meters. The length of the leaves ranges from 1.5 to 4 meters. Profiles are installed at the junction of the strips.
To create a comfortable and attractive look for the room, it is important to determine the range of colors of plastic panels.
When you choose texture and color panels, turn to the professionals. If the room is in a classic style, choose cream or light panels. In other cases, you can use different colored sheets.
Design selection
What panels will you be pleased to see on your ceiling? Here's what they can be:
- shiny glossy;
- rough matte;
- plain
- colored;
- with contrasting frame;
- with mirror stripes;
- with alternating stripes of different colors;
- marbled;
- under the tree;
- under the skin;
- with an image
- with ornament.
The color scheme and style of your kitchen will help you make the right choice.
For example, if the entire room is predominantly made in one color, PVC panels of a lighter shade will look harmonious. Or, thinner stripes on the ceiling will duplicate the color of the kitchen unit, and those that are thicker will match the color of the walls.
The creation of a holistic space is facilitated by PVC wall panels of the same color and texture. But for some, the same design of walls and ceiling may seem too monotonous and boring.
If your kitchen is located on the sunny side, you can “cool it down” slightly with cool shades of gray or metallic. Otherwise, you should give preference to warmer tones.
Gold or silver, alternating with white, mirror stripes will give your kitchen a sophisticated look and create a harmonious environment, moderately reflecting all interior items. Panels with a pattern can create excessive variegation, but they will look good as inclusions on a plain background.
The main accent on the ceiling can be a beautiful chandelier with stained glass windows. Square, round or a more funky shape, it will not only look great on a plain ceiling, but will also fill your kitchen with an unusual color palette.
What else can tell you the best colors for ceiling panels? The colors of the floor, table and chairs, household appliances, kitchen apron and, of course, your taste preferences.
In addition to the color, you need to choose the width of the panels.
It can vary from 12.5 to 50 cm. Although panels made of wide plastic help create a solid, monolithic space, they are not so convenient to work with, because they are usually less flexible.
The optimal width is 25 cm.
Ceilings in light colors are best suited for the kitchen, which will make it more spacious. The glossy surface creates additional depth and will serve as a pleasant bonus for low rooms.
Taking into account the characteristics of the kitchen, white panels will quickly lose their immaculateness and will require more frequent cleaning.
They might be worth it because... These ceilings look really very beautiful and modern. Panels in light gray, brown or warm yellow (vanilla) shades would be practical for this room.
If PVC panels hide all the curves of the ceiling, then uneven walls can be hidden with molding or ceiling plinth. Plain, in the form of a plank, or decorative, embossed, it will give the transition between the ceiling and the wall a more neat and comfortable look.
What about two-level designs using several types of panels that contrast in color? Contrary to popular belief, this is quite possible, as evidenced by the photos below.
Placed at an acute angle or perpendicular to each other, plastic panels will add volume to the ceiling, divide the kitchen into zones or act as an addition to the interior.
How to prepare the surface for installation
Before starting the installation, you need to take care of installing the wiring and all devices. Then you need to pre-prep the surface. It is recommended to clean the ceiling from dust and eliminate unevenness using plaster. Take care to additionally protect the surface from fungus. Treat the surface with special mixtures that will disinfect and prevent the appearance and development of microorganisms.
Preparing to install plastic sheets on the ceiling
You also need to determine the height of the net attachment. It is recommended to install the panel at a distance of 7-9 centimeters from the base surface.
The principle of installing sheets on the ceiling
Before installing ceiling strips, it is necessary to eliminate defects in the base surface.
Installation technology
If you are making a ceiling from PVC panels in the kitchen with your own hands, then start the work by preparing the base. You need to remove the old finishing material from it, which does not adhere securely to the base. Surface areas affected by fungus are well cleaned and treated with antiseptics.
How to fix and cover a balcony ceiling with PVC panels with your own hands
Important! At the preparatory stage, lay utility lines under the ceiling and prepare installation sites for lighting fixtures.
Materials and tools
The following materials, devices and tools will be useful for the work:
- ladder;
- construction level;
- plastic panels;
- PVC plinth;
- for the manufacture of lathing you need wooden slats 40x20 mm or metal profiles;
- perforated hangers;
- metal corners for connecting wooden frame elements;
- screws and dowels;
- to attach the panels to the wooden sheathing you need staples and a construction stapler;
- metal screws will be needed to fix the sheathing to the metal frame;
- perforator;
- hammer;
- screwdriver;
- pliers;
- drill;
- laser level;
- square and pencil;
- tape measure and ruler;
- wood hacksaw;
- special scissors for cutting metal;
- stationery knife.
Installation of sheathing
First of all, the ceiling sheathing under the plastic panels is installed.
The operating procedure is as follows:
- We determine how much the ceiling will drop and set this distance down from the lowest corner in the kitchen. Using a laser level, we make this mark on the remaining corners of the kitchen. Connecting the marks, we draw horizontal lines on the wall.
- We attach a load-bearing wooden beam along the lines on the wall surface. We fix the element with dowels and self-tapping screws, installed in increments of at least 300 and up to 500 mm.
- On the ceiling surface we mark the installation locations of the longitudinal elements. We attach perforated hangers along these lines in 0.6 m increments.
On a note! If the base is fairly level and the ceiling drops slightly, you can omit the use of hangers and attach the beam directly to the base surface.
- After this, using corners, we connect the longitudinal slats with a wooden beam installed on the walls around the perimeter. In the middle, we attach the slats to perforated hangers.
Panel installation
First you need to secure plastic skirting boards around the perimeter of the room. This element has a special groove for installing panels and at the same time serves as a starting strip. We fasten the skirting boards with self-tapping screws to the wall so that the part is closely adjacent to the beam or guide profile installed around the perimeter of the kitchen.
Then we install the panels in the following order:
- We cut the element to the length or width of the room, depending on the direction of the frame slats. The panel is fastened across the slats. The length of the slab should be 0.5-1 cm less than the distance between the walls.
- We mount the first element with a tenon facing away from us, placing its ends into the grooves of the baseboards. We push the slab point-blank up to the wall so that the tenon fits completely into the groove of the plastic plinth. We screw or staple the shelf of the tongue-and-groove joint on the other side of the panel to the sheathing.
- We install the next slab in the same way, inserting its tenon into the groove of the previously installed element. We also attach the panel to the frame.
- We cut the last slab to length and width. First, we insert it with the ends and the cut side into the grooves of the baseboards, and then we push it back a little so that the tenon of the plate fits into the groove on the previous element.
If you are making a ceiling from PVC panels with your own hands, a video of the process will help you clearly understand the installation technology.
Attention! If you plan to install built-in lamps, then holes for them are cut during the installation of the slabs.
How to care for ceiling panels
Ceiling tiles differ precisely in that they are quite easy to clean up, regardless of the level of contamination. We offer you some tips for cleaning your kitchen ceiling and getting rid of grease and dirt.
Panel care
Vinegar is a great grease killer that is also much cheaper than any liquid grease on the market. Mix equal parts hot water and vinegar in a spray bottle. Spray the mixture onto the ceiling and let it work for a few minutes.
Rinse with a damp cloth and then wipe with a dry cloth.
Lemon is another home method. Place the juice of 4 lemons in a saucepan and bring to a boil. The lemon steam will act as a degreaser, softening the dirt on the ceiling so that you can remove it more easily with a damp cloth.
It is recommended to clean the ceiling a little at a time rather than trying to wash it all at once. Otherwise, the grout will fall and stain your kitchen floor.
Options for attaching panels to wood sheathing
There are two options for attaching the plastic trim to the frame - using short screws or staples. The first option is used for installing plastic panels on a metal frame. For fastening, use short metal screws with flat heads. The slab is fixed to the wooden frame with staples.
In any case, the fastening element is screwed or shot into the upper flange of the groove, which is adjacent to the frame. Fasteners are installed only in those places where the longitudinal slats of the sheathing pass.
The material is old and proven, or drywall in your kitchen
Sheets of plasterboard in the kitchen are an opportunity to create a ceiling of different shapes and at several levels, to combine with other building materials. You should choose one that can withstand high humidity, will not crack, or crumble over time, that is, moisture-resistant drywall.
Its high quality is ensured by fiberglass and polymer additives that prevent both the filler (gypsum) and the cardboard outer layer from getting wet. Even when in water, the sheet filler does not swell, therefore, does not increase in volume and does not damage the uniformity of the cardboard layer. Therefore, such a ceiling will “survive” even water hitting the surface!
Plasterboard ceiling
However, it is worth remembering the features of installation and subsequent work, which are not so cheap. This:
- fastening to a metal frame base. Wooden is not suitable due to the characteristics of the room;
- costs for connecting elements, etc.;
- sealing seams, painting them with special paint.
Only after this can you decorate the ceiling by choosing one or another finishing material. And it turns out that with a plasterboard ceiling there is a lot of additional hassle, which can be avoided with other materials. Therefore, it is worth choosing between the possibility of hiding defects in the ceiling surface, the comparative cheapness of the sheets themselves, the long service life and the possibility of flooding by neighbors above, and the need for periodic updates. You decide!
Attention! Despite the stated moisture resistance parameters, many moisture-resistant plasterboard ceilings develop mini-cracks and crevices over time. To avoid this, you can use special movable two-level CD connectors during installation, but they will significantly increase the cost of the work.
Frame installation method
Before you begin installing the ceiling panels, it is necessary to carry out preparatory work and remove the excess layer of plaster. After this, a rigid frame should be installed around the entire perimeter. The location of the profile is marked with a marker. The height of the structure is selected taking into account the utilities that are planned to be hidden in the box. Then the crossbars are installed and the plastic is cut. To do this, you can use a jigsaw, hacksaw or sharp knife.
Ceiling panels are installed one after another, starting from the wall. The very first element is installed flush against the guide profile. All subsequent plastic fragments should be pressed firmly against each other and secured with self-tapping screws.
The most difficult part is installing the edge panel; it must be cut to size before installation.
The frame can be made of wood, plastic or metal. Suspended ceilings are well ventilated, making them ideal for rooms with high humidity levels. In addition, it is easy to install spotlights in the ceiling structure, allowing you to create lighting in the room that is as comfortable as possible for the eyes.
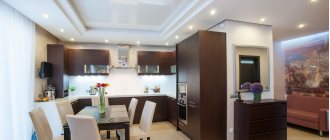
Classic options
Drywall
Drywall is a common material used in ceiling decoration. It is used to construct single-level structures and beautiful multi-tiered systems. The main advantage is the figured design of the ceilings. Various shapes and elements are cut from gypsum plasterboard. Curved lines, circles, ovals, waves can be made from a sheet of drywall.
For additional decor, choose lamps that are mounted in levels. Between the devices, gypsum boards are painted in different colors to maintain the main atmosphere of the interior. The surface of a plasterboard structure, in addition to painting, is decorated in other ways: covered with wallpaper or tiles, finished with decorative plaster.
Stretch ceiling
With two-level stretch ceilings, the kitchen will become stylish and beautiful, because PVC film has many more decorative possibilities. Types of textures, a range of amazing shades, photo printing - these are part of the advantages of vinyl canvases. By combining two or more colors, you can zone the space, separating the dining area from the food preparation area.
Two-level stretch ceilings also perform a practical function. With their help it is easy to level the ceiling surface and disguise the wiring. This design will improve the heat and sound insulation of the room and will provide reliable protection against an unexpected flood. A suspended ceiling mounted on two levels looks much more attractive than a multi-tiered plasterboard structure.
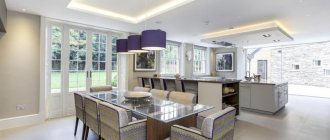
Photo of an example of lighting in the kitchen
Proper lighting will further enhance the decorative properties of two-level ceilings. Illumination with an LED strip, a themed lamp over the dining table, and spotlights in a plasterboard niche will allow you to achieve a stunning result that will surprise guests and put the owners in the mood.
Ceiling with a picture photo
Typically, suspended ceilings are made from canvases of two contrasting shades. However, today, ceiling design ideas are common, when structures are decorated with PVC film with thematic designs. In tandem with another level, such a masterpiece resembles an artistic painting in a frame. If you need to add a touch of nature to your interior, choose a canvas depicting an azure sky or a forest landscape.
Rack and pinion
Narrow plastic ceiling slats are ideal for decorating a compact kitchen and will organically fit into the interior concept. Among the advantages of panels are:
- fire resistance;
- moisture resistance;
- resistance to sudden temperature changes;
- are not afraid of mold;
- combined with lighting devices;
- life time;
- ease of care.