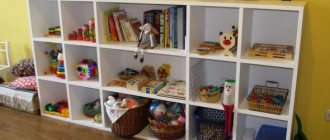
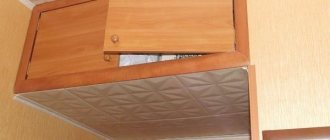
A children's shelf, which you can make yourself, will definitely come in handy in a room for storing small items. A children's shelf is used as additional storage space. It allows you to put necessary or beautiful objects in a prominent place. Most often these are small things: books, toys, photographs, various souvenirs. Such pleasant little things are not only always at hand, but also decorate the room. And you can make a shelf for them with your own hands from scrap materials, spending literally one day on the work.
Original shelves for a children's room: a selection of ideas
The wall shelf has a simple design, so when making it you need to think about an interesting design. Of course, you can get by with an ordinary board attached at the corners to the surface, but such a product will not decorate the interior of the nursery and will certainly upset the child.
You can easily get acquainted with interesting options for children's shelves on the Internet.
Before you start making a shelf, you need to ask your child what toys he wants to place on it. You can ask questions about the color of the structure, its shape, etc. Children from an early age have an excellent imagination, so a product made according to their ideas will be truly original.
Inspiration for creating your own shelf can be gleaned from a small selection of ideas:
- Figured product. Not the most practical, but very beautiful shelf, which is made using a jigsaw.
- Hanging house. A girls favorite design for folding dolls and books.
- Hanging shelf decorated with ropes or straps. A design element that will become a real decoration for a boy’s room.
- Hook design. A functional shelf that is suitable for children of all ages. Used as a hanger for clothes, medals or jewelry.
To make shelves, you can use any available materials. For example, sheets of plywood, drywall, boxes, old boxes, chests and even skateboards. The more unexpected the choice of material, the more original the product will be.
It is important to consider the size of the room. The ideal solution for a small room would be homemade corner shelves that allow you to make the most of the space.
Types of shelves
Depending on the installation, shelves are divided into wall-mounted and floor-mounted. Hanging shelves in a nursery, as a rule, serve as decorative elements. They are mounted on special brackets or decorative pipes directly to the ceiling.
Wall shelves do not clutter up the space and save useful space in the room
The floor shelf can be easily moved to another location
Depending on the design and design, shelves are divided into corner, straight and non-standard or combined designs, consisting of several sections, which can, if necessary, be supplemented with hinged or sliding doors.
Corner
Using corner shelves in the interior is perfect for small children's rooms. They will help save free space, as well as smooth out corners, and make the interior of the room softer and more comfortable.
Corner models cope most successfully with the task of saving space
Corner shelves placed from floor to ceiling will help to visually raise the height of the ceilings - this is a great option for rooms with low ceilings. Such models placed in a window opening look very attractive. You can complement them with a comfortable soft sofa for reading with a beautiful view from the window.
Built-in corner shelves - a practical and functional solution
Direct
Straight shelves will help make a room visually wider or longer. Such models are most often placed above a bed or desk.
Straight red and white shelves as a bright accent in a boy's bedroom
By connecting several shelves together with metal decorative tubes, you can design a chic floor shelf for books in a child’s room.
For teenagers, you can use chains and straight shelves to create a hanging composition in a marine style. You can also use a rope as a fastening. The shelves will look very stylish and impressive, especially in combination with nautical-style decorative elements: shells, clocks or sailboat models.
The simplest shelf in a nautical style is a panel attached to ropes
When selecting shelf models, three main factors are taken into account:
- Functionality - the expected load and weight of what will be stored on the shelf (stuffed toys or school textbooks).
- Dimensions: the longer the shelf, the more it can hold; such models are great for creating wall shelves.
- Design: the shelf can stand out with non-standard shapes, have open or closed segments, and can be visually airy and light.
DIY narrow shelf for books made from planks
Books can not only enrich a person’s inner world, but also decorate a room. Bright covers placed on the shelf will become an original decorative element that will attract all the attention.
To store small children's books, you can make a narrow shelf from planks
The ideal solution for placing books is to install narrow slats. A distinctive feature of such shelves is their width, which allows you to place a book only with the cover first. Such a library will definitely attract the child’s attention, helping to instill a love of reading.
Narrow planks are constructed of three parts: a supporting element, a shelf surface and a small side. Attached to the wall using regular self-tapping screws. This bookshelf can also be used to display a collection of cars or store souvenirs.
Interesting ideas: shapes and placement
Wall shelves for a small child's room should not be placed very high, but so that the child can reach them from a low chair or his bed. If there are drawers on the shelves, they should open without effort, and the doors should be light so that the child does not get his fingers pinched.
For kids, it is better to choose bright colors and interesting shapes:
Classic honeycomb-shaped niches located on the walls look very good. The child will be happy to place his toys and books in such niches. In the future they will be replaced by technology, discs and other teenage things.
You can place honeycomb shelves in any order, creating interesting shapes.
There are no shelves in the room in the photo below: they were replaced by interesting baskets in which children put stationery, paper and much more. Such improvised shelves do not block access to light, leaving the children room for personal space.
The area of the room in the photo below is only 8 square meters. m, but nevertheless it managed to accommodate two beds and a chest of drawers. Shelves and storage area are placed on the wall. A practical solution that allows you to significantly save space.
Curly plywood shelves: fantasy on the theme of mountains
Curly shelves provide maximum scope for creativity. You can cut out a cloud, a truck, or even an entire landscape from plywood or chipboard. Shelves in the shape of animals or flowers - any child’s fantasy will come true. You can start experimenting with simple designs, for example, making a product with the silhouette of mountains.
A creative figured plywood shelf will help you decorate the interior of a children's room a little.
To work you will need:
- Sheets of plywood or several boards of soft wood;
- Holders made of untreated wood;
- Sandpaper;
- Screws, dowels;
- Drill;
- Level, ruler;
- Pencil and wood paint with brush.
First of all, a drawing of the mountains is drawn on one board, and markings are made for cutting on the other. The blanks are fixed on the table, and a schematic picture is cut out with a jigsaw. Before assembly, the parts are treated with sandpaper.
The structure is assembled using self-tapping screws or regular nails. The main thing is that the attachment points coincide with the location of the holders, which will then hide unattractive elements.
After assembly, the product is painted or varnished and left to dry completely. At this time, the holders are attached to the wall: a hole is drilled, dowels are inserted and screws are screwed. The mountain-shaped blank is placed on top and screwed.
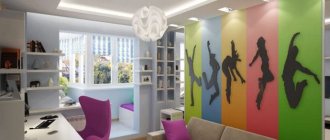
Fresh solutions for a teenager's room
Choosing such a design for a teenager’s room is easier, because your child already knows what he needs. Typically, teenagers choose models made of glass, bright plastic, shiny materials, adapting them to a specific style.
In teenagers' rooms, strict shapes predominate - squares, rectangles, minimalist thin shelves. The rooms are dominated by restrained shades or one selected interior style, which the teenager meticulously adheres to. True, it should be noted that teenage girls treat their rooms more tenderly, retaining a drop of childhood in them, while boys try to grow up faster, furnishing the room “like adults.”
Girls usually have a lot of things in their rooms, so shelves are definitely not enough here. Don't miss our article on how to choose a wardrobe for a girl.
A small room with an original shelf for a teenage girl.
How to make a shelf on the wall with your own hands: design with straps
Wooden shelves with straps are suitable for storing toys, phones, books or crafts from kindergarten. This design will be a great addition to the interior of a boy’s room.
The shelf, which is made of boards and belts, is distinguished by its originality and unusual design.
To work you will need:
- Two leather belts;
- Board;
- Sandpaper;
- Screws, drill.
First of all, the board of the required size must be sanded until completely smooth. Then, if desired, paint or varnish.
All metal parts are removed from the belts: rivets, buckles, etc. It is better to take a leather product - the fastening will be more durable.
Small holes must be drilled at both ends of each strap, then folded in half to form loops. Attach to the wall so that the distance between them is not much less than the length of the shelf. Then insert the board parallel to the floor. For better fastening, the belt can be secured with several screws on the underside of the product.
General recommendations
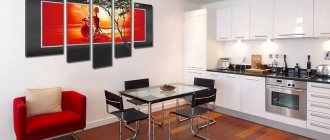
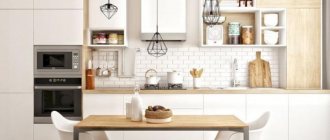
Beautiful shelves will find their application in any room of the apartment, be it the kitchen, living room, bedroom, hallway or bathroom. With their help, the room will look more lived-in, interesting, and there will be additional space for storing any useful items.
First, decide for what purposes the wall structure will be used, this will help you not to make a mistake with the required dimensions and strength of the device.
A shelf for heavy objects, for example, books, an aquarium, collectible dishes, potted plants, should be as reliable as possible, made of solid materials.
A shelf in the bathroom for storing various cosmetics and bath accessories may not be so strong, but be sure to keep in mind that the materials for its manufacture must be moisture resistant.
Therefore, before starting the process of designing a shelf, be sure to consider the following details:
- full load on the structure;
- fastening method;
- compliance of the materials used with the purpose of the room in which installation is planned;
- product style and design;
- functional.
DIY glowing wooden shelf
A luminous hanging shelf is a design that a child of any age will be delighted with. To make such a magical product, you don’t even need to insert light bulbs or LEDs. All you need is an old relief board with cracks and notches, as well as a mixture of polyester resins and luminescent pigments. This composition should be poured into the recesses of the material and the holes should be sealed with tape.
A luminous shelf made of wood, which you can make with your own hands, will definitely appeal to both adults and children.
When working, the shelf should be parallel to the floor, and the mixture should not spill over the edges of the cracks. This must be monitored carefully.
After drying, the workpiece must be sanded and varnished in 10 layers. Install in any convenient way over a table or bed. Or create a whole system of such shelves. At night, the bookcase will glow mysteriously.
Plastic shelves
These shelves are considered the weakest, as they can bend from the heavy weight standing on them. But now experts have developed plastic that can withstand very heavy weights. So, don’t be afraid or wary of buying plastic shelves.
How to make a toy rack with your own hands
Racks are the most convenient and original designs for storing children's things. You can assemble such a piece of furniture in various ways. For example, glue boxes or crates together. Or cut several blanks of the same length and width from plywood, which are then fastened and decorated with decorative elements to your liking. Ready-made designs of various shapes and sizes can be purchased in the store.
Before you start making a wooden toy rack, you should prepare the necessary materials and tools for the job in advance.
A rack with square compartments (or a whole system of them) is considered an ideal option for storing toys. This design is highly durable and spacious, which is very important for furniture intended for a children's room.
You can supplement the storage system with various containers and drawers. Thanks to such small elements, even the smallest things will always be in their place.
Color scheme and style
After determining the type of shelves for the children's room, you need to choose their color. At this moment, you need to rely not on the personal preferences of the parents, but on the general style, size and lighting of the room, and the child’s desires.
Small rooms are suitable for calm shades - white, beige, light green, soft pink, lemon. They visually expand the area and make the interior unobtrusive. Calm tones are diluted with bright toys that the child can arrange independently.
For bright rooms with pastel-colored wallpaper, brightly colored shelves are suitable - blue, green, red, orange. The choice of shade depends on the preferences of the children and the shape of the shelf. For a cloud it is better to choose blue, turquoise colors, and for a tree green or light green are suitable.
You should not burden the interior with numerous bright elements - this will create a feeling of a crowded atmosphere.
Children's wall shelves are made in several styles:
- hi-tech - light, small structures that are attached directly to the wall;
- modern - products of regular geometric shape;
- classic - rectangular and corner options.
The choice of furniture style depends on the child’s opinion, interests, and hobbies. It is important not to overdo it, but to make the interior simple, comfortable and functional.
Girl's shelf-house: master class on making
A multifunctional dollhouse will be a great gift for a little princess. This design can be used both for playing and for storing various things.
An unusual shelf house will be a great gift for a little princess
To make a shelf house you will need:
- Wood panels;
- Plywood (thickness 10 mm);
- Euroscrews;
- Tools;
- Dye;
- Decoration materials.
The first step is to decide on the design of the future house. There are various options for drawings on the Internet: you should choose any one and use it to make parts from wood panels, which are then fastened with Euroscrews.
Don't skimp on interesting decorative elements. Railings and openings in the house can be made from wooden rulers; ready-made twisted parts can be used for fencing. Window frames must be decorated with corners. Thanks to this, the product will take on a finished look.
The roof can be made of plywood with cardboard “tiles” laid on top. Finish the parts with special acrylic paint. For realism, you can add a flashlight to the veranda or attic of your house by making it from a small light bulb and a lampshade. Hide the batteries in a niche under the ceiling or roof.
Drywall
This type is very rarely used for children's bedrooms. It is unknown why. Probably this material just doesn’t fit well into the decoration of a child’s room.
Shelves are a necessary part of decorating a children's bedroom. After all, they are very convenient for storing things and objects that “clutter” the room.
And on the shelves these things can be beautifully placed and the room will be in order. And various options and styles of shelves for the nursery will help transform your bedroom where your child will live.
How to make a children's toy shelf (photo examples)
Playing out in the interior
Even an ordinary square shelf can become a full-fledged “highlight” in the interior; to do this, it is enough to play with it, showing imagination and ingenuity. Thus, the trend of this season is the uneven placement of simple square structures of various shades and configurations on the wall.
The distance between them can vary from 20 cm to opposite ends of the room
It is important that the number of such modules be more than three or four.
The following technique is also popular: painting the deep walls of nearby shelving compartments in bright contrasting colors. Mirrors inserted instead of backdrops also look luxurious.
Designers often use the technique of visually expanding space by purposefully leaving some sections empty. A free shelf illuminated by a built-in lamp or framed by an LED wire also looks interesting.
Original homemade shelves are always in fashion, while the artificial aging of the material, negligence, massiveness and sloppiness give them charm and originality.
You can decorate the product yourself, which will require leather or leatherette, metal elements, textiles, paper, stencil, tree branches or logs, paints, brushes, glue.
The first step is to think through the algorithm on paper, look at photographs of living room shelves designed by designers, look for ideas on the Internet, prepare the surface and get down to business.
Let's start designing
After you have decided on the model of the wall shelf, found and prepared all the necessary materials, it’s time to move on to the creative process, that is, creating the product.
It is best to adhere to the following algorithm of actions:
Draw a rough sketch on paper, indicating the planned dimensions of the shelf, or even better, a full-fledged sketch of how the future shelf will look on the wall, indicating its dimensions.
Decide on the type of fastening, whether it will be construction dowels, anchors, brackets that can withstand heavy loads, or whether the shelf will be attached to a flexible base, for example, flagella, braided ropes, belts - these fasteners are only suitable for lightweight ones used primarily as a decorative element , shelves
Cut the materials to the required sizes, or, if using store-bought blanks, prepare them for assembly. Proceed with the immediate assembly of all parts and components, attach brackets, hinges or other prepared fasteners to the shelf.
Make horizontal markings on the wall surface to ensure even mounting to the wall. Attach the finished structure to the place allocated to it, check the strength of the structure.
The process of making a shelf with your own hands has come to an end, now all you have to do is display your favorite collection on it, lay out a set of books or any other items for which the shelf was intended.