Paint the walls and ceiling the same color
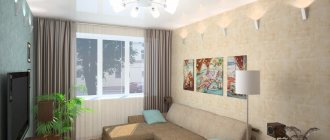
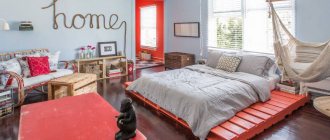
To the popular design solution of painting the walls of small rooms in light pastel colors, you should also add painting the ceiling in the same color. This little trick includes the ceiling in the visual perception of the room as a single space without a sharp, as if chopped off division into bottom and top.
Photo: rilane.com/living-room
Combination of living room and loggia
The interior of the combined room should be light, because the loggia becomes a natural extension of the room. On the combined balcony you can equip a bedroom for the summer period. It is the summer bedroom, since in autumn and winter, even with a warm floor, sleeping near the balcony window will still be cool. Create a home office or craft corner. And lovers of beautiful flowers can set up a winter garden . Equip a summer children's room. Children will be delighted if you hang a hammock instead of a crib. In any case, the design of the combined premises will depend on the purpose of the room. The style of the interior depends on this. For example, a romantic style is made using light finishing materials and miniature furniture. Vintage style is achieved when the walls are brick, the floor is plank and there are a lot of colors. Swedish style is a balcony upholstered in light plastic lining. Country style - wooden upholstery of the balcony walls and wicker furniture.
Choose a floor color close in tone to the color of the walls and ceiling
Calculate the exact cost of repairs using an online calculator
and receive a free detailed estimate for repairs
Calculate
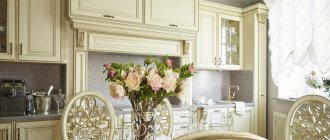
Unlike the ceiling, the floor should not match the color of the walls. It is better to make it bright and expressive, but not contrasting. The floor can be multi-colored, for example from decorative tiles, with one of the shades of the pattern repeating the color of the walls. You can cover the floor with light laminate or parquet, similar in tone to the walls and ceiling.
Photo: vdrhomedesign.com
Combine a bathroom
Most apartments with a standard layout suffer from one drawback: a very small area allocated for the bathroom - toilet and bathtub. Moreover, for some reason, initially these two rooms are separate. As a result, both the bathroom and the toilet cannot be expanded and there is definitely nothing additional that can be installed (a washing machine and a water heater, for example). They correct the situation by removing the partition and making it joint.
One of the options for combining a bathroom
The specific remodeling plan depends on the similar layout, but the general idea is the same: they destroy the partition and remove one of the doors. In some options, it is possible to slightly increase the area of the bathroom due to the area “stolen” from the corridor (as in the photo above).
As already written above, it is possible to increase the area of wet rooms only at the expense of technical rooms. At the same time, during repairs it is necessary to take a particularly careful approach to waterproofing issues. It is necessary to apply several hydrophobic layers (at least 3).
pros
The advantages of converting a bathroom into a combined one are quite obvious. Its area increases, the number of doors decreases. The room becomes more functional. It is useless to argue about whether it is convenient or not. For some this option suits, for others it does not.
Under renovation
Minuses
They can manifest themselves in “densely populated” apartments, when everyone is going to work or school at the same time. If one of the family members occupies the bathroom for a long time, the rest become nervous.
Paint the walls in adjacent rooms the same color
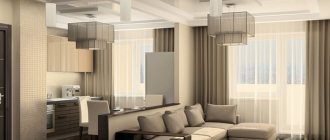
Another design trick is to unite all rooms with the same wall color. The main task is not to make sharp transitions, not to divide the small space of the apartment. One color will become the general background for embodying a unified interior design concept.
Photo: homedesign.lakbermagazin.hu
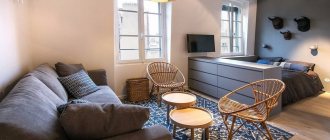
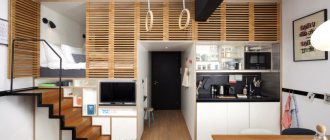
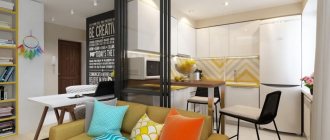
Narrow apartment design
Here is another small narrow apartment,
whose design maximizes space and creates a cozy living environment.
The total area is 46 sq.
m. The design was developed
not only for housing, but also for the work
that the owners do at home.
Moreover, the apartment has all the necessary premises.
There is a lot of space for storing things, appliances and accessories: for example, there are shelves in the most unusual places that minimize clutter.
The tree, in turn, gives its
warmth to this house.
Paint contrasting edgings on the ceiling
To visually increase the space not only in width, but also upward, you need to draw a rectangle of contrasting edging on the ceiling. It is located in the center and follows the contours of the ceiling along a smaller perimeter. This edging solves two problems: it decorates the ceiling and visually increases its height.
Photo: wedo.com.vn
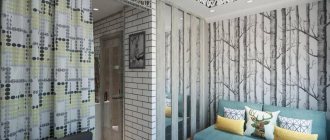
Design of a 1-room apartment
Small, comfortable and bright apartments in Stockholm will inspire you to create and remodel a small apartment. Design of a 1-room apartment
presented on a total area of
38 sq.
m. There is an interesting, beautiful, light-colored floor in a rustic style,
as well as
a full-size kitchen
with plenty of storage space for household utensils.
Two windows
transmit the entire necessary palette of light entering the bedroom and kitchen.
High ceilings and white tones
give good lighting.
Moreover, there is a feeling of large space in this 1-room apartment. The bedroom has a small mezzanine
that can be used as a relaxation area or a second floor. The apartment has a dressing room and a living room.
The apartment is in a quiet location overlooking the courtyard.
Hide the cabinets in niches and paint the doors the same color as the walls
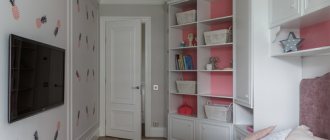
There is no need to display cabinets unless they are antique. It is better to choose a built-in wardrobe, which will be located in a niche or wall. And the doors can be painted the same color as the walls so that they practically merge. If guests don't notice your cabinets, then everything is done right.
Photo: jak.bono.odessa.ua
Refuse doors where you can do without them
Doors take up a lot of space, so in a small apartment it is better to abandon the kitchen door. As a rule, it is rarely used; it gets in the way, blocks part of the wall, and prevents anything from being placed there. Interior doors can be replaced with curtains if you don’t have big secrets from your household, or you can leave the openings completely open.
Photo: casadistile.it
An example of renovation in a small apartment (photo report)
An ordinary small one-room apartment in an old building.
Apartment plan
It was decided to start renovating a small apartment by combining the bathroom. In addition, the wall, which is currently at an angle, will be leveled.
Bathroom renovation
First we break the partitions in the bathroom.
The wall between the toilet and the bathroom has been removed
Next, all the walls are trimmed down to brick, and the tiles on the floor are also removed. Working with a hammer drill is dusty and there is a lot of debris.
A window of unknown purpose is blocked
We make grooves for cold and hot water pipes and sewerage. First, we cut the brick with a grinder with a diamond blade, then we cut out the inside with a chisel and hammer.
After using the diamond blade
We lay water supply and sewerage pipes into the prepared grooves. We solder the water pipe from polypropylene. Good material, easy to solder, has a long service life.
Making the wiring
In place of the riser we make a plasterboard box for taps, meters and other plumbing fixtures. We fill the free space at the top with bricks.
Box for meters and taps
Next, we proceed to installing partitions. To do this, we use tongue-and-groove wall slabs (GWP). In places where they join the walls and floor, we lay a cork backing, glue it with special glue, and fasten it with straight drywall hangers. Before fastening, carefully check the verticality and horizontality.
Partitions made from wall blocks
The floor is very uneven. First, we lay out bricks almost to the desired level and roughly level with mortar. After drying, fill with a thin layer of self-leveling mixture.
Rough leveling over bricks After pouring self-leveling cement
We check the alignment results - deviations are no more than 5 mm. It will be fine under the tiles.
Now you can level the walls. One is heavily piled up, from about halfway up. The discrepancy is almost 7 cm. We take the solution, wire and apply it layer by layer, reinforcing the layers.
The first layer for leveling a littered wall
Wire reinforcement
When the wall has become more or less even, you can place beacons and then plaster over them.
Beacons displayed on a lined wall
There are large holes on the other wall near the area for the bathroom taps and washbasin. they also need to be sealed with reinforcement - a layer of more than 3 cm.
Preliminary reinforcement with various pieces of iron and painting mesh
Then seal with mortar
Let's start plastering (read how to plaster walls using beacons here).
Plastering the walls
While the walls are drying, we coat the floor with waterproofing. We apply it in two layers, additionally gluing the corners with serpyanka.
Waterproofing is serious business
Tiles can be laid on dried plaster.
First on the floor then on the walls
We build in an inspection hatch
After the tiles are laid, we decorate the bathroom. We assemble the frame for finishing, cover it with plasterboard (moisture-resistant), and install hatches on it and glue tiles.
Assembling the frame
We cover with plasterboard
The bathroom is ready. We install plumbing and appliances.
Finishing touches
The shared bathroom is ready, let's move on to the kitchen.
We are renovating the kitchen
A kitchen design project was developed in CorelDraw. It was compiled taking into account the connection of water supply and sewerage systems; based on the results, an electrical wiring diagram was developed. It’s much more convenient to do this in a program than on a piece of paper; you can immediately put down existing dimensions and then build on them.
Kitchen set project Scheme of engineering systems and electrical wiring
Next comes the actual repair process. It all starts with the removal of old finishing materials, the poorly adhering plaster is chipped off, and the paint is removed. Everything is stripped down to the materials of the walls.
We remove all the old trim down to the bare wall
We make grooves along the walls, lay wires in them, bringing them to the places where the sockets will be located. Long and dusty. We don’t gouge the ceiling - it will be tensioned, so we just lay it on top and fasten it.
We simply attach wires to the ceiling - the ceiling is suspended
The walls are more or less smooth, so there is no need to plaster. Enough putty (read how to putty walls here).
First layer of putty Second (we didn’t put putty under the tiles, since the differences are small, the glue will handle them well
We install a plastic window and install a heating system.
PVC window installed, radiator connected
In order to set the window sill to the desired height, the board was sawn into small bars. Using wedges, the window sill was leveled. A load was placed on top (circles from a collapsible dumbbell), and the gaps were filled with foam. The foam was used with weak expansion so that the window sill would not bend.
Window sill installation
We continue to tidy up the walls. We lay the tile apron. We fix the guides level, exactly to the horizon (preferably a plasterboard profile, since wooden planks are rarely perfectly level). Although the guide is only needed temporarily, it must be fastened properly so that it does not move during operation. When laying the apron, simply rest the tiles on the exposed strip.
Tiles on the backsplash in the kitchen are laid
You can read about the types of kitchen aprons here.
Let's start renovating the floor. First, we remove the old hardboard, then we remove the paint from the wooden floor and smooth it out. Long and tedious. If there were enough funds, it would be possible to completely replace it, but they left it as is.
Removing hardboard and paint
We lay fiberboard, nail it around the perimeter, and then in a checkerboard pattern around the area. We spread linoleum on top.
Fiberboard laid, linoleum on top
Now it's the walls' turn. It's simple - we glue wallpaper.
The walls are finished (almost)
Spare parts made from laminated chipboard were ordered from the factory according to their dimensions. The edges were glued on their own. We take an iron, iron the edge, gluing it to the cut of the chipboard. Cool with a wet cloth, cut off the excess with a sharp knife, and smooth the edges with fine sandpaper glued to the block. It turns out exactly like the factory edge.
Edge processing
Afterwards, we assemble the entire kitchen set according to the drawings. This is from another story, but in my case it was part of the repair.
Wall cabinets
These are floor cabinets
It was decided to make the dining table folding with a rotating mechanism. It unfolds along the long side of the tabletop, the two halves are fastened with card loops, there is a turning point (in the photo where the crossbar is visible), along which the tabletop rotates. When folded, the table is small, when unfolded it is twice as large.
Folding table
While everything was being assembled, the facades arrived - MDF covered with plastic in an aluminum frame. Beautiful and very reliable in terms of impact resistance.
Facades made of MDF coated with plastic
They are already assembled
The kitchen renovation is now complete. It was the turn of the balcony.
Repair on the loggia
It was decided to combine a loggia (7 sq.m.) with a room. For small areas, this increase is very noticeable. First, we removed all the trim and removed the old glazing. They left the parapet for now - for safety and began by leveling the floor for laying gas blocks.
We level the floor along the edge of the loggia so that the wall of foam concrete blocks can be properly laid
When laying the wall, a reinforcing rod was laid across the row, the ends of the reinforcement were embedded in the walls. A groove is made under the reinforcement in the stacked blocks, and a rod (8 mm) is inserted into it, which is placed with glue. (Read more about laying aerated concrete partitions here).
Partition on the balcony made of aerated concrete blocks. The fittings are visible (pictured left). At the same time, wooden planks were installed on the outside, onto which the siding was attached.
Having laid out three rows of blocks, I secured the strips on the outside - the sheathing for the siding. I immediately attached the siding to them. Then it will be problematic to do this. In the meantime, having tied himself with ropes to a block built into the wall (9th floor) for insurance, he worked bent over. The wall was assembled quickly, as was the exterior sheathing.
A team from the company arrived and installed the windows. The junction of the window and the wall is covered with a vapor barrier tape - so that warm air does not enter the microscopic gap and condensation does not form there.
Windows installed
Insulation was purchased for the walls, ceiling and floor - extruded polystyrene foam. We attach it to the walls with special plastic mushrooms, and to the floor with polyurethane foam. Since a wooden floor will be laid on top of the insulation, wooden mortgages are attached in 60 cm increments, to which the logs will then be attached.
Installation of insulation on the loggia
Penoplex glue with lavsan heat-reflecting film is applied on top of the thermal insulation. They recommended foil foam, but it was not available in stores. All surfaces are covered except the warm wall. On top of it is a lathing for finishing with plastic panels.
Nailed sheathing for plastic panels
There will be a computer desk at one end. At this point, plywood is attached to the wall. The table frame and monitor will be attached to it. We immediately install electrical wiring and Internet cables to this place, and install sockets. Then you can sew it up with panels.
Preparation for installing a computer desk
Sheathing with plastic panels is one of the fastest and easiest operations in all repairs. We place the starting strip, insert a panel cut to size into it, and attach it to the planks with staples from a construction stapler. And so on.
Panels are hemmed
One of the tasks is to correctly make plastic slopes. It seems that it turned out well (read how to make plastic slopes here).
Waiting for the foam to polymerize
Let's get to the floor. We lay plywood on the penoplex, and on top of that there is another layer of penoplex, to which we attach the floor temperature sensor.
Preparing the floor for laying heating film
We roll it out on the floor and attach the heating film with double-sided tape. It should not be under furniture, so the consumption is not too great. We install a thermostat on the wall.
The film is laid, the thermostat is installed
If laminate was being laid, it would be possible to lay it directly on the heating film. We will have linoleum, so we put another layer of plywood on top, and not that - linoleum.
The floor is ready
Now it's time to remove the window side and doors to the balcony.
Removing the balcony door
We ennoble the remaining opening with laminated chipboard. We do it according to the principle of slopes, we plant it on polyurethane foam. Read how to install slopes from laminated chipboard or MDF here.
Finishing a former window opening
Next, we assemble and install the furniture - we brought the cut pieces, we also glued the edges, and assembled them.
The cabinets on the loggia are assembled and hung
Room
The doors were moved during the renovation process. The partition is made of foam concrete blocks, so cutting out a new doorway was easy. The old one was laid with tongue-and-groove slabs, secured with metal strips and the joints were taped with paint mesh.
Moving a doorway
The rest of the finishing is uninteresting and standard: we tear off the old wallpaper and loose plaster. We prime, plaster again and glue fresh wallpaper. In general, renovating the room was the easiest part.
The floor was level - plywood was laid on the screed, so this time we just laid laminate on top. Easy, fast, dust-free.
Laying laminate flooring
The last stage is assembling the furniture. It was also developed in the same program, chipboard cut to size was ordered. A closet with sliding doors is installed in one wall from edge to edge.
Wardrobe assembled
I liked two “gadgets” - a retractable ironing board and a hanger for small items. Very convenient, by the way.
Folding ironing board
Pull-out hanger
I brought the corner sofa I ordered.
The sofa stood in its corner
The free wall was occupied by shelves and cabinets, and a TV was also installed there.
We designed everything ourselves, according to our sizes.
That's all, the renovation of the small apartment is complete. The time frame turned out to be more than a year, but everything was done by one person. The exception is suspended ceilings and PVC windows.
Install glass doors
For those rooms where doors are indispensable, for example in a toilet or bathroom, it is better to choose doors made of smoky or colored glass. They allow light to pass through and thus do not create the feeling of a blank, impenetrable wall or block space. And you don’t have to be afraid that they will see you from the outside - they won’t see you until you lean against the darkened glass.
Photo: klaverweiden.com
Interior styles of a one-room apartment
What style is best for a small apartment? Laconic or exquisitely delicate, strict, with a minimum of non-functional details and decorations. These include:
· classic version;
· cold-cozy Scandinavian;
· romantic Provence;
· practical American country;
· innovative high-tech;
· strict minimalism.
Mixed trends give the apartment a special charm, for example, eco elements in neoclassical design, or national Russian motifs surrounded by modernism. There is no need to be afraid to bring something of your own to the standard design. The main thing is that the whole composition looks harmonious.
Use glossy surfaces
When light is reflected from surfaces rather than absorbed by them, the room expands and appears larger. Glossy surfaces reflect light well. Don't worry about them getting dirty - they can be cleaned quickly and add a nice glow to the room.
Photo: homedit.com
Photos of 22 m2 studios in various styles
Most studio apartments are decorated in a modern style. This direction allows the use of bright colors, multifunctional designs, and spot lighting. Even panels or drawings on the walls are appropriate: a correctly selected image distracts from the modest size of the apartment.
Increasingly, studio owners are paying attention to the Scandinavian style, which came to us from Finland, where residents lack light and free space. They decorate their small, bright apartments with home plants and cozy textiles, not forgetting to save space: here you can see products with thin legs, hanging structures, and the absence of unnecessary things.
Scandinavian style is a more “homey” version of minimalism, which in turn represents the ideal of an ascetic lifestyle. The furniture here is laconic, and the decor is considered excess. Roller blinds are used to decorate windows.
The photo shows a modern studio of 22 sq. m. with a practical folding sofa.
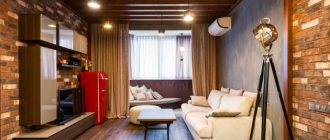
The small area of the studio apartment is 21-22 square meters. m. is not a reason to refuse a designer interior. A loft would be an interesting solution: it values not only brick and exposed metal pipes, but also space, so the roughness of the finish is balanced by glossy surfaces, mirrors and light flowing fabrics on the windows.
Lovers of natural materials can decorate a studio in an eco-style, adding wooden textures (natural furniture, wood-look laminate flooring), and connoisseurs of French comfort can decorate an apartment in the Provence style, with floral patterns and antique furnishings.
In the photo there is a studio of 22 sq. m. with a glass tile partition and a brick wall.
Even a luxurious classic style can be appropriate in a studio: among expensive materials, figured furniture and decorations, it’s easy to forget about the modest size of the apartment.
Install multiple light sources
Playing with light is an important element in transforming a small apartment. It will look bigger if you spare no electricity and install several lamps in each room: a chandelier, ceiling or table lamps, a floor lamp, a sconce. It is not at all necessary to turn on everything at once, although an abundance of light is desirable for small rooms.
Photo: abecedazahrady.dama.cz
Expanding the space: ideas for small apartments
Techniques that allow you to expand space can be divided into two types:
- radical (redevelopment)
- visual
The furniture is located radially opposite the kitchen
Delicate pink color is perfect for small apartments
Among the radical redevelopment options, the most popular is combining the kitchen and the adjacent room into a common space. Demolishing a wall in a separate bathroom will provide an additional couple of square meters of space, and giving up a bathtub in favor of a shower will provide the opportunity to place a washing machine. Additional space for the bathroom can be allocated through the corridor (hallway). The meters gained by adding a loggia to the room will also not be superfluous.
Open hanger - as a means of saving and zoning space
The closet in the hallway is used as a partition
Small bright kitchen-studio and sofa in the kitchen
But all these radical methods have several significant disadvantages:
- redevelopment possibilities are limited by the presence and location of load-bearing walls
- the need to coordinate all ongoing redevelopments with the relevant regulatory authorities
A decorative brick wall improves the perception of the interior. This wall design helps add zest to the interior.
Sofa as a means of zoning the space of a small apartment
Visual methods do not provide a physical (measurable) increase in space, but through optical illusions they create the visual effect of increasing space. First of all, due to the correct color scheme: all warm and light shades help to optically expand the space, and this rule applies to both walls and furniture.
Bright decorative elements help diversify the color scheme of the interior
And colored accents and dark inserts will help prevent the room from turning into an expressionless monolithic light spot. Predominant dark colors will absorb the interior of the room - because of this, it will visually shrink.
Bright painting in the white interior of a small apartment
Advice! The wallpaper pattern will allow you to optically adjust the volume of the room - a horizontal pattern will make it longer, a vertical pattern will “raise” the ceilings.
A few more techniques that allow you to “play” with space:
- mirrors are a win-win technique, a must-have for a small apartment. Mirror doors from the ceiling to the floor of the wardrobe will add “half” to the room. A mirror placed opposite the window will add light to the room.
High floor mirror
- refusal of solid dark wood - oak furniture will absorb the entire space
- replace chandeliers, even not very impressive ones, with built-in lamps
Several rows of recessed ceiling lights
- no blank facades - doors, racks, shelves must have transparent glass doors, this will relieve space
Open shelving ladder for the hallway of a small apartment
- light, more light - do not plunge the room into twilight, a well-lit room looks more spacious
An unglazed balcony and a wide window will help gain additional light.
- a suspended glossy ceiling will eliminate the feeling of a hanging ceiling
Combine different textures and styles in one room
Do you want to make the room emotionally rich and interesting? Then feel free to combine objects from different styles and materials, play with colors and textures. The main rule: in a small space there can be only one large thing, around which medium and small objects “dance”.
Photo: blogkeyla.online
Modern apartment design
Maximization
is a growing trend recently in
modern apartment design.
Countries like China and Japan are working hard to bring
small apartment ideas
as their urban populations continue to grow.
However, this apartment is located in Paris.
This original project
bedroom, dressing room and home office called Red Nest are “sandwiched” into an area of
23 square meters.
m. And all thanks to the ingenious solution
of a transforming bed,
which even hides the toilet room. Such an original bed can easily take on various shapes and also perform mobile maneuvers.
Mirrors that create a feeling of increased space
used to
divide a room.
This narrow red and white apartment is
the perfect place to live
without compromising on style or function.
Make built-in storage systems
If there are not enough cabinets, use the voids under large furniture: a sofa, a bed. And don’t just randomly push boxes of things under them, but equip full-fledged storage systems with a convenient mechanism for lifting the frame and niches for items of different sizes.
Photo: olsh.co
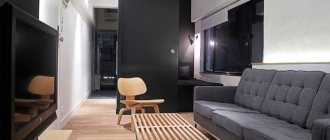
Studio interior design
To save space in an apartment of 22 sq. m., a sleeping place can be arranged upstairs: a loft bed on racks, a hanging bed or a podium, inside of which personal belongings can easily fit, is suitable.
A work and children's area for such an area is not an easy task, but it is doable. To help a family living in a studio, there are bunk beds and transformable furniture. If the apartment has a balcony, it must be attached to the living space or insulated and furnished as a separate room or office.
The photo shows a dark kitchen, which serves as part of the structure for sleeping and working.
If residents like to receive guests, it is worth considering zoning for the studio: it is not customary to meet friends in the bedroom, so the bed should be folded, turning the room into a living room.
In studios, the bathroom is usually combined with a toilet, so it looks relatively spacious. It’s ideal if there is space in the bathroom for a washing machine and you don’t need to move it into the kitchen. It is better to store household products in hanging mirrored cabinets, and reduce the number of open shelves as much as possible.
Entrance hall in a studio apartment of 22 sq. m. is small, so the optimal solution for storing outerwear is closed cabinets. If the corner is empty, it is advisable to purchase a corner cabinet: it is much more ergonomic than a straight one.
The photo shows a hallway with a mirror at the front door, a shoe rack and a small closet.
Use window sills
In small apartments, window sills are often turned into a storage area for items to be “at hand.” The window sills are covered with curtains so that guests do not see the chaos reigning there. But the window sill is a very valuable space. There you can arrange a desktop or part of the tabletop, a bar counter, a shelf for toys, a mini-garden or a place to relax if the window sill is low and wide. And under the window sill it would be nice to build in shelves and pull-out cabinets.
Photo: aeropaca.org
Planning and creation of a one-room apartment project
What needs to be done to make a small one-room apartment or studio sparkle with new facets, becoming not just a place to live, but a warm, cozy home with its own special atmosphere? A small living space dictates its own conditions:
· it is necessary to clearly imagine the final result;
· take into account the comfort and hobbies of all family members, including pets;
· you cannot purchase furniture and decorative items just “to have it” or being captivated by advertising and stylish design. The entire furnishings must be kept in an extremely laconic style and perform certain functions;
· well-developed design project for an apartment of 40 sq. m. - half the success. The room is divided into functional zones; there should be no empty, unused areas or niches.
If possible, it is worth agreeing on the redevelopment before starting the renovation. Usually the partition between the room and the kitchen is removed, combining them into one living-dining room. But this decision is ambiguous: the constant bustle, noise, smells when working in the kitchen, with the inability to isolate themselves from them, negatively affect the psychological comfort of household members. If we are talking about a studio, then it is recommended to separate the kitchen from the rest of the space and move it closer to the hallway.
Transformations of the internal space that will expand the area of a single room can be as follows:
· dismantling doors and windows onto a loggia or balcony. They are carefully insulated, double-glazed windows are installed, light and heating are installed. It turns out to be a cozy room that can be used as you please. It can be made completely closed using glass sliding doors, hanging curtains, or left open;
· instead of an uncomfortable storage nook, they make a spacious dressing room by dismantling the wall and installing doors and partitions from lightweight structures. The vacated area is also used as a small bedroom or office;
· combine a separate bathroom by installing a compact shower stall or a modern partition made of tempered glass. This creates space for placing a washing machine and water heater.
Examples of harmonious and effective zoning of small rooms can be found on the Internet. This article also presents photographs of the most successful ideas for planning studios and one-room apartments, which have already been tested by life.
You can develop your own design project using special editor programs. Or simply draw a plan by hand, observing the scale, and “play” with the arrangement of furniture and arranging the necessary functional areas.
Zoning options for an apartment of 40 sq. m
To fit into the design of a one-room apartment of 40 square meters. m. all the necessary furnishings, you need to plan everything carefully. After all, such living space is often home to families of 3-5 people, each of whom needs personal space, a place for relaxation, work and study, and creativity.
How to do it? Pay attention to the advice of professionals and choose the appropriate option for yourself.
Reupholster upholstered furniture
Do you like your upholstered furniture, but the upholstery is faded, worn and dirty? Just choose the color and texture of the upholstery fabric and have the sofa and armchairs reupholstered. Questions from friends about your purchase of new furniture will not keep you waiting, and the interior of the room will be noticeably refreshed.
Photo: inhomeplans.com
How to make a small office functional and cozy
Each of us needs a space where we can retire to do important work. To set up a workplace, often only a small area is required, but such a room must be functional and comfortable. Before you renovate a small room, consider how it will be used. Will you work in the office on weekends? Will you read books there and check your email? Study magazines? Then a small table and an easy chair, as well as a small bookcase, will be enough.
A home mini-library can also be located here - equip shelves on the wall from the very bottom to the top. You can store some things on the lower shelves. Will business meetings be held in the office? You will need small cozy armchairs or a mini-sofa, as well as a table for drinks.
Decorate the walls
Despite the fact that light walls without a flashy pattern are desirable in a small apartment, they should not remain empty. It’s better to decorate the walls, but there’s a lot of choice with what. These can be family photographs in beautiful frames, stylized pictures, posters on various topics, reproductions of masterpieces of world painting, volumetric wall decor, and ethnic elements.
Photo: cheatersutopia.com
Modern apartment design
The wardrobe-house was developed by the Portuguese company Consexto. We present a thoughtful and modern design of an apartment with a total area of 44 sq. m. m.
At first, you might think that this is just a tastefully decorated modern home with some unusual design ideas.
This unique apartment consists of five different areas,
two of which can be changed by simply pressing a button.
Because everything in this high-tech apartment is automated.
There is a home cinema, a minibar, a large closet, a fully equipped kitchen and a comfortable dining table.
For a more detailed look at the modern design of this apartment, you can watch the video.