Many are convinced that drywall is a material intended only for covering walls, partitions and ceilings. It will be a surprise for them to learn that gypsum boards are used to make homemade cabinets of various designs. A cabinet made of plasterboard will cost much less than furniture made of chipboard or MDF. In this article we will talk about how to build a plasterboard cabinet with your own hands using metal profiles.
Cabinet drawing
The creation of furniture begins with its drawing. A detailed diagram of the installation and arrangement of the wardrobe elements will help to avoid mistakes during its assembly. You need to determine the location of the future structure: in the hallway, bedroom, as well as in other rooms, you need to take into account the distance from the windows to the door, the height of the ceiling.
Form a body from profiles and cardboard. Design the future content and make a list of accessories for this. The sliding door system is created from traditional materials and will be independent of the frame design.
Having determined the dimensions of the built-in wardrobe, transfer them to paper. Draw the position of the shelves and partitions. Calculate the required amount of materials and prepare the tool.
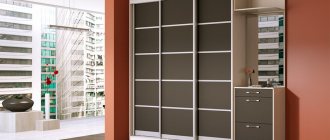
Possible design options
First, you need to understand what kind of cabinet you need. There are several possible options:
- linear. This is the simplest and most familiar cabinet that will fit well wherever they want to install it;
- built-in This design is suitable only in cases where the apartment already has a niche that needs to be filled. Moreover, it is necessary that the dimensions of this niche be sufficient for all things to fit in the new closet. Often they resort to this step when making repairs in the pantry;
- the wardrobe is a very complex design, but you will be able to hide all your things from a prominent place;
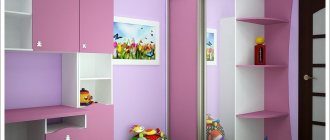
- angular. They create a corner cabinet from plasterboard with their own hands in cases where there is very little space. By placing the structure in a corner, you can save space, because along the wall it will take up much more space.
A built-in wardrobe always needs a niche for placement.
We will consider creating the very first option as the simplest and not requiring special skills.
Tools
To make a cabinet body from gypsum plasterboard, you will need the same tool as for normal work with drywall:
- metal ruler and tape measure;
- level and plumb;
- drill-driver;
- perforator;
- metal scissors;
- hammer;
- end plane;
- marker or pencil;
- construction knife;
- hacksaw for metal;
- jigsaw;
- brushes;
- spatulas.
As you can see from the list, the tools are standard, quite often found in every home.
Classics of the genre
Wallpaper is a classic finishing option. And, if in Soviet times, their choice was not so wide, now manufacturers offer wallpaper for every taste and color. Moreover, each type has its own advantages. The surface to be finished does not need to be perfectly leveled.
- Liquid wallpaper is ideal, as is paint in places that cannot be reached with other finishing materials. They are able to hide small defects in the walls. This type of wallpaper is easy to clean, easy to apply and can be combined with any other materials. In addition, they have greater air permeability.
- Fiberglass wallpaper is an innovative development. They are mainly used for painting due to their compatibility with any paint base. The material is able to withstand external mechanical stress, so they can be safely used if there are pets in the house. At the same time, they retain their original appearance for a long time.
- Vinyl wallpaper on non-woven or paper backing is equally good. The main advantage is the variety of patterns.
- Cork wallpaper is a special type of finishing. The interior takes on a noble look with an interesting design. They create additional noise and heat insulation. Heat resistant, antistatic and easy to clean.
- Metallic wallpaper, distinguished by its durability, will help add elegance. The only drawback is the overpriced material. Plus, you need to have special skills when working with them.
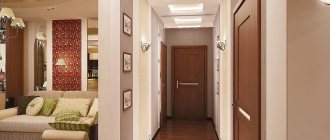
Example of finishing a corridor Bright hallway room
Materials
Based on the drawings, draw up a specification of materials necessary for installing the body and filling the wardrobe:
- drywall;
- metal profile;
- screws and dowels;
- damper tape;
- polymer mesh (serpyanka);
- putty (starting and finishing composition) and primer;
- water-based paint;
- vinyl wallpapers.
Depending on your taste preferences, you may need one thing: either wallpaper or paint.
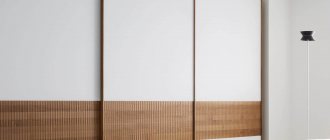
Creating a facade
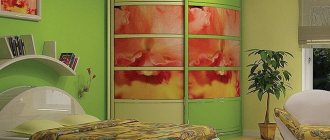
Decorative finishing of the cabinet is one of the most pleasant moments of the whole process. Here you can use your imagination and figure out how to make the closet beautiful and original. Let's consider several finishing options for this product.
| Painting | It is considered the simplest option for finishing work. For this, acrylic or water-based paint is used. After processing the background, you can use a stencil and draw funny pictures. |
| Mirror surface | If there are no mirrors on the doors, they can be made on the sides of the cabinet front. Designing a full-length mirror will provide the opportunity to fully see your reflection. |
| Decorative plaster | If the rest of the room is made of plaster, do not deviate from the plan. |
| Wallpapering | Choose contrasting or plain wallpapers that are similar to the main materials. |
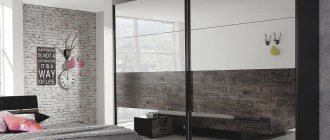
| Imitation of natural stone | Stone masonry is the choice for antique interiors or loft style. |
| Decorative film | A simple way to diversify the surface of the cabinet is to stick a film. It is recommended to do this using a rubber spatula. |
Most types of cabinet finishes are applied directly to the primer, so be sure to complete this step before decorating.
Drywall
The choice of cladding material must be treated with extreme caution. The design of the shelves takes on the vertical load from the things placed on them, sometimes quite weighty ones. Therefore, it is better to take gypsum board with a thickness of at least 12.5 mm.
To cover a metal frame, it is enough to use sheets 8 mm thick. We advise you to purchase sheets of plasterboard of the same cross-section: this way you will not have any difficulties in covering vertical and horizontal metal surfaces. There will always be an opportunity to cut an additional piece from the entire stock of cardboard. Therefore, choose all cardboard according to the maximum end size - 12.5 mm.
If you decide to make a built-in, free-standing cabinet in the bathroom or kitchen, then use moisture-resistant plasterboard. This also applies to all damp rooms.
Expert opinion
Bashir Rabadanov
Technologist at the furniture company Woodband
Even on a glazed balcony or loggia, I recommend using plasterboard sheets to assemble the cabinet.
In any room, furniture located near a frequently opened window is also made of moisture-resistant material.
Speaking of dimensions, retail chains sell plasterboard sheets in the following sizes:
- length from 2 m to 4 m;
- width from 1.2 m to 3 m;
- thickness from 6.5 mm to 24 mm.
Based on the dimensions of the gypsum board you have chosen, we make a cutting drawing of all the cladding elements of the wardrobe box. It will help to avoid shortages or excess material. Allow an additional 5% of the total cardboard area for defects or accidental damage to parts during their manufacture.
Types of plasterboard sheets
Each room requires its own cabinets - a bedroom, kitchen or bathroom have their own “microclimate” characteristics, which must be taken into account when creating or purchasing furniture.
Table 1. Types of plasterboard sheets
| Type | Description |
Ordinary | When making a cabinet for rooms with a stable microclimate (such rooms include bedrooms, living rooms or corridors), it is recommended to buy classic gray plasterboard sheets. They do not deform under the influence of the environment and will retain their proper appearance for a long time. |
| Moisture resistant | When installing a cabinet for rooms with high air humidity (namely, exceeding 70%), you should pay attention to moisture-resistant plasterboard sheets, which were mentioned in the chapter on advantages |
| Fire resistant | In rooms where the risk of fire of furniture is increased (in particular in the kitchen), experts recommend choosing fire-resistant plasterboard sheets for cabinets (they are marked with a special red marking during production) |
Metal profile
Galvanized steel profiles for drywall are available in several types. These are UD, CD, CW and UW rolled products intended for the formation of partitions, suspended ceilings and cladding of wall enclosures indoors. Some of them are needed for the installation of supporting elements, while other long lengths are used to make the connecting parts of the frame, ensuring the rigidity of the entire structure.
From the entire assortment, we will select the profiles that you will need to install a wardrobe made of gypsum plasterboard.
UW (MON and PNP)
Guide profiles limit the horizontal framing at the top and bottom of the box. UW slats are fixed to the floor and ceiling using dowels. If, when installed in a niche of a built-in structure, the height is less than the distance from the floor to the ceiling, the upper belt of the box is attached to the walls.
A similar method is used if it is necessary to fill the entire width of the wall with the structure. The profile is mounted vertically with shelves facing the inside of the room.
Steel slats are available in the following sizes:
- length – 3 m;
- shelf height – 40 mm;
- base width – 50, 65, 75 and 100 mm.
For the cabinet, we select long-length profiles with a wall width of 65 mm. If the furniture is small in size, then slats with a wall of 50 mm can be used as guide profiles.
CW (PS)
CW posts form vertical metal support members. Their ends fit into the UW rail guides. The rack profile transfers the entire load from the filled shelves to the base of the room. Dimensions of steel products:
- length – 3, 3.5, 4 and 6 m;
- shelf – 50 mm;
- wall – 50, 65 and 75 mm.
In our case, we use a profile with a wall of 65 mm. The edges of the sides are slightly curved, the wall has longitudinal grooves so that the length has increased rigidity and increased load-bearing capacity.
CD
We use UD strips as connecting elements of the frame and to create supports for shelves. The products are manufactured with a length of 3 m, a shelf height of 27 mm and a wall of 60 mm.
Other walls
The use of mineral wool for the purpose of heat and sound insulation is justified only for the external walls of the apartment. When the wall bordering the living room is covered with plasterboard, it is quite acceptable to do without insulation.
The assembly of the wall frame with the doorway is carried out using traditional technology - racks with a pitch of 400 mm; three hangers for each rack.
If you have all the necessary tools and materials at hand, even one person can install drywall on the hallway walls in two to three days. I would be happy if I could complete the painting work in the same amount of time.
After installing the partition separating the bathroom, a large amount of drywall scraps remained. They found application when installing a wall that will not be visible, since it will be covered by a wardrobe. But this wall still performs a certain functional load. It is in this wall that a large amount of mineral wool is used, which covers the opening of the old ventilation shaft.
Used plywood used to construct a slope performs two functions: it is a load-bearing element in securing the wall and will serve as the basis for installing decorative material when finishing the space between two entrance doors.
Having covered the walls in the hallway with plasterboard, although we suffered a loss in area (according to my calculations, about 0.35 square meters), we received an ideal surface in geometry, suitable for any finishing.
Self-tapping screws and dowels
Using self-tapping screws for gypsum boards and fastening metal profile elements, you will need screws 10 and 30 mm long.
The steel parts of the supporting structure are connected to each other using screws using a screwdriver. Long fasteners are used to secure gypsum board sheets to metal. Use dowel nails to secure the supporting structure to surrounding concrete or brick fences. Drill the metal and the wall with a hammer drill, then hammer in a dowel consisting of a screw inserted into a PVC tip. Typically, fasteners with a length of 30–40 mm are used.
DIY dressing room
A storage room for a dressing room is a convenient option for self-furnishing. You won't have to work hard on finishing. It is enough to simply remove everything unnecessary from the pantry and carry out cosmetic or complete repairs.
All that remains is to plan the areas and purchase all the necessary wardrobe details. Then install them and enjoy your work. Dressing room lighting. It is optimal to place the lighting fixture directly inside the resulting room. One spotlight will be enough.
Additional lighting can be considered next to the mirror. Seam taping, puttying and priming. There will definitely be seams between the laid slabs.
They need to be glued with bandage tape and then puttied. The resulting joints are primed. With the right approach and following the instructions (which we give in our article), you can make a dressing room with your own hands in two ways: The first is a long vertical area.
Things will be stored here on hangers. At the bottom there are places to store shoes.
Putty and primer
There are putty compositions for starting and finishing gypsum board coatings. The building materials market offers dry mixtures and ready-made putty. The advantage of dry compounds is that you have the opportunity to always prepare the amount of putty required at this stage of work. The powder must be diluted with warm water and mixed thoroughly.
You will use the starting mixture to cover the drywall joints, seal the screw heads and secure the protective corners on the outer and inner sides of the frame cladding.
Once the starter coat is dry, apply primer to the entire cardboard using a brush. The mixture is sold in glass or plastic containers. The product will strengthen the paper base and the surface layer of gypsum.
Using a spatula, treat all surfaces of the gypsum board with the finishing compound. This coating is also applied with a spray gun, which forms a high-quality smooth surface of the cardboard.
Final finishing
Now all that remains is to bring the design to the final stage. For this we:
- We seal all joints between the slabs with serpyanka;
- We putty all the places where screws are screwed in and the joints between the sheets. After the material has dried, make the surface even and smooth using sandpaper;
- prime the dressing room;
- Apply the final layer of putty.
After this, all that remains is to give our structure a more aesthetic appearance that will allow it to fit into the surrounding environment. The dressing room can be painted, covered with wallpaper, decorated with decorative stucco and artificial stone, etc. This will help avoid the feeling of foreignness and emptiness behind the false wall. Now we insert the doors. Experts recommend using sliding doors, which will help avoid a lot of problems, especially in small rooms. Next, we install the lighting - and your dressing room is completely ready. As you can see, making your apartment more functional and comfortable with the help of drywall is quite simple. The main thing is to follow the instructions exactly and everything will work out with your wardrobe.
Making plasterboard ceilings in the kitchen
Making plasterboard ceilings in the bedroom
Step-by-step instructions for assembling the box and filling it yourself
| Step No. | Photo | Process description |
| 1 | We determine the location of the wardrobe. Furniture should not interfere with the passage of people and prevent the full opening of doors and windows. The corner closet is conveniently located opposite the entrance to the room. | |
| 2 | We mark the dimensions of the box on the floor, ceiling and walls. To do this, we use a pencil, marker, tape measure, metal ruler and level. | |
| 3 | According to the drawings and specifications, we cut the steel profile into the required sections using metal scissors, a hacksaw or a jigsaw. | |
| 4 | In accordance with the markings, we fix the UW guide profiles to the floor and ceiling with dowels. | |
| 5 | Having installed the racks, we fasten them with self-tapping screws to the top and bottom rails. Now you need to attach the vertical elements to the walls with dowels through perforated strips of hangers in increments of 40–50 cm. | |
| 6 | We install the transverse frame slats. They are inserted into racks and secured with self-tapping screws using a screwdriver. The crossbars are fixed in such a way that the openings between the shelves are at least 300 mm high. This is the optimal size recommended by furniture assembly specialists. You can maintain a different distance between the shelves. | |
| 7 | In the clothing compartment, you need to attach a rod to the metal crossbars of the box on which the tremels will be hung. | |
| 8 | To divide the contents of the closet into compartments for shelves and for outerwear, install a partition. Assemble it in the same way as the side walls of the box. | |
| 9 | You can also assemble the metal frame of the partition cabinet. Often a homemade wall is made open to delimit (zoning) a nursery, living room or room for another purpose. In this case, the structure can be used as an open bookcase. A plasterboard wall is often placed in the corridor to store everything that gets in the way in living quarters. | |
| 10 | If the box does not reach the ceiling, then you can make a straight arch, which fills the space between the ceilings. Make the arch from a metal frame covered with sheets of plasterboard. | |
| 11 | Mark the sheets of drywall using a tape measure and a metal ruler. Draw marking lines with a pencil or marker. | |
| 12 | Drywall cutting can be done in two ways. In the first version, cardboard is cut with a jigsaw. But this is not very convenient to do without a large workbench or table. You can cut the material directly on the floor. Place any flat length (beam or board) under the cut line. Applying a ruler, cut the markings shallowly with a construction knife (3–4 mm). Then, pressing with your hands on one side of the sheet, achieve an even break of the cardboard. If you have no experience in this matter, then it is better to practice on unnecessary scraps of material. | |
| 13 | Treat the ends of the facing elements with a plasterboard cross-cut plane. This work can be done with a sanding mesh secured with clamps to a special block. | |
| 14 | First, attach the shelves to the cabinet frame with self-tapping screws. After this, sheathe the vertical surfaces of the box. | |
| 15 | When installing shelves with a width of more than 50 cm, secure additional cross beams from the CD profile. Cut the ends of the crossbars with scissors, separating the shelves from the wall at a distance of 60 mm. Bend the ends of the shelves outward at a right angle. Then secure them with self-tapping screws on the side surface of the rack, and attach the end of the wall with a self-tapping screw to the base of the rack profile. | |
| 16 | To ensure that the thickening of the side surface of the rack does not interfere with the cladding, the contact area of the drywall must be sharpened with a plane or rasp. | |
| 17 | Apply primer to all surfaces using a brush. | |
| 18 | Use starting putty to cover the joints, cladding seams and cover the screw heads. Attach the screws so that their tops are recessed into the drywall. | |
| 19 | Cover all treated areas with sickle tape. Treat the ribbons with the starting mixture. | |
| 20 | Install the corner profile, covering it with a spatula and putty. | |
| 21 | After 24 hours, treat the drywall with a finishing compound. Clean up any imperfections with a mesh or fine sandpaper. | |
| 22 | Paint the entire box with a brush again with primer. | |
| 23 | At your request, the entire structure can be painted with a water-based composition or covered with vinyl wallpaper. | |
| 24 | Once the work is completed, proceed to install the sliding doors. To form the frame, use boards or timber with a width equal to the cross-section of the metal guide rails. | |
| 25 | Install the wooden frame almost close to the vertical posts of the box. It is necessary to maintain a gap of 1–2 mm. This must be done so that dynamic loads from the movement of door panels are not transferred to the drywall. Otherwise, the cladding material may crack and subsequently collapse. | |
| 26 | If the floor and ceiling have an ideal horizontal surface, then you can get by with installing only timber racks. Attach the guide strips of the sliding system with dowels directly to the horizontal railings of the room. | |
| 27 | The gap between the door frame and the coupe body must be filled with damper tape. | |
| 28 | It is advisable to attach swing doors to the bodies of small cabinets. If you nevertheless decide to install such doors on a plasterboard structure up to the ceiling, then you cannot do without installing a wooden frame. |
Why do you need a dressing room in the bedroom?
By replacing the closet in the bedroom with a full-fledged dressing room, you can significantly save space not only in the bedroom, but also in part of the hallway and other rooms. A dressing room is a multifunctional room, a kind of storage room in which you can store many things.
Namely:
- Clothes;
- Linen;
- Toilet accessories;
- Cosmetics;
- Shoes;
- Outerwear;
- Bags;
- Cosmetics, etc.
In many apartments, the space is not enough to store the same supplies of household chemicals and other household items, so often all this is placed in the dressing room.
So, where do you start building a plasterboard closet in your bedroom?
Cabinet-table made of gypsum plasterboard for TV
The principle of assembling a TV stand made of plasterboard with a frame made of steel profile remains the same. It should be noted that the cabinet needs to be made mobile. To do this, we assemble a floor frame from a guide profile. Install furniture legs in the corners. They can be monolithic or equipped with wheels.
Then assemble the entire metal frame. Attach a plasterboard table top to the top frame. It can be made semicircular or rectangular.
After puttying and painting, secure the doors. Hinged planes can be made from other materials (chipboard or MDF).
It is easy to give the cabinet an original design that will harmoniously fit into the interior of any room.
Decorative plaster
A huge selection of finishing materials allows you to turn any design solution into reality. Each of them has both its advantages and disadvantages. There is no specific recommendation for choosing a finish; everyone chooses the material at their own discretion.
Among the abundance of assortment, decorative plaster stands out. Its use allows you to give surfaces different textures, colors, relief patterns, and so on.
Bright hallway room
Beautiful drawing on the wall in the hallway
Among its main advantages:
- environmental friendliness (the material does not harm others, does not emit toxic substances into the air);
- has excellent breathability, allowing the walls to breathe;
- has a long service life;
- decorative plaster is easy to maintain;
- fits perfectly with any stylistic direction.
Finishing walls with decorative plaster requires certain skills, so it is better to entrust this process to specialists. In addition, it is applied to a perfectly flat surface.
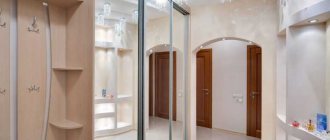
Corridor interior
Decorating the hallway of the room Bright design of the hallway of the room
Features of installing gypsum plasterboard cabinets for kitchens and bathrooms
In these rooms, due to high humidity and temperature changes, unfavorable conditions are created even for furniture made from gypsum plasterboard. This. If you decide to install such furniture, then it is better to place it away from the stove, refrigerator, sink, shower or bathtub.
Why do you need a dressing room in the bedroom?
By replacing the closet in the bedroom with a full-fledged dressing room, you can significantly save space not only in the bedroom, but also in part of the hallway and other rooms. A dressing room is a multifunctional room, a kind of storage room in which you can store many things.
Namely:
- Clothes;
- Linen;
- Toilet accessories;
- Cosmetics;
- Shoes;
- Outerwear;
- Bags;
- Cosmetics, etc.
In many apartments, the space is not enough to store the same supplies of household chemicals and other household items, so often all this is placed in the dressing room.
So, where do you start building a plasterboard closet in your bedroom?
Advantages of making furniture from plasterboard
It is not for nothing that plasterboard furniture is very popular among the population. This phenomenon is facilitated by the following positive qualities of the material in question:
- Easy installation of structural elements. You don’t need a lot of experience in handling tools; furniture manufacturing is available to anyone who wants to assemble a wardrobe from gypsum plasterboard.
- If we compare the cost of manufacturing a wardrobe from MDF and assembling furniture of similar dimensions from metal profiles and plasterboard, then savings can amount to up to 20% of the total costs.
- The ease of joining steel elements, cutting them, and cutting sheets of cardboard allows us to quickly produce a cabinet of the required dimensions and with the required contents.
After reading the article, you should have no doubt that drywall can be effectively used to make furniture. Despite the apparent fragility, gypsum plasterboard in combination with metal profiles can be used to make quite strong and reliable cabinets.
Useful tips for arrangement
Not everyone has the opportunity to install huge storage facilities for things. Often you have to be content with more modest premises. But even in the smallest dressing room (1 x 1 m) you can create all the conditions so that every item has its place.
Some tips:
- the space of the room will look visually larger if you use glass or glossy doors and lighting built into the shelves;
- drawer dividers will allow you to store belts, ties, and jewelry in a systematic way;
- inscriptions on drawers and boxes with lids will help you find the necessary items faster;
- to avoid the appearance of musty odors and dampness, good ventilation must be provided;
- It is necessary to promptly get rid of things that have not been used for a long time, which will allow you not to create a mess in the room and free up space on the shelves.
It is recommended to design the optimal arrangement of boxes, containers and organizers made of plastic, fabric, straw or wood. They are ideal for storing belts, ties, scarves, gloves, and clothes that do not require ironing. In addition, such storage systems help save space on shelves and quickly find the things you need.
Summarizing
If you still have any questions about installing a corner shelf, we recommend taking a look at the video in this article posted on our website. We are confident that it will help you find answers to your questions.
This is especially necessary when the shelf serves as an interior partition or is mounted on a wall behind which noisy neighbors live. If more powerful sound insulation is required, we recommend filling the cavities with cement mortar - in this case, the plasterboard sheet will turn into permanent formwork. If this is not the case, the shelves should be attached to special zippers - “butterflies” (the picture below shows a clear attachment). You may have add-ons installed in your browser that can make automatic search requests.
In this case, we recommend that you disable them. If automatic requests actually come from your computer, and you know about it (for example, your line of work requires you to send similar requests to Yandex), we recommend using the Yandex.XML service, specially developed for these purposes. An ordinary piece of furniture can become a real hallway decoration if you glue a special film or paper with text printed on the back of the shelf. With this design, it is better to choose a neutral color for the shelf itself. True skateboarding fans always have a few old boards that have fallen into disrepair.
As a last resort, you can turn to fellow hobbyists for help. Multi-colored shelves are great for storing sports shoes. Metal shelves have several advantages over wood.
Metal does not absorb odors. And also due to the fact that metal shelves have a slatted or mesh structure, the shoes will be naturally ventilated. A plastic shelf always has an open appearance, and therefore you can only choose the number of shelves in the rack. In addition, such shelves are often not strong enough structures.
Although their indisputable advantage is their ease and ability to wash. To avoid storing clothes on the sofas of your rooms, you should hang a clothes hanger. One of the best options is a wall hanger, which is mainly used for everyday clothes.
The most convenient way to store keys is to use a key holder. This is a specialized locker with hooks where you hang your keys. It can also be hung on the wall.
How to make a shoe rack in the hallway, photo collection
The issue of placing shoes in the house remains relevant both in summer and winter. Often the hallway is filled with shoes, especially in the evening, when the whole family has returned home from work or school. To avoid this problem, you can make special shelves for shoes in the hallway, which will help not only decide on the issue of storing things, but also decorate the room. Every housewife knows that such a useful item is necessary in the house, since the durability of shoes depends on both proper care and proper storage, which a well-designed shoe rack in the hallway can provide.
Types of shoe shelves
This piece of furniture should be characterized by versatility and compactness, because the hallway usually has a small square area. Shelves for shoes in the hallway can be made in various designs. Among the varieties that you can make with your own hands, the following are popular:
- Models for walls. An ideal option in a small hallway where it is impractical to install a cabinet. It is easy to create such a shelf yourself using wood as a material. If you wish, you can find many photos on the Internet and make the product according to the picture;
- Shelving. The most successful choice for decorating free space. The upper part of the shelf plays the role of a bench or is used as a stand for various useful items;
- Slim cabinet. Such shelves are practical and convenient, as they hide shoes from prying eyes. To open, the product is turned 45 degrees. You can make any shoe rack in the hallway with your own hands: straight, rounded or angular;
- Stands. The most common type of floor shelves. In production, you can use the usual bottom of a cardboard box, cover it with some material that does not get wet, and add pebbles.
Nuances of work
You can make a lot of decorative elements from plasterboard: wardrobes, shelving, wardrobes and regular shelves for books. Their creation has its own characteristics:
- The coupe is particularly spacious . It can be located in a niche, along a wall, or simply occupy a certain corner of the apartment. Moreover, to create a corner structure, it is important to follow the same instructions as given in the article;
- shelving is most often located along the surface of the walls . Although they are perfect for zoning a room, acting as a kind of partition or serving as a bar counter.
To create a cabinet from plasterboard you do not need any special skills or specialized tools. Every man has everything he needs in his pantry. A little effort and high-quality furniture is ready. You just need to set a goal and strictly follow the instructions in our article.