Other articles on this topic:
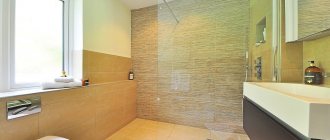
⇒ Installation of a built-in tile shower in a bathroom or toilet
In a house or apartment it is convenient to have a small sauna right in the bathroom. A home mini sauna has the following advantages:
- Allows you to take bath procedures at any time without leaving your home.
- Preparing for work and warming up such a home sauna occurs quite quickly.
- The energy consumption for operating a mini sauna is minimal.
- Building a sauna in the bathroom will cost less
than in any other place. But in an apartment, this is perhaps the only option.
The sauna in the bathroom is a cabin in which the necessary microclimate is created. In the same sauna steam room you can create three different types of microclimate:
- Dry or Finnish sauna
, the air in which is heated to 90-110 oC. Relative humidity at this temperature is approximately 10%. For comparison, in a regular room this figure is usually in the range of 40-60%. High temperature and dry air affect a person in a sauna so that he begins to sweat intensely. - The sauna is wet -
the air is heated only to a temperature of 70-90 oC. But the relative air humidity is higher - 25-40%. To increase humidity, water is poured over hot stones placed in the heater compartment. - Steam sauna (hamam, tilarium) -
the temperature is even lower - less than 60 oC. The air in a steam sauna is saturated with water vapor using a special steam generator. If you add herbal infusions to the steam generator, you can take inhalations in the sauna. The microclimate in the steam sauna is comfortable for everyone, including children.
A steam sauna is also called a Turkish (hamam) or Roman (tilarium) bath. Most people feel comfortable in such a bath at a temperature of about 40 ° C and a relative air humidity of 100%.
Procedures in a steam bath do not put significant stress on the human body. Therefore, a steam sauna can be used by people of all ages, with minimal health restrictions and as often as desired, even every day. In addition, the necessary microclimate in a steam sauna can be created in just a few minutes.
When choosing microclimate parameters in a dry and wet sauna, experts advise adhering to the “rule of 110”. According to this rule, the sum of temperature and relative humidity values should not exceed 110. For example, at a sauna temperature of 65 °C, humidity should not exceed 45%.
Microclimate of an infrared sauna
In recent years, mini sauna cabins with infrared heat sources have appeared on sale and are being actively advertised.
All bodies on Earth are sources of infrared radiation of varying intensities. The higher the temperature of the source, the more energy the rays carry. The most ancient source of powerful infrared radiation that man has learned to use is the flame of a fire. Every person who has taken the “procedure” while sitting by the fire knows that your front burns and your back freezes. Infrared radiation from hot coals has long been used by people to cook food on a grill, grate or spit.
high-temperature heaters with screens that reflect infrared rays towards a person
are used as a heat source In a mini sauna cabin, infrared emitters should be directed at a person from all sides and at all parts of his body. To equip the booth you will need at least 5-6 devices - emitters installed in different places.
The intensity of exposure to infrared rays strongly depends on the distance between the emitter and the human body. The effectiveness of the procedures decreases as the number of people in the infrared sauna cabin increases. People shield each other from the effects of heat rays. The distance from a person to the emitters becomes less than optimal. Individual parts of the body heat up very unevenly. It is better to be alone in the booth.
The air temperature in the infrared mini sauna is maintained at a fairly low 35 - 45 °C. The surface of the human body is heated due to the thermal radiation of infrared emitters directed at it. Similar to how shawarma is cooked on a grill. In such conditions, it is difficult for a person to control the degree of heating of his body. You can easily overheat and even get fried.
Much has been written about the benefits and harms of various types of baths, microclimates and bath procedures among different nations. To decide what suits you, you need to try everything.
Since the infrared bath is a relatively new phenomenon in our country, I will give a review from one who likes to try everything:
“And I think the biggest disadvantage is the time of the procedure. It takes about 30 minutes, although you can endure more, but the body will receive severe stress. And repeated visits are also undesirable. To me, visiting an infrared bath reminds me of receiving a treatment procedure in a physiotherapy room in a hospital.
You cannot take procedures lying down in it! Just sitting!
In addition, in an infrared bath, the color and emotions of a regular bath are completely absent, where you can properly steam yourself with a broom, breathe in the aromas of essential oils and infusions, lie down to rest, and repeat all this as many times as your heart desires, without being limited by time.”
Panel or film cabins - saunas
There are also cabins on sale in which electric heating panels or underfloor heating film are used as heating elements. Sellers call them panel, film or thermal cabins (saunas). Or even infrared saunas.
In panel heating cabins, the temperature of the heaters is low , 60-70 °C. The main heat transfer occurs by convection rather than by infrared rays. The air temperature in the cabin is even lower, and there is no way to change the air humidity.
In real infrared saunas, high-temperature heaters , with a temperature of at least 230-290 ° C. Most of the heat from such heaters is transferred by infrared rays.
The microclimate in panel heating cabins differs significantly from both saunas with a stove and real infrared saunas. The health-improving effect on humans of procedures in such thermal cabins is minimal. Sellers, in order to attract buyers, will tell you tales about miraculous carbon heaters, about the “Rays of Life” or about “resonance absorption”.
Further, infrared saunas and heat cabins are not discussed in this article.
Main types of baths and saunas in an apartment
A properly equipped steam room in a modern apartment can be of any type. This is a Russian or Turkish bath, an electric or infrared structure, a miniature structure or an entire room.
Infrared
In a city apartment, an infrared sauna is also convenient - it deeply warms all body tissues. Some believe that the device causes harm due to its radiation, but an infrared sauna is easier to tolerate for people with heart problems, since it is impossible to overheat in it.
You should not use cosmetics inside the structure, as burns are possible.
Mini
The smallest option is a phyto-barrel. This is a heated structure with a bench inside that can accommodate one person, whose body, with the exception of the head, fits completely into the keg. The device operates from a regular outlet.
There are also ordinary small structures that occupy less than one square meter. m. area of the room. They are easy to integrate into any niche.
Turkish
A Turkish-type steam room is installed in rooms with a height of at least three meters, equipped with ventilation, sewerage, and vapor barrier. There is high humidity, relatively low temperature, and a mild microclimate. This is a suitable place for a variety of beauty treatments.
Finnish
Such a structure is suitable only for very spacious apartments, where you can allocate an entire room for a sauna. The structure generates dry air, so it is easy to stay in it for a long time; there is practically no steam. Manufacturing the structure is labor-intensive, installation is complicated.
Russian
A steam or Russian bath requires medium temperature combined with high humidity. Warming up of the body occurs especially actively here, due to the formation of a thin film of water on the skin.
The structure is heated with a metal or brick stove, preferably closed. Additional installation of a steam generator is allowed.
Electric
The electric sauna installed in the apartment is heated using an electric stove-heater. The structure has a beautiful appearance, it is fireproof, since there is no need to buy special fuel.
The main disadvantage is that energy costs will increase significantly.
Dimensions and design of a mini sauna
A sauna in the bathroom allows you to take bath and water procedures without much preparation, at any time and without leaving your home.
There are ready-made saunas on sale - cabins that are simply installed in the bathroom. Cabin sizes may vary. In the smallest single or double cabins you can only sit on a bench. It is more comfortable to take bath procedures in cabins measuring 2x1.6 m.
and 2x2
m
.
In such booths you can lie down not alone, but together. The height of the sauna cabin inside should be about 2
m. Inside the cabin there is an electric sauna heater, as well as wooden benches and shelves in two or three levels. The walls and ceiling of the cabin are a three-layer sandwich, which consists of internal wooden panels, mineral wool insulation and external cladding.
Mini sauna in a new house
In a new house, it is convenient to place a mini sauna in a separate room on the floor, in the basement or in the attic.
Anyone who wants to have their own sauna - comfortable, spacious and, above all, functional, should think about it already when ordering a house project or when purchasing finished project.
In a new house, a spacious bathroom is usually provided to accommodate a mini sauna. More comfortable conditions for taking procedures can be created if the sauna is placed in a special fitness room. Exercise equipment or recreational furniture are often installed in the same room. It would be good if this room has access to the garden, terrace or balcony.
To install a mini sauna in a new house, you can provide a separate room in the basement or attic.
Mini sauna in an existing house or apartment
In an existing bathroom, instead of a bathtub, you can install two cabins - a shower and a sauna
Another option for replacing a bathtub in a city apartment with a ready-made cabin is a shower and a sauna together, the size in plan is 200x130 cm.
In an existing house, a sauna can be installed in a large bathroom or, for example, placed in the basement, or one of the rooms can be equipped for this purpose .
The interior panels of the cabin are made from certain types of wood. For example, coniferous wood of northern spruce, fir or cedar releases aromatic substances when heated. But the aroma should be light, there should not be too much of it. Therefore, pine wood, which contains a lot of resins, is not recommended. Panels made of aspen or linden create a more neutral atmosphere in the sauna.
Finished booths are sold disassembled. The booth must be assembled at the installation site. A gap of 20-50 mm is left between the stall and the bathroom wall. for ventilation.
Minuses
What are the disadvantages of a sauna installed in a city apartment:
- Quite a high cost. Setting up such a sauna, even a small one, is not affordable for everyone. Sometimes a bath once a week or month is more affordable.
- Arranging a classic sauna requires enough free space, which not every interior can allow. At the same time, having spent space on arrangement, you may not find time to enjoy it regularly.
- Electricity consumption increases. Heaters in a sauna, even if it is a mini one, “eat up” a lot of kilowatts.
- Not every apartment can be equipped with such a structure - a suitable layout, appropriate parameters and design are needed.
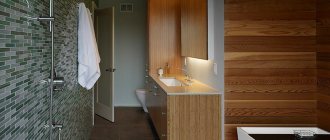
Bathroom design
Small sauna in the apartment
Corner sauna in the apartment
Small sauna in the bathroom interior
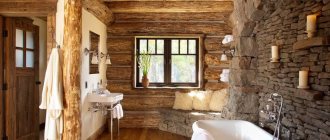
Finishing the sauna and bathroom with wood
Sauna in the interior of the apartment
Mini sauna for apartment
How to make a small sauna with your own hands
A sauna measuring 200x160 cm can be placed in a bathroom with an area of 9 m2.
It is cheaper to make a small sauna in the bathroom with your own hands, building it into the room.
The walls and ceiling of the bathroom at the location of the sauna are insulated from the inside with mineral wool on a wall frame. It is more convenient to attach the wooden cladding of the sauna to the wooden crate.
Read: Insulating walls from the inside with mineral wool.
The walls separating the sauna from the rest of the bathroom are assembled on a frame, similar to how they are done when constructing frame partitions. Thermal insulation is also placed in the walls of the cabin.
Read: DIY frame partition.
In order for the sauna to quickly warm up and consume less energy on heating, all heat-intensive surfaces inside the cabin - walls, ceilings made of bricks, blocks, concrete, as well as logs and beams - must be protected with thermal insulation. The thickness of mineral wool thermal insulation is usually 50 mm or 100 mm. for insulating an external wall. For the same purposes, the height inside the sauna should not be more than 2 m
.
For thermal insulation, it is better to use slabs rather than rolled material. Mineral wool boards are denser and less prone to slipping on vertical surfaces.
For a sauna measuring 200x200 cm, a bathroom with an area of 12 m2 is better suited
The insulation from the inside of the sauna is covered with a heat-resistant (with operating temperature above 110 ° C) vapor-proof film laminated with aluminum foil. The film prevents moisture from the insulation and also protects the interior of the sauna from mineral wool dust and other harmful emissions from the insulation. The film is laid on top of the thermal insulation, with aluminum inside the cabin. The joints and places where the film is nailed to the frame are sealed by gluing with aluminum tape - adhesive tape.
On the construction market you can find insulation slabs made of stone wool specifically designed for baths - saunas. Such plates are already covered with aluminum foil on one side. During installation, all seams between the plates and joints are taped with aluminum tape.
In any case, you should choose mineral wool insulation boards that use materials that are harmless to humans as a binder. For example, slabs for facade insulation are usually made using various types of formaldehyde resins as a binder. Such stoves constantly emit the deadly gas formaldehyde. The intensity of gas evolution increases when the material is heated.
Read: Formaldehyde in the house is a source of OSB boards (USB), mineral wool...
The thickness of the wooden cladding inside the sauna (lining, block house) must be at least 12 mm. What type of wood to use for the cladding is written above.
To ensure that the cladding does not darken over time and its appearance remains always attractive, the wood is coated with a liquid heat-resistant compound specifically designed for this purpose. For example, oil based on natural wax “Supi Saunavaha” from Tikkurila.
Wooden elements that are located in areas of lower temperatures, for example, floor gratings, door thresholds, can be protected with ordinary varnish.
The outside of the sauna frame is sheathed with wood, plasterboard or other board material, and lined with ceramic tiles or plastic panels.
Bath cabin - saunas made of profiled timber or boards
A more expensive sauna option is to make the cabin entirely out of wood.
, without insulation. Walls made of timber do not require additional protection with any films or compounds. Outside, timber walls are decorated with vapor-permeable paints and varnishes.
The walls of the cabin are laid out from thin planed profiled dry timber or boards with a section of 35-70 x 140-180 mm. laid on edge. To seal the joints between the beams, a cord or ribbon made of jute or flax is placed in the groove. A ventilated gap of 20-50 mm is left between the bathroom wall and the timber wall.
It should be noted that the heating time of a sauna made from timber will increase slightly, since the heat capacity of timber, compared to lining, is quite high.
Which sauna or bathhouse is better to choose for an apartment?
At home, the design of the steam room is selected based on the available area and the possibility of connecting communications. Electric and infrared saunas are the most convenient, since they do not require fuel in the form of firewood or other similar material. The frame itself can be built into any niche or assembled separately.
The second option is preferable, since if you move, it’s easy to take the “bathhouse” with you to your new place of residence.
To decide which sauna to place and where, they make a detailed drawing with dimensions and several location options.
How to make a sauna floor
Diagram of the drain into the sewer and the floor of the sauna bath in the bathroom.
Waterproofing layer made of built-up roofing material. In a sauna, it is best to make a concrete floating floor over a layer of extruded polystyrene foam insulation. Ceramic tiles are laid on top of the concrete floor screed.
The sauna floor in the passages is covered with removable wooden gratings. This floor design is not afraid of water and allows for convenient cleaning in the sauna. It will be even more convenient if you install a drain in the floor - a receiving grid with a siphon for draining water into the sewer.
Door to the sauna
The door to the sauna is usually made of wood. Bath doors made of tempered glass are also available for sale. For safety reasons, the door to the sauna should open outward and not have locks, but only latches.
Products for construction and repair
⇆
Sliding doors are convenient - they take up little space when opened, or swing doors that open in both directions. The height of the doors is usually 180-190 cm. The width of the doors varies. The door should not be too narrow - less than 60 cm.
The handles on the door and the handrails inside the sauna are made of wood so that they do not burn your hands.
Shelves and benches in the sauna
Shelves and benches in the sauna are made from wood that does not contain resin - aspen, linden, or from various exotic species that are commercially available. Experts say that products made from these rocks in the sauna are less hot to the touch.
The width of benches and shelves is made in the range of 31 - 55 cm. Benches and shelves are usually arranged in two tiers in height. The vertical distance from the floor to the first tier and between the shelves should be about 40 cm. From the ceiling to the top shelf there should be a distance of 1.2 m. It is recommended to make the top shelf at least 50 cm wide. Shelves and benches should be made of slats, leaving There is a gap of 5-10 mm between adjacent slats. for free air circulation in the mini sauna.
The length of the shelves, for comfortable procedures while lying down, is about 2 m. For ease of cleaning in the sauna, it is better to make the benches and shelves movable - lifting or removable.
It will be more comfortable to sit and the walls of the sauna will remain clean if you install backrests along the shelves and benches on the walls.
How to sheathe
Let's consider which materials are best suited for the interior design of a home sauna:
- The best option is heat-treated wood. The best wood for a sauna is linden or aspen. They heat up the worst and are not resinous, which makes staying in the sauna more comfortable. In addition, these trees have, according to folk medicine, healing properties. The Russian traditional bathhouse is also often made from these trees.
- Arrange the paneling in vertical stripes - this visually makes the room wider, which is especially important for a mini-sauna.
- Nail the paneling using a secret technique - into the groove. This will make the room more aesthetically pleasing.
- First, you need to sheathe the ceiling in the room, then the walls.
- The floor is also made of wood - this option is best. Sometimes tiled or ceramic floors are installed, but in this case a wooden grate is still installed to prevent your feet from getting burned.
- The door is wooden. A modern version of a matte or tinted design will also look very interesting and attractive.
Wooden sauna paneling
Wooden and stone lining of the sauna
Wooden and stone finishing of the sauna
Small sauna in the bathroom
Beautiful sauna design
Sauna with glass partition in the bathroom
Stove in a metal casing in a sauna
Beautiful lighting in your home sauna
Wooden accessories in the sauna
Electric stove - sauna heater
To heat a mini sauna, the easiest way is to install an electric heater. The power of the stove depends on the size of the sauna.
The power of the electric furnace is selected at the rate of 1-1.5 kW
.
per 1 m2
of sauna area.
For a mini sauna measuring 2x2 m
.
An electric heater with a power of 4-6 kW
. Such a stove can be connected without any problems to the panel at the input of a regular single-phase electrical network of an apartment or house.
The higher the power of the stove, the faster the sauna will heat up. The power of the stove is considered sufficient if the air in the sauna heats up to a temperature of 80 ° C in 20-30 minutes.
An electric sauna stove is usually equipped with a thermostat, which automatically maintains the set temperature in the sauna.
The sauna stove is placed on the floor or on the wall, always near the door
. This arrangement of the oven ensures that the cold air entering through the door is captured by the flow of hot air from the oven, quickly mixed and warmed up. It is convenient to clean the sauna if the stove is mounted on the wall, at a small height from the floor.
It is recommended that the level of the stones in the stove be at the level of the feet of the person sitting on the top shelf. To place the stove at the required height, sometimes it is necessary to build a pit in the floor.
Some furnace designs require guards to be installed around them to protect people from accidentally touching hot parts. It is also necessary to comply with the requirements of the factory fire safety instructions.
The sauna heater stove has a compartment where stones are loaded. The heated stones are watered with water, which turns into steam, increasing the humidity in the sauna.
For laying in the oven, stones with a fraction of 40-80 mm are used. certain minerals, for example, diabase, jadeite, soapstone, etc. Using random stones is dangerous.
Hot stones can crack and fly apart when watered on them. There should not be too many stones, because then the inertia of the furnace increases and, as a result, energy consumption increases.
Experts have calculated that a medium-sized home sauna (200x160 cm
) for one session of bath procedures,
kW*hour
of electricity
for heating . Moreover, most of this energy remains in the house, heating it. For comparison, it takes 1.5 kWh
kWh
to bathe in the bathroom . Most of the energy spent on heating water flows along with the water into the sewer.
For example, one of the domestic manufacturers produces wall-mounted electric heaters under the SteamSib brand. The electric heater is designed to heat and maintain a set temperature in a steam room and generate steam from the stones.
The wall-mounted electric heater “SteamSib” is commercially available in three modifications: with a power of 3.4 kW, 4.4 kW, and 5.4 kW. Dimensions of the electric heater (HxWxD) 506x446x290 mm.
Heating is controlled using a remote control panel. The control panel consists of a control unit and a temperature sensor. The control unit is mounted outside the steam room and connected to the electric heater and temperature sensor mounted inside. The control unit sets the heating level of the steam room and the operating time of the electric heater, and also turns the electric heater on and off.
Stove in the sauna interior
The main structure of any bathhouse is the stove. It can be free-standing or built into the floor or wall. Models differ in functionality and appearance. It’s easy to choose a ready-made stove that matches the design of your home sauna.
Some owners make their own stove in the steam room. It can be lined with special stones that maintain the necessary thermal conditions.
A popular material for cladding is soapstone. This is a stone that perfectly maintains temperature conditions. The heat remains inside the furnace or room if soapstone chlorite was used for them. Stone admixtures can be used in tiles. Therefore, any material with soapstone is ideal for finishing a sauna stove.
Serpentine stone has similar properties. It can be used to decorate the outside of the stove. The design will not only look beautiful, but also retain the necessary heat.
A more budget-friendly option is a stove with a metal frame. It's easy to do it yourself. It is enough to solder all the parts in the desired configuration. The metal heater can be hung from the wall, or placed in the center of the mini sauna.
When installing the heater, it is necessary to take into account its installation location. It should be mounted in a separate area so that the hot steam does not burn a person. The place above the stove is important. It should be free.
Therefore, you should not install shelves or seats there. The only accessory allowed above the heater is a bowl for aroma oils. Vapors coming from the oven will spread upward. And under their influence the smell of oils will begin to spread.
Electric steam generator instead of a heater
With a heater stove in the sauna, you can create two microclimate options - a dry or wet sauna.
To create a steam sauna microclimate
It is necessary to additionally purchase a steam generator for the sauna. The steam generator is installed outside and requires connection to a water supply. In the steam generator, water is heated, boils and turns into hot steam, which is supplied through a pipe into the sauna. The tip of the pipe is located in the sauna under the shelves.
heater stoves with a built-in steam generator on sale
For a mini-sauna in the bathroom, a universal device is more suitable - an electric steam generator, with which you can create any type of microclimate in the steam room.
SteamCity (SteamCity) is an electrical device for creating a bathhouse microclimate. Just 3-5 minutes after switching on, the temperature in the steam generation chambers reaches 650 °C and the water coming from the dispenser begins to turn into light, comfortable steam.
An electric steam generator can independently heat small steam rooms (4-8 cubic meters depending on the modification). In addition, it can be used as an addition to the main electric heater in large steam rooms - up to 20 cubic meters.
SteamCity can be used for spa treatments and aromatherapy.
Electric steam generator with a power of 2.6 kW. may be the only heating device for a steam room with a volume of 4 m3 and a power of 5.3 kW. enough to heat a steam room with a volume of 8 m3.
Dimensions of the electric steam generator (HxWxD) 700x400x150 mm.
Lighting in a mini-sauna
In the sauna bath it is necessary to install special waterproof sealed lamps with incandescent lamps. Lights are usually placed high up on the wall in the corners or on the ceiling of the booth.
Sometimes the lamps are installed under the shelves or behind the backrests at a safe distance from the wooden flammable parts of the cabin. It should be borne in mind that this option requires the installation of lamps that are more resistant to water.
Modern energy-saving and LED lamps are not suitable for installation inside a sauna cabin. They are not designed to operate in high ambient temperatures. Such lamps can be installed outside, directing the light inside the booth through the glazing.
Sauna equipment
The heart of the steam room is traditionally a heating device - a heater for a bath, an infrared or electric heater for a sauna, a stove with a steam generator for a hammam. It can have one or more temperature and humidity modes, and be equipped with additional options - aromatherapy, salt dies.
If the steam room is small in size, you can make a bath canopy of 2–3 steps inside. If space allows, a full-height lounger is arranged, on which visitors hover each other with brooms.
The stove is protected by enclosing structures - railings on racks. Waterproof lampshades and LED strip are used for lighting. Temperature and/or humidity control is carried out using built-in sensors.
To ensure maximum comfort, a shower and a tray with a drain connected to the drainage system can be built into the cabin. Removable, retractable, transformable seats, shelves, floors simplify cleaning and maintenance of the steam room.
Glass doors are convenient because they do not deform from humidity and temperature, unlike wooden ones, but they are more expensive.
Ventilation in the sauna
| The oven should be located next to the door. The inlet hole is at the bottom, near the floor under the stove. The air outlet is at the top, in the wall or ceiling of the sauna. |
Be sure to arrange ventilation
home sauna.
A hole for air flow is made in the wall of the sauna, below the floor. The inlet opening should be located under the stove or next to it. The hole area is approximately 125 cm2
.
To allow air to escape, another hole is made at the top, in the wall or ceiling of the sauna. The exhaust vent is located as far as possible from the supply vent and from the sauna door. The area of the exhaust opening is twice as large as the supply opening, about 250 cm2
.
The supply and exhaust openings and the sauna door should open into the same bathroom area.
Air circulation from the sauna to the bathroom and back reduces heat loss and helps warm the air in the bathroom.
While the steam room is heating, the ventilation exhaust hole is covered - the sauna will heat up faster. At the end of the procedures, the hole is opened completely to dry the cabin.
The bathroom in which the sauna is located must have an exhaust ventilation duct with access to the street. An electric fan is installed in the exhaust duct .
Read how to properly ventilate your home.
Economy - ventilation channel in the sauna
In order to use the heat of the sauna to heat the house, prudent owners install an economy channel for forced air supply from the bathroom to an adjacent room, for example, to a corridor or hall. Warm air is sucked by a fan into the economy duct from the top of the bathroom and flows down through the pipe, and then exits at floor level in the adjacent room.
The thermostat turns on the fan in the economy channel when the air temperature in the bathroom exceeds the set value. Warm air from the bathroom enters the corridor, hall and then naturally spreads throughout other rooms of the house.
In summer, excess heat from the sauna is utilized by removing warm air to the street through the forced ventilation exhaust duct.
Ventilation
For ventilation, it is necessary to maintain the dimensions of the sauna. It should have a height of 2.2 meters. If you have a higher ceiling, you can use the space to create a mezzanine. The inside of the boards is nailed with gaps of 1-2 centimeters at the bottom and top. This ensures natural air movement.
In addition, the oven has its own fan to mix the internal atmosphere and equalize the temperature.
Fire safety requirements for saunas
SP 54.13330.2016 Residential multi-apartment buildings
7.3.14 When designing saunas in apartments of multi-apartment buildings (except for blocked ones), the following should be provided:
- steam room volume - ranging from 8 to 24 m3;
- a special factory-made oven for heating with automatic shutdown when the temperature reaches 130 °C, as well as after 8 hours of continuous operation;
- placing this stove at a distance of at least 0.2 m from the walls of the steam room;
- installation of a fireproof heat-insulating shield over the stove;
- equipping the ventilation duct with a fire damper in accordance with SP 60.13330, SP 7.13130;
- equipment with a deluge or dry pipe connected outside the steam room to the internal water supply.
The diameter of the dry pipe is determined based on the irrigation intensity of at least 0.06 l/s per 1 m2 of wall surface, the angle of inclination of the water jet to the surface of the partitions of 20°-30° and the presence in the dry pipe of holes with a diameter of 3-5 mm, located in increments of 150- 200 mm.
It is recommended that the fire safety requirements outlined above also be followed for saunas located in a private home.
Tips and recommendations for decorating the interior of an apartment with a bathhouse, sauna
The bathhouse designs in the apartment in the photo look very different. Design and renovation specialists give the following recommendations for their design:
- the lighting is not bright, but diffused, which ensures better relaxation;
- It is not advisable to make the shelves themselves from coniferous wood;
- It is not advisable to coat wooden structures inside the steam room with varnish, but only with anti-rot compounds;
- an additional therapeutic effect is achieved by decorating the bathhouse floors or its fragments with large pebbles;
- glass doors are the optimal solution for those who feel uncomfortable in an overly cramped enclosed space.
Sauna care
Untreated wood deteriorates when constantly exposed to moisture, so when caring for a sauna it is very important that it dry thoroughly after each use.
To keep the sauna clean, after finishing the procedures, while the sauna is still warm, you must:
- wipe the benches and shelves of the sauna with a damp cloth or sponge;
- lift the grate or rug from the floor, lean it against the wall and let it dry;
- remove the remaining water, wipe the floor dry, pick up wet towels;
- open the door and vent.
Under such conditions, a heated sauna will easily dry out, since fresh air, quickly heating up, will take away moisture. This way we will prevent the appearance of mold and mildew, which quickly develop in a warm and humid environment.
Periodically, as the wooden parts of the sauna become dirty, it is necessary to carry out general cleaning. Wash wooden elements with a brush and detergent. Wash off any remaining detergent, wipe with a damp cloth and wipe dry. Then turn on the heater and dry the sauna.
There are also special products on sale for cleaning the internal parts of the sauna, which are also used for disinfection, making it easier to maintain the room.
It is better to cover all wooden surfaces of the sauna with a protective compound (for example, “Supi Saunavaha” from Tikkurila). The composition containing natural wax creates a water- and dirt-repellent surface. Thanks to this coating, wooden surfaces will become less dirty and easier to clean.
The container for stove stones must be cleaned at least once a year. To do this, stones are removed from it, and then fine sand and sediment from water.
More articles on this topic:
⇒ Installation of a built-in tile shower in a bathroom or toilet
More articles on this topic
- Do-it-yourself soundproofing frame partitions made of plasterboard
- Sound insulation - sound insulation of a house, apartment
- Correct wooden house made of construction timber
- House with monolithic walls made of large-porous expanded clay concrete
- Review of heating equipment "Teplodar"
- Gas detector - detector of domestic and carbon monoxide leaks in the house
- Dew point, vapor barrier and ventilated wall gap
- Do you need heated floors in a private home?
Finishing materials
Finishing materials must be selected taking into account the presence of high temperatures and high humidity in the steam room. It is important that the finish can withstand changes in the listed parameters. For a sauna, we recommend choosing wood as the base, mainly hardwood, such as linden and aspen. Panels would be a great option. They will not cause burns and do not emit harmful substances when heated. Coniferous species are not suitable due to the appearance of a pungent odor when the temperature increases.
Organizing a useful and practical place for relaxation with a sauna is a rational embodiment of the dreams of many homeowners of private houses.
It is recommended to make the floor wooden. Herbs are suitable for a steam room, with the ability to pick them up and dry them. This will help avoid rapid rotting. Tiles are often used, especially if there is a swimming pool. Due to high humidity, choose products that are rough and will not allow you to slip.
To visually increase the space, install glass doors.
See alsoFeatures of store interior design