Increasingly, country houses are being built from natural wood, the unique structure and environmental friendliness of which endow it with special performance properties. No other building material has been able to surpass wood in its ability to positively influence human health and create an optimal microclimate in a living space. Wooden houses are warm and cozy, but wood, unfortunately, has one significant drawback - vulnerability to moisture, which can be overcome if you take into account all the rules for arranging a bathroom. The floor in the bathroom in a wooden house deserves special attention. It must be not only durable, but also moisture resistant.
Bathroom floor in a wooden house
Features of a wooden house
Particular attention should be paid to the upcoming loads on the floor beams. At the planning stage, the dynamic stress that will act on the wooden floor when the bathtub is filled with water is taken into account. To reduce this influence, the spacing of the beams is reduced by using a larger cross-sectional area. The thickness of the overlap will increase by 25%, while minimizing its “fatigue” and subsequent destruction.
More often the floor consists of the following layers:
- rough board flooring;
- concrete screed;
- finishing.
In addition, the floor must be waterproofed. Waterproofing can not only protect the concrete surface from destruction, but also protect the property of neighbors in the event of some unforeseen situations. You will find the installation technology in a special article.
The design and thickness of the concrete screed are also taken into account at the design stage. In this case, the beams are installed lower by 20 cm, so that the thickness of the screed and finishing ultimately lead to a uniform level of the finished floor in all rooms. Otherwise, the floor in the bathroom will be higher than in other rooms. The most successful and expedient solution would be to install the floor in the bathroom slightly lower than in the other rooms. This will protect the remaining rooms from flooding in the event of an emergency.
Concrete screed device
Features of using a bathroom in a wooden house
A bathroom is a room with specific operating conditions, which is especially important to consider if the house is made of wood. The following nuances of using a bathroom can be highlighted:
- High humidity.
- There is a high probability of liquid getting on the walls and floor.
- The likelihood of emergency situations associated with flooding of the premises.
- Temperature changes.
- Exposure to hot steam on wall and floor surfaces.
- Lack of ventilation.
Therefore, you should be especially careful when choosing materials that should have the following properties:
- Low water absorption. The material should not absorb moisture and swell under its influence.
- Waterproofing qualities.
- Resistant to high temperatures and temperature changes.
- Mechanical resistance and resistance to deformation.
It is worth remembering that the finishing material also puts a load on the base
How to choose a place for a bathroom
The location of the bathroom is chosen at the design stage of the house. From a practical point of view, the location of the bathroom should be near the bedroom, wardrobe or between the living rooms of the first floor. In a house with several floors, bathrooms are planned at different levels; a guest bathroom must be located on the first floor, and a bathroom near the “quiet” private rooms on the second floor.
Project of a one-story wooden house
Important! On average, a bathtub bowl weighs around 100 kg. When filled with water, its weight doubles; if you add the weight of a person, then the calculated load should not be less than 460 kg/m².
At the design stage, the location of the main communications, inputs and outputs, connection points, the location of fasteners and valves are noted in the plan and, based on this, the arrangement of the main plumbing equipment is visualized.
Location of the bathroom near the bedroom
Instructions for arranging waterproofing
The owner can choose any of the above options for waterproofing the floor at his discretion. But, as practice shows, the most effective is the integrated use of coating and pasting materials. You are invited to read the instructions on how to independently perform this particular method below.
Preparatory activities
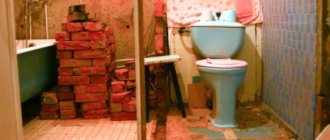
Old flooring should be removed
If the room is new and there are no significant differences in height, before starting work you will only need to make sure that there is no dirt or dust on the base. If the bathroom has already been in use, the finishing coating is first removed, followed by the screed is dismantled, if this is justified by the degree of its wear.
Armed with coarse sandpaper or a spatula, remove plaster or other coating from the walls to a height of 10-20 centimeters. As a rule, 10-centimeter “sides” are quite enough. For the rest, be guided by personal preferences, focusing on the operating features of your particular bathroom.
If the screed is not of sufficient quality, it is better to dismantle it or repair it
Grease and paint stains, broken fragments, dust and other contaminants are removed. Cracks and other defects are repaired with a special repair compound or ordinary cement. Along the lines where the floor and walls join, a groove of approximately 10 mm in depth and similar width is created. A bentonite cord is placed in the groove. Instead of a cord, you can use cement mortar to fill the recess. As a result, you will ensure maximum resistance of the mating areas to the damaging effects of moisture.
The main stage of work
Having finished with the preparatory activities, proceed to the main stage of work. Cover the floor, as well as adjacent walls, with primer to the height of the “sides” of the insulation pan.
Priming the bathroom floor
Apply the primer in a double layer, thoroughly rubbing the mixture into the base. The layers are arranged perpendicular to each other.
In places where risers and other communications intersect the floor, fill in liquid waterproofing. Treat the floor and lower part of the walls with bitumen mastic or other selected coating material. While the mixture has not hardened, strengthen the joints of the floor and walls with PVC mesh, slightly recessing it into the material.
Coating waterproofing applied to walls
Recommendations regarding the required number of layers of mastic/paste are given in the manufacturer's instructions, follow them. Wait for the composition to gain strength. The required time will also be indicated in the attached instructions.
Applying coating waterproofing to the floor
Waterproofing seams
Waterproofing bottom corners
While the coating dries, start cutting the rolled material into strips of the required length. The required indicator is calculated extremely simply: the amount of allowance for the walls is added to the length of the base.
Pasted waterproofing. Flooring strips
As a rule, the underside of rolled insulation is covered with a special adhesive composition, so there is no need to use third-party mixtures to create the layer - just get rid of the protective polyethylene film. Set aside a distance from the edges of the cut of insulating material along the height of the sides of the protective “pallet” being installed. Glue the main part of the strip to the floor and wipe it firmly with a roller.
Follow the given sequence, laying each new strip with approximately a 10-centimeter overlap on the previous one. The result is a continuous, moisture-proof membrane. Once again, go over the coating with a heavy roller and begin arranging allowances for the walls.
If possible, preheat the bottom of the wall. Next you will need to fix the free parts of the strips on the walls
To securely fix it in the corners, carefully press the material down using a plank. Finally, treat the areas around the pipes again with bitumen mastic
With high-quality waterproofing, the floor will be reliably protected
Now your bathroom floor is reliably protected from the adverse effects of moisture. You can proceed to further stages of arranging the room, which, as a rule, boil down to pouring screed and laying floor tiles.
Good luck!
Material
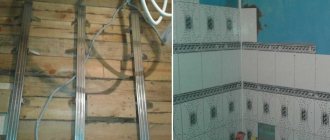
The structure of the floor, as noted earlier, consists of a base - a durable plank flooring, a concrete screed, which allows you to obtain a perfectly flat surface and a finishing layer.
The screed device allows you to solve several issues:
- Level the base.
- Hide communications.
- Install a “warm floor” system.
Now there are several types of “warm floors” on the construction market. They differ in the type of coolant and operating efficiency. How to choose a heated floor? We'll tell you in our article.
The screed can be wet or dry. Cement-sand screed is made under a ceramic coating, and for the installation of wood and laminate flooring, dry screed technology is used in the form of laying gypsum fiber sheets, OSP boards and waterproof plywood.
Dry floor screed
The following is used as a finishing coating:
- natural wood;
- ceramic tiles;
- mosaic;
- porcelain tiles;
- linoleum;
- laminate;
- traffic jam
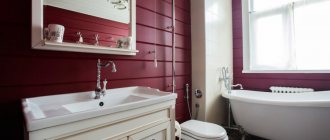
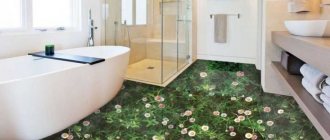
Ceramic tiles in the bathroom blend seamlessly with the wall material
A plank floor in a bathroom in a wooden house looks most organic and natural. For its construction, it is recommended to use teak or larch as a board material or waterproof parquet. A reliable and practical solution would be ceramic tiles that imitate wood.
Important! When installing a plank floor in a bathroom, it is recommended to use boards made of moisture-resistant wood, additionally treated with antiseptics and compounds designed to increase the moisture-repellent properties of the material, its resistance to temperature changes, insects, fungus and rot.
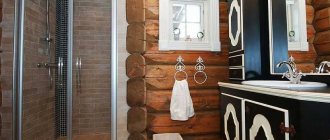
Natural stone slabs will look original on the floor in a bathroom with wooden walls.
Wooden covering
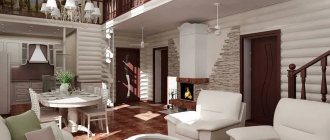
First of all, when choosing a flooring material in a wooden house, the thought arises of natural wood. The plank floor will organically integrate into the overall interior concept. How practical is this material?
Interior with wooden floor
Everyone knows about the incompatibility of wood and water, but there are species that are successfully used in wet rooms - bathrooms, saunas and baths. With proper processing and due to the presence of natural antiseptics (essential oils) in the material, it is not at risk of rotting and fungus formation. The most moisture-resistant boards include larch, teak and beech boards. In terms of cost, larch is a budget option, and teak is considered an elite type of wood used in shipbuilding.
Teak has a deep natural shade
A type of moisture-resistant material includes thermowood, which at the stage of lumber production is subjected to high-temperature (220-240°C) and oxygen-free treatment using water steam. As a result, the water absorption rate of the material is significantly reduced and the degree of resistance to fungus increases several times. Laying such a floor can be done on a waterproofed wooden base without installing a concrete screed.
Properties of thermowood
Thermowood
One of the materials that can recreate the atmosphere of closeness to nature and create a moisture-resistant floor in the bathroom that imitates a board is decking, which is otherwise called wood plastic or decking board. The polymers that make up this material increase its moisture resistance and mechanical strength. Decking has an attractive appearance and strict geometric dimensions. This material can withstand extreme outdoor conditions, so it will perform well indoors with high humidity.
Decking
Ceramic tile
When choosing the traditional method of tiling the floor with ceramic tiles, you should take into account that when laying it on the floor in a wooden house, there are some nuances:
- The immobility of the base will need to be ensured using a sand-cement screed.
- To lay ceramic tiles, the base must be as level as possible.
- The presence of a screed will entail additional load on the base and the beam floor, so it is necessary to ensure the stability of the structure by increasing the number of beams and reducing the distance between them.
- Taking into account the screed and waterproofing layer, it is necessary to calculate in advance the height of the beams - they will be approximately 10 cm lower than in other rooms. When all the layers are installed, the difference will be equal, but it is advisable that the floor in the bathroom be 2 cm lower.
- The construction of the screed is associated with some inconveniences - the labor-intensive process, providing time for the screed to dry, increasing the load on the floor, taking into account the fact that the finishing material weighs a lot.
There are different ways to properly level a bathroom floor, and they all have their pros and cons. After carefully studying all the options, you can easily choose the most optimal one. To do this, you can read our special article.
Bathroom floor tiles
Among the positive qualities of flooring made of ceramic tiles or mosaics, the following can be noted:
- mechanical stability;
- moisture resistance;
- resistance to temperature changes, chemicals and detergents;
- easy care;
- hygiene.
The principle of laying tiles on a wooden base
Important! When laying tiles, special attention must be paid to the joints - this is the weak point of the coating, the moisture resistance of which depends on the chosen grouting material.
Laminate
A relatively inexpensive and practical choice would be to install a floor covering using a moisture-resistant laminate. This material imitates various types of wood, including valuable ones, their texture and pattern. When choosing a material, you need to make sure that it is suitable for use in rooms with high humidity - the markings on the information sheet in each pack of laminate will tell you in detail about its properties and requirements for operating conditions.
Which class of laminate to choose for the bathroom? Read in the special article.
Moisture-resistant laminate
Also, special attention should be paid to the joints; some craftsmen treat them with silicone sealant.
As for laying laminate flooring, the process itself is no different from working in “dry” rooms. Closer attention should be paid to the rules for choosing a material that is moisture-resistant and water-resistant. These two types differ in the design of the board, namely its base (bearing layer).
Structure of a laminate board
The basis for the moisture-resistant laminate is a dense HDF board. This is a composite material that contains crushed organic fibers. A cellular polymer synthetic board, resistant to moisture and steam, is used as the supporting layer of the waterproof laminate.
Otherwise, the structure of the board does not differ from multilayer structures with other performance characteristics:
- The bottom layer is stabilizing.
- The supporting layer is the thickest.
- A layer of special paper with a decorative pattern applied.
- Protective lamination coating, characterized by high wear resistance.
Waterproof laminate is most preferable in rooms with high humidity. The service life of such a coating largely depends on the abrasion class of the outer layer, which also protects the remaining layers from moisture.
Linoleum
The most budget option is laying linoleum. The advantage of this material is its high moisture resistance and the absence of joints. The pattern on its surface can imitate natural wood, tile, or natural stone. The installation process does not take much time, but waterproofing work should not be neglected.
Important! The bathroom must be equipped with a high-quality hood. This will guarantee a healthy microclimate, absence of high humidity, damp smell, fungus and mold.
Laying linoleum does not require special skills
Prices for Tarkett linoleum
linoleum tarkett
Base waterproofing
To ensure effective adhesion of waterproofing materials to a wooden coating, a primer is performed, followed by drying. Vulnerable areas at joints and corners are sealed with insulating tape for additional protection.
To insulate floors from moisture, the following are used:
- Tol. A special type of cardboard impregnated with tar or a liquid composition based on coal. Indoors, options without sprinkling are used. Placed on the floor using tar mastic.
- Ruberoid. Roofing material with bitumen impregnation. A surface layer of sand, asbestos or talc protects against sticking.
- Isoplast. Made from fiberglass or polyester. Impregnated with bitumen. Waterproofing characteristics are enhanced by polymer additives.
- Mostoplast. The canvas is made from modified bitumen material. Protection against moisture is provided by the presence of polymers in the composition.
Procedure for laying self-adhesive polymer roll waterproofing:
- A layer of bitumen-emulsion primer is applied to the cement-sand screed.
- After the impregnation has dried, a waterproofing membrane is laid out on the surface. Marking in progress. The material cut to size should rest for some time.
- The roll is rolled up on both sides and the protective film is cut. Gradually exposing the self-adhesive base, installation is carried out. A roller is used to remove waves and air bubbles.
- The side overlap should be at least 10 cm, at the ends - from 15 cm or more. These areas are impregnated with bitumen mastic or primer. After similar treatment, the material is applied to the walls by 20 cm.
Liquid waterproofing compounds are thoroughly mixed before use and applied to the prepared surface. Vulnerable areas at corners, abutments and joints are sealed with insulating tape, and a second layer of coating is applied on top.
For floors in wooden buildings, the following types of mastics are used as a waterproofing material:
- Bitumen-polymer. It is made on the basis of plasticizers, organic solvents and latex filler. Does not require heating before use. Characterized by increased plasticity.
- Bituminous. When cold, it is suitable for all substrates, with the exception of concrete surfaces. When heated, it gains versatility.
- Acrylic. Has no smell. The material is highly durable, plastic and environmentally friendly.
READ MORE: How to do a self-leveling floor on a wooden base correctly
A reliable waterproofing device will serve to protect the wooden base from moisture and prevent the beams from being damaged by microorganisms and rotting. In addition to insulating the floors, it is necessary to insulate the walls to a minimum height of 20 cm from the lower level.
Warm floor
The installation of heated floors is very popular among owners of private houses, including wooden ones. Installing a water heated floor requires pouring a screed, while electric infrared floors are mounted on a wooden base.
There is a laying technology for water heated floors, when the base is covered with polystyrene laying mats, inside which pipes are laid. A gypsum board coating is placed on top as a base for the final coating.
Layered method
Table 2. Method of installing heated floors without pouring screed
| Illustration | Description |
| The surface of the subfloor is covered with foamed polyethylene with a reflective film based on lavsan. | |
| The bars are installed, between which the pipes will be located. | |
| The distance between the bars should be exactly 20 mm. To control, you can place the plate so that it fits snugly against the bars. | |
| The bars are fixed using wood screws, recessing the caps by 2 mm. It is recommended to fasten the bars in increments of 30 cm. | |
| After all the bars are secured, heat distribution plates are inserted. Each plate is supplied in a length of 120 cm and is divided into 20 cm sections. The plates must be laid depending on the pipe laying spacing from 20 to 30 cm between pipes. | |
| Plates are not used at pipe turning points. | |
| Starting from the installation box installed in the corner of the room, the pipe is laid in the recess in the heat distribution plates. | |
| When turning the pipes, take a larger radius so as not to damage the polyethylene. | |
| The next step is to lay gypsum fiber sheets, which will promote uniform heating of the floor and create additional heat accumulation. | |
| The sheets are fixed to the block with self-tapping screws, being careful not to damage the pipe. | |
| At the final stage, the finishing coating is laid - laminate, linoleum or tile. |
The heated floor system not only increases the comfort of staying in the room, but also allows you to disguise communications.
Waterproofing methods
The choice of waterproofing material for the bathroom depends on the method of its implementation. In fact, there are many ways to waterproof a floor, but we are interested in those that can be done independently, without the involvement of specialists. Do-it-yourself high-quality waterproofing of a bathroom floor with the right choice of materials and compliance with certain rules is not so difficult.
Let's look at the two most suitable methods of waterproofing:
- Pasting,
- Coating.
Features of adhesive waterproofing
This type of waterproofing is made from rolls or sheets of waterproof materials using special glue.
Performing waterproofing
Waterproofing the bathroom floor begins with preparing the base surface. It should be smooth and completely dry. The surface is primed with bitumen emulsion. Next, gluing or fusing of insulating materials occurs. The elements are overlapped. Installation using the heating method is not very suitable for enclosed spaces, therefore, for adhesive waterproofing in the bathroom, special adhesives that do not require heating are used. The choice of them on the construction market is quite large; modern mastics for waterproofing also serve as a sealant. Gluing the material is quite simple: using a notched trowel, apply an even layer of glue to the edge of the waterproofing material and lay it down.
Advantages
- High reliability,
- Durability provided that modern materials are used,
- Low cost,
- Possibility of laying the floor covering immediately after installing waterproofing.
Flaws
- Possibility of installation and normal operation only on a very flat surface (unevenness is permissible no more than 2 mm),
- It is difficult to do it carefully at the junction of the floor and walls if installed by an inexperienced person.
Features of coating waterproofing
Coating waterproofing is a coating made of special plastic materials. It can be either single-layer or multi-layer, with a thickness from a millimeter to several centimeters.
Materials for coating waterproofing
- Bitumen mastics,
- Bitumen-polymer mastics,
- Polyurethane mixtures,
- Polymer mixtures,
- Acrylic water-based waterproofing.
Bitumen mastics have some disadvantages, which limits their use:
- Surface cracking due to temperature fluctuations,
- Susceptibility to biological corrosion,
- Unpleasant smell.
Polymer mixtures, which also have a more aesthetic appearance, do not have all these disadvantages, so the surface after treatment with them becomes blue or gray.
Execution of work
- The first layer of waterproofing is applied to the corners between the floor and the wall along the entire perimeter.
- After drying, you can glue them with self-adhesive rubber waterproof tape.
- The coating is applied to the entire prepared area using a wide paint brush or roller. It definitely takes a day to dry each layer. Typically three layers of coating waterproofing are applied.
Advantages
- Can be applied to almost any surface, even uneven and wet ones.
- Possibility of application to any insulated base material.
- Ease of work. There is no need for any special skills or abilities.
Flaw
The need to perform a concrete screed before finishing the floor. That is, the length of time between the implementation of waterproofing and the completion of work on the floor.
Plank floor installation
The finished plank floor is arranged as follows:
- The logs should be installed using the floating method without rigid fixation into the walls, for example, on brick pillars.
Wooden logs
- The logs are treated with antiseptic compounds and coated with bitumen-based mastic.
- The plank flooring is installed using a tongue-and-groove board with a tongue-and-groove fixation method. In this case, the coating is strong, without gaps.
- When fixing the board to the joists, nails or screws and glue are used to lubricate the groove.
Fix the logs
- If required, sand the surface of the finished wooden flooring.
- At the final stage, the board is covered with a protective and decorative composition. More often it is a varnish that increases the moisture resistance of the coating.
Wooden floor in the bathroom
Recommendations for choosing the right type of tree
These floors can be made from several types of wood.
Teak covering
This wood has been used in shipbuilding for several hundred years. The fiber structure of teak is very dense. This allows the material not only to be waterproof, but also to accumulate heat. Installing a bathtub on teak wooden floors is also justified by the fact that such a coating has a very high resistance to chemicals.
The slight roughness of the front layer makes the coating slippery and therefore completely safe. The shade of teak is deep and dark, it makes the room more luxurious, respectable, and beautiful. The only drawback is the high cost of the material.
Thermowood
It is obtained by treating valuable wood species with very high temperature steam, in the complete absence of oxygen. This processing technology makes it resistant to high humidity, making it much stronger. Fungus and mold will not form on such a coating. Thermowood does not rot or deform.
Economy class tree
There is a flooring option that will be more accessible to the buyer. This wood is: larch; elm; oak; ash
With lower cost, high quality indicators and performance properties, these species can be a worthy alternative to teak or thermowood. With their help, reliable floors are created that are resistant to high humidity and temperature changes.
Note to the reader! Maybe
Attention to microclimate
Parquet is natural, environmentally friendly, which means it breathes. As the humidity in the room increases, it increases in size, swells, and warps. Dry air provokes drying of the coating, the appearance of cracks and crevices. That is why it is worth noting that high-quality moisture protection plays an important role even at the stage of laying parquet.
A gap of about one centimeter should be left around the perimeter of the coating. It is filled with sealant (elastic) - the product will allow the parquet to expand with changes in temperature and humidity conditions.
Seasonal fluctuations in the size of parquet planks are a natural thing and are inherent to a greater or lesser extent in all tree species without exception. It is worth noting that with oak, ash, walnut and maple there will be no special problems in this regard, but the “exotics” will certainly show themselves in all their glory.
But is it possible to somehow weaken this process? Certainly! Ensuring indoor air humidity control is half the battle. Parquet should be used at a relative humidity not exceeding 60%; The optimal temperature is 15-25 degrees.
Parquet care: dry cleaning
Winter period
The heating season begins and the air in the room is certainly “dried out.” The dies shrink and gaps form between them. Stop panicking! In spring, the air will be filled with moisture again, and the gaps between the slats will disappear.
Oh, do you want the cracks not to bother you even in winter? This means you will have to additionally humidify the premises. For this purpose, it is best to purchase a portable device, and even better (if possible) to integrate a humidifier into the ventilation system. If you do not allow the humidity level to drop below 45%, cracks will not appear.
A regular hygrometer will help you monitor the humidity level in your home. Excessively dry air, by the way, can also deteriorate human well-being.
Summer season
In warm, rainy summers, the relative humidity in the rooms reaches 95%. The tree, absorbing moisture, expands. Excess moisture in the air, even in a few days, can “bring” the parquet to the “boat” effect - the edges of the planks rise above the center. Something similar can be observed after the floor has been flooded with water (which was not removed in a timely manner and had time to be absorbed). As humidity drops, the slats begin to slowly straighten.
In warm countries with consistently high humidity (India, Indonesia, certain regions of China), it is for this reason that a completely different parquet flooring technology is used: the sanded and oiled coating is laid on a substrate without glue (free flooring); they press him against the walls.
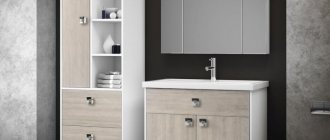
Selection and installation of plumbing fixtures
When all the most difficult work is over, the time comes to select and purchase plumbing fixtures. This issue takes into account the size of the room, its location, and the number of family members.
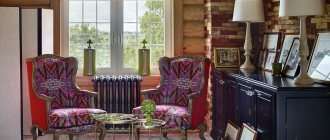
The style of the room also matters. For each style - country, art deco, Provence or classic - you can choose suitable plumbing equipment.
There are different models of bathtubs on the market:
- wooden;
- cast iron;
- steel;
- acrylic.
It is better to discard the option of purchasing a cast iron bathtub immediately. It is unacceptable for a wooden house due to its impressive mass. More practical are steel products that are suitable for small spaces.
For rooms decorated in eco style, it makes sense to purchase an unusual wooden bathtub. Acrylic models have the greatest variety of configurations. Among them there will definitely be something that fits perfectly into a certain interior style.
If the size of the room allows, you can install the bath in the center. For a wooden house, this arrangement is very convenient and practical. In this case, the walls do not come into contact with water, which significantly extends the life of their finish.
In combined bathrooms, it is advisable to separate the bathtub and toilet with partitions made of plasterboard, wood, colored, frosted or mirror glass. Also in the room there should be designated areas for swimming, relaxation, and a sanitary area.
Plumbing must be installed so that there is free space around it:
- bath – 100 cm;
- toilet – 60-70 cm;
- bedside table with opening doors – 50 cm;
- shower cabin – 90 cm;
- sink – 70 cm.
The distance between each type of equipment should be at least 20 cm. This will allow you to easily use each device without clinging to each other.
In order to save space, it is recommended to purchase corner furniture and replace the standard bath with a shower cabin
You should choose plumbing fixtures for small rooms very carefully. In order not to further narrow the space visually, you should not install a toilet, sink or bathtub in dark colors. A profitable solution would be to introduce pastel shades, transparent shelves, and built-in furniture into the interior.
Main types of waterproofing
There are several ways to waterproof a floor. Experts distinguish four main types of waterproofing: pasted, impregnated, painted and cast. How are they different from each other?
Pasted waterproofing is a coating made of bitumen-polymer materials. In this way, you can both waterproof a wooden floor and lay a protective layer when pouring a cement screed. The working surface is pre-cleaned of debris and leveled, the boards are treated with fire retardants and an antiseptic. Next, the installation of insulating material begins.
The best option would be to consider flooring made from a single sheet of material, but the area of the room does not always allow this. If the waterproofing layer is made up of separate pieces of material, then they must be overlapped by at least 10 cm. Each joint is carefully glued. The finished insulation layer is treated with a special mastic, which must be selected for a specific type of bitumen-polymer sheet. Another layer of waterproofing is laid on top of the mastic.
For adhesive waterproofing, materials with a foil surface are sometimes used, which serves as an additional protective barrier for the floor from excess moisture and at the same time helps to retain more heat by reflecting it into the room.
Painting waterproofing involves the use of special polymer or bitumen varnishes. It’s much easier to make: just apply several layers of varnish to the work surface. How does this waterproofing of a wooden floor work? The varnish with which you cover the base of the floor fills all the pores and cracks on the surface. Since all the pores will be securely closed with varnish, moisture will not be able to penetrate into the wood and destroy its structure.
The painting method of protecting a wooden floor from moisture is simple to perform, it does not require any special skills, the main thing is to choose the right polymer composition and apply it in several layers in accordance with the instructions. One of the significant disadvantages of this waterproofing method is its short service life. Under normal environmental conditions, the varnish will have to be renewed every five years, and with serious temperature changes leading to freezing of the floors - even more often. When exposed to cold temperatures, the varnish layer cracks and cannot serve as reliable protection for the wood.
Impregnated waterproofing for floors is the treatment of a rough coating with drying oil or tar. This method of protecting the floor structure from moisture in a wooden house is used quite often. Impregnating the surface with drying oil does not require special knowledge and is done quickly and easily. Instead of drying oil, modern water-repellent materials based on acrylic or silicone are increasingly used for these purposes. The surface to be treated must be thoroughly cleaned and dried before applying impregnation. Compliance with this requirement guarantees reliable protection of the plank floor from moisture.
Experts consider cast waterproofing to be the best option for protecting floors from moisture. Making it yourself is already more difficult, but the high efficiency of such protection makes it the most preferable compared to all other options. The sequence of work includes treating the working surface with soil, laying roll material, pouring a special screed 5 cm high and finishing with a waterproofing mixture. The method requires significant financial costs, but all your expenses will be compensated by high-quality waterproofing of the floor, ensuring its long service life.
Linoleum
An example of using linoleum for a bathroom.
The most economical option for flooring in the shower and bathroom. Linoleum itself is like waterproofing - it practically does not allow water to pass through. This is also the easiest option for DIY installation. But again, you should choose a material other than for installation in the house. In the bathroom it is needed to be more wear-resistant.