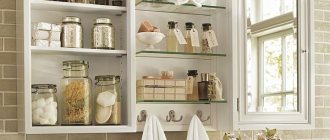
Where is mosaic installed?
Based on the composition of the material and its design, the tiles are used on:
- Constantly wet areas adjacent to plumbing equipment;
- Vertical partitions from floor to ceiling;
- Covering floors, shower walls, bathtub sides;
- For decorating arches, niches, columns.
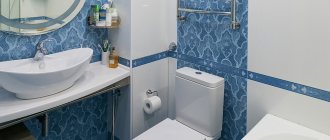
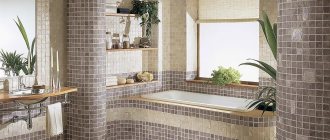
For example, a mosaic for a bathroom in Leroy Merlin is perfect for decorating semicircular walls and a shower tray. Even an inexperienced master can handle the job.
Shape of elements
The shape of the product is of great importance for interior decoration. The tile can be:
- rectangular;
- square;
- diamond-shaped;
- hexagonal;
- round;
- irregular shape (stones, beveled rectangle, uneven oval).
Rectangular tiles Round mosaic Pebble-shaped elements
Varieties of mosaic tiles
Typically, mosaics are produced in modules consisting of squares 4 millimeters high, and the sides can be from 1 to 5 centimeters in length.
Based on the composition of the material, it can be divided into the following types:
- Painted glass;
- Glassy smalt;
- Aluminum or stainless steel;
- Ceramics;
- Stone (marble, jasper, lapis lazuli and others);
- Ceramic granite, suitable for flooring only;
- Treated wood.
In the photo you can see different forms of mosaic tiles used for tiling in the bathroom.
Combination of mosaic with other finishing materials
There are six types of finishing materials that are used for the bathroom. These are ceramic tiles, porcelain tiles, mosaics, paint, decorative plaster and natural stone (granite and marble). What is mosaic best and most often combined with? First of all, with ceramic tiles and porcelain stoneware. These materials complement each other perfectly and are capable of creating not only magnificent panels, but also a holistic image of the bathroom. Secondly, mosaic looks no less interesting in combination with paint, and sometimes in a trio design: for example, the upper part of the wall is painted, then there is a strip of mosaic, and ceramic tiles are laid below. The option of mosaic and decorative plaster is rare, although intriguing. Each of these materials is beautiful and whimsical, and their juxtaposition should be perfectly thought out. The combination of granite or marble and mosaic (smalt or natural stone) is an expensive pleasure. If the cost of finishing with these materials does not bother you, you are guaranteed a luxurious bathroom interior.
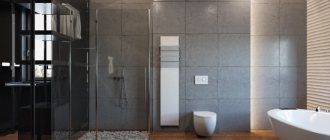
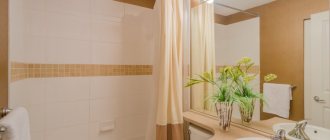
Photo by ReRooms
Mosaic in a bathroom design project from ReRooms
Mounting methods
A standard mosaic block is a quadrangle with a side of 30 cm, the seams have a size of 2 mm.
In addition, they have different attachments to the surface:
- Paper version, when the squares are glued onto paper. The front side is covered with paper, so they glue it to the surface without seeing the result. A layer of paper is moistened with water, then it is cleaned of squares. The advantage of this type of mosaic is that it is cheap.
- Mesh option. The back side of the squares is glued to the PVC mesh. After attaching it, adjustments can be made. If some parts come off, this can be fixed immediately. The mesh is not removed from the surface, so the structure holds tighter.
What are mosaic tiles
People have been making patterns of small geometric shapes, known as mosaics, for more than 5,000 years. Specimens have survived from India, Greece and Persia.
Nowadays, mosaics serve as a decorative element and, thanks to a wide range of sizes and options, can be used as finishing for entire swimming pools or luxury baths.
Due to the fact that mosaic is made from various materials, including quite expensive ones, it adds a lot of uniqueness.
- There is a so-called micromosaic measuring 1 by 1 centimeter, from which you can create original works of art, including portraits.
- However, in bathroom or kitchen series you will most often find traditional mosaic formats with square dimensions ranging from 2.3 x 2.3 cm or 4.9 x 4.9 cm to 10 x 10 cm.
Preparation process
After choosing the type of mosaic, you need to move on to the preparatory work.
First you need to treat the surfaces:
- Spray the walls and floor with a special liquid that will protect against mold and mildew;
- Lay a waterproofing layer;
- Level the walls and floor;
- Prime the surface with the required color.
Kinds
It is presented on the market in different colors and quality shades; it can be used to create any ornaments and decor. A comparison of mosaic types and the advantages of each of them is given in the table below.
| Selection criterion | Proposed options and their advantages | |||
| Form | Square (the most common elements, traditional version) | Rectangular (traditional design) | Round (allows you to create smooth lines and beautiful transitions) | Multifaceted (the ability to create unusual compositions) |
| Material of manufacture | Ceramics (easy to care for, variety of shades, low price) | Natural stone (a symbol of luxury, a rich palette of natural shades) | Glass (creates a 3D effect, does not require special care) | Natural wood (rich palette of shades, durable material) |
| By base type | Mesh (the mosaic is easy to cut, the elements are arranged in a certain order, suitable for installation on any surface) | Paper (ease of installation, quick and accurate laying of tiles, elements are easily fixed) | Without a base (used to create beautiful panels, installation requires certain skills) | |
| Bathroom design combinations | Single color (suitable for spacious bathrooms, the tiles have the same shape and size, use them to create a bright color accent) | Background (use white or a color close to it as a background, bright shades as an addition) | Gradient (a smooth transition from one shade to another, allows you to visually expand the room and raise the ceiling) | Mix (it is better to use contrasting shades) |
Glass
An excellent option for decorating a bathroom would be glass mosaic tiles, which allow you to create a 3D effect in the room and literally bring it to life.
The main advantages of glass tiles are their availability, relatively low price and ease of maintenance.
Glass tiles simply need to be wiped with a damp cloth and detergent.
To decorate your bathroom, choose glossy or matte tiles.
Main advantages of glass tiles:
- Presentable appearance.
- A large number of textures and shades.
- The likelihood of bacteria growing on the surface is zero.
- Temperature resistant.
- Anti-slip properties.
- Suitable not only for wall cladding, but also for floors.
Ceramic
Ceramic mosaic tiles for the bathroom are inexpensive; they are easy to cover walls with, even without the proper experience.
Ceramic tiles have water-repellent properties, it is possible to choose almost any color and pattern, but they are not suitable for finishing the floor - the material is very slippery.
Metal
Base – brass, stainless steel. The main advantages of such a mosaic are strength, resistance to temperature and mechanical damage. Suitable for tiling walls and floors, however, it can look very rough, so it should only be used in a specific bathroom interior design with mosaic tiles, skillfully combined with furniture and ceilings.
Stone and pebble
It is made from different types of stone, from pebbles to marble and granite. Stone mosaic adds rigor and richness to the interior, making it presentable. At the same time, the stone has good performance characteristics: it is durable, resistant to various types of influences, including temperature.
To make the stone look attractive, it is subjected to special processing, polished, and some areas are made “softer.” Stone does not like chemicals; wiping it with detergents is not recommended.
Use ordinary soapy water. These tiles are suitable for tiling rooms with high humidity and will be an ideal option for a kitchen or bathroom.
It is quite expensive, but at the same time, the option adds the natural shine of natural stone to the interior.
We also recommend watching - Characteristics and design of marble tiles for the bathroom
Stages of room decoration
When the surfaces are prepared, you can proceed to the main work. The standard design of a bathroom with mosaic tiles is carried out in the following sequence:
- Purchase of mosaic panels. It’s easier to work with small pieces, so it’s better to purchase ten-centimeter blocks. If the drawing is complex, then you need to make a stencil. This will make it easier to cut out the desired shapes.
- If the bathroom will be tiled not only with mosaics, but also with tiles, then you must first tackle the tiles.
- Before gluing the mosaic composition, you should check the size of the squares and their location.
- For work use a rubber spatula. They apply glue and also press the pieces to the surface for better adhesion.
- The adhesive base dries for 48 hours, this must be taken into account.
- After drying, moisten the entire paper base of the mosaic with water and remove it.
- A construction float is used to grout the seams between the tiles.
- Dust and dirty places are removed from the installed mosaic using a regular sponge.
The bathroom can only be fully used after 3 weeks.
What material is it made of?
This finish is classified according to the type of materials used for its manufacture.
- Ceramic tiles (tiles).
- Plastic.
- Glass.
- Smalt.
- Metal.
- Stone.
Not only the appearance of this cladding, but also its service life depends on the type of material.
Master's recommendations
Many experts advise adhering to certain installation features so that the bathroom is properly prepared for mosaics:
- Use a level and a grater to adjust the displacement of the cubes;
- For transparent glass, use white glue, which is applied over the entire area of the mosaic square;
- Do not press too hard on the pieces;
- When gluing, the paper base should be on top and the mesh on the bottom;
- The pattern should be clearly drawn on the surface; you can use a prepared stencil;
- Cladding work should start from the top and work downwards;
- Larger parts are covered with small parts.
If decorating a bathroom with mosaics will be the basis of the design, then it is necessary to plan the work in advance.
What is needed for quality design
Decorating an interior with mosaic tiles is a labor-intensive and complex process that requires patience and concentration. Without experience, it is better not to risk expensive materials and turn to specialists.
Mr. Build recommends: for self-installation, choose not small elements in bulk, but ready-made canvases on a backing. They are easier to operate and more economical.
The following video will demonstrate interesting design options.
Positive and negative points
Interior decoration of a bathroom with mosaic material has many advantages.
Main advantages:
- Huge selection of mosaics;
- Durability of the structure;
- Due to its small size, uneven surfaces can be coated;
- The color of the product does not fade;
- You can create various patterns and designs;
- Sticks well to any surface.
The only downside is the high cost of the material and labor-intensive work. But with such a finish, you can forget about renovations in the bathroom for a long time.
Creating patterns, designs and ornaments from mosaics
One of the most important decorative qualities of mosaics is the ability to create any designs, patterns, and bright ornaments. Absolutely any. The choice depends on the aesthetic preferences of the bathroom owners, their imagination and the time they are willing to devote to this creative process. You can come up with a drawing, pattern or ornament yourself, draw it on paper, or draw it in boxes on the wall. It’s long and painstaking, but no one will ever have this happen. There is also a simpler option: buy ready-made blocks and use them to assemble a design invented by factory designers. And this will also be a non-standard design of the bathroom - how long have you seen a dolphin splashing in the waves from a blue-blue mosaic on the wall of the bathroom? That's it. So you can safely go to the store and choose a design, pattern or ornament from the mosaic for the bathroom.
Bathroom design
Mosaic tiles in a small bathroom can help create different styles when decorating.
Using a variety of color solutions, designers achieve interesting options:
- The classic style involves the use of mosaics in light colors. You can choose elements from marble chips and panels.
- The ethnic option should be created using wooden or stone mosaics of natural color.
- Minimalism includes glass or plastic. The background is not flashy, but there are bright spots in the picture.
- Sand-colored tiles are used in Art Nouveau style. To complete the look, mirrors are hung on the walls and lighting is installed.
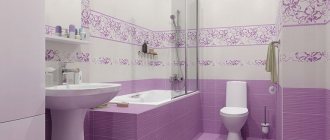
- Provence is decorated in beige tones, decorated with floral patterns.
- High-tech will create an atmosphere of peace in the room. Contrasting designs are used: black and white, milky brown. There should be small textured patterns throughout the surface.
Working with mosaics is interesting, but not easy.
Getting an original room design is much more pleasant. And everyone can learn to create beauty if they have the desire and patience.
Use Cases
It is not recommended to cover all surfaces in the bathroom with mosaics; the room will become pretentious and uncomfortable. In addition, the material is not cheap. This material is best used to decorate one of the walls.
Using a mosaic pattern or panel, add a bright color accent to your bathroom that will visually expand the room.
Sink work area
The traditional option is to decorate only the work area near the sink with mosaics. This design will help solve several problems at the same time:
- Make it easier to clean the sink work area. This wall often gets water, soap and other products that can be difficult to remove from other materials. Soap scum is easily wiped off the mosaic, leaving no streaks or stains on the surface.
- Beautiful bathroom design.
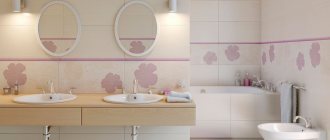
Use a separate mosaic to decorate the area near the mirror or the wall opposite it. Mirror reflection will visually increase the number of colors and help make the bathroom truly bright and interesting.
Vertical surfaces
Focus on a vertical surface - for example, a free wall or a wall opposite a window. Patterns should not be too bright and catchy, because the bathroom should provide comfort and give peace of mind. The wall behind the bathtub or shower should not be decorated with mosaics, since it will be almost invisible.
Particular attention should be paid to the color scheme. The most reasonable option is to cladding the wall opposite the bathroom, so that while basking in warm water you can admire the beautiful patterns.
Floor
Decorating the bathroom floor with mosaics is an unconventional and interesting solution. Carpets and rugs are becoming a thing of the past; they have not been relevant for the bathroom for many years, since they do not absorb moisture well and quickly get dirty.
Using mosaic tiles on the floor, you can create something like a carpet and decorate the surface with colorful patterns. It will be pleasant to step on such a floor not only in shoes, but also barefoot. Mosaics can be used to decorate the entire surface, using calm colors, or a separate area: for example, an area near the bathroom or sink, in the manner of a rubber mat.
Panel
Using a matrix or chipped mosaic panel, you can easily decorate not only the walls, but also the floor or ceiling. Such decor can be placed both in a certain area and around the entire perimeter of the bathroom, which allows you to turn it into a single unique picture.
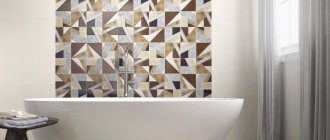
With an image
It is the main interior highlight and a bright accent that undoubtedly attracts attention. Thanks to the mosaic decoration with a pattern, it is possible to turn any fantasy idea into reality.
Combination of mosaic and tiles
This combination with tiles completely changes the appearance of the room and gives it a certain neatness, high cost and real irresistibility.
Mosaic honeycomb
The hexagonal shape is very popular in interior decoration. Honeycomb mosaic is a fairly active design element, which can become even more noticeable due to the bright color scheme.
Under the stone
It has a stylish and sophisticated appearance, a texture imitation of travertine, granite or marble stone and is distinguished by a rich natural color palette that gives the atmosphere uniqueness and harmoniously matches any style decisions.
Pebbles
The natural smoothness, pleasant-to-touch surface and uniqueness of pebble mosaics give the space smooth lines, natural shades and an attractive appearance.
Mosaic inserts
One or more mosaic stripes, depending on the location, can not only adjust the geometry of the space, but also provide a very effective partial cladding, which, thanks to the play of glare and soft shimmer, will endow the atmosphere with special mystery and sophistication.
Cladding of individual elements
When covering walls with mosaics, it is recommended to use a vertical arrangement of elements in order to visually enlarge the room and make it more spacious, and raise the ceiling. Several mosaic design options:
- Design the wall above the bathroom in such a way as to create the illusion of a real mountain waterfall: add the illusion of water drops, a beautiful bird, treetops, animals.
- In an apartment with a shower, make an imitation of water coming directly from the shower. This way you can create a beautiful waterfall.
- The most common option for the bathroom is to imitate raindrops on the wall. From moisture they begin to shine and give the room the necessary coziness.
To add some zest to the interior, tiling the bathroom itself (if it is white or light).
Rooms with complex geometry
The bathroom does not always have standard sizes and shapes of a square or rectangle, which can be easily decorated in any style. In private houses and cottages, bathrooms are often located in an attic room of non-standard size. Cladding asymmetrical walls is much more difficult.
Mosaic is an ideal option for rooms with complex geometry. When decorating the walls, you will not have to cut off excess pieces of tiles; the overuse of tiles will be minimal.
Even concave, convex and rounded walls can be decorated with mosaics, making them presentable and simply beautiful.
Photo of mosaic for the bathroom
Mosaic tile adhesive
For gluing mosaics, flexible white adhesive designed specifically for this finishing material is ideal. It does not distort the shade of the grout used.
The mosaic seam plays an important role, since high-quality seam material creates a strong frame and contributes to the durability of the entire structure.
The correct choice of grout is also influenced by the environment in which the mosaic is located.
- Bathrooms and kitchens are places where we often work with a variety of harsh cleaning products that can break down or stain joints.
- For this reason, it is advisable to use joining compounds with increased water-repellent ability.
- It should be taken into account that the characteristic colors of the seams completely change the shade of the entire ceramic product.
Therefore, manufacturers recommend using neutral white, beige or gray grout.
Specifics of finishing
Self-adhesive mosaic has earned reviews from experts who evaluate it as a universal material when combined and easy to install.
Along with other types of finishing, self-adhesive mosaics for walls will cost much more. The price for installation work is an order of magnitude higher than for tiling with ceramic tiles. If exclusive design solutions are required, you will have to pay extra for that. Therefore, you need to carefully select a specialist who will not spoil the expensive material and will perform the installation conscientiously and efficiently. It will help you select the necessary primer for pre-treatment of surfaces and the appropriate adhesive and grout for the type of mosaic.
The process of laying and finishing tiles
Surface tiling is a rather painstaking procedure that requires experience and skill. Laying tiles right away, even in a small room, is quite difficult.
It is worth remembering the following algorithm of actions.
Leveling surfaces. The mosaic will last for a long time only on a perfectly flat surface. If there are deviations on the walls or floor, they are eliminated using putty and primer. The floor is leveled with a cement solution, which is used to create a screed. After screeding the floor covering, a level check is carried out. The finished surface for installation must be clean, dry and perfectly flat.
Before laying the mosaic, the surface must be perfectly leveled.
Marking. After the base is leveled and primed, mark the area on which the tiled option will be laid. This can be done using a level.
The surface is marked so that all cut tiles are in the corners between the floor and the wall.
After leveling, it is necessary to mark the surface for the tiles
Slicing. After marking the base, it is necessary to cut the tiles along the marked lines. Excess pieces are cut off.
Depending on the markings, it is necessary to trim the corner tiles
Styling:
- In a clean, dry container, dilute a small amount of glue according to the instructions. This will prevent it from drying out. It is not recommended to dilute already dried glue with water.
- Using a spatula, evenly apply enough adhesive to the wall so that the total surface area covered does not exceed 9 sheets. Otherwise, the glue will dry out, which will make laying out difficult.
- Apply the prepared canvas to the marked area, check that the pattern lies flat, and then press it into the adhesive solution. Do not press the canvas too hard against the wall, otherwise the glue will protrude beyond the seams, and this should not happen.
When laying, the room temperature should be from +5 to + 30 degrees.
Gluing the tiles begins from any convenient place in the bathroom. The next pieces of tile are glued close to the previous ones and smoothed out
Grouting joints. A day after installation, start grouting the joints. Before doing this, remove the protective layer from the canvas according to the instructions. Make sure the seams are clean before grouting. Grouting of joints is carried out exclusively with a rubber spatula. Use it to apply grout with smooth movements to the seams in the horizontal and vertical directions until they are completely filled. Wait 30 minutes and begin cleaning the seams from excess mixture.
After installation, all seams are rubbed down
Cleaning. Upon completion of work, carry out final cleaning of the canvas from plaque using a felt glove.
Be sure to wash the tiles after grouting
Main stages of installation
The procedure for decorating a kitchen with self-adhesive finishing mosaics usually includes the following steps:
- surface preparation;
- careful marking of walls;
- gluing the tiles themselves.
Installation of this type of material is actually an extremely simple operation. Even a person who has never dealt with heavy types of facing materials can cope with such work. However, at each stage of the work when decorating walls with such mosaics, all required technologies, of course, must be followed exactly. Otherwise, the design of the kitchen or bathroom will turn out sloppy and unattractive.
Design and interior design options
In small bathrooms, as a rule, separate areas of the room are decorated with mosaics: niches, ledges, bathtub. The rest of the room is decorated with tiles. This combination will visually enlarge the room and reduce repair costs.
An excellent option for decorating a small room would be to place a small mosaic panel on the accent wall.
A bathtub and shower cubicle tiled with mosaics add a special sophistication to the room. The mosaic countertop under the sink with a niche for a washing machine looks comfortable
Shelves and ledges can also be laid with mosaics. The mosaic wall in the shower looks very impressive
Useful tips
Thus, installation of self-adhesive mosaic is extremely simple. You can decorate a kitchen or bathroom using this material, even with your own hands, in just a couple of days. But in order to prevent overspending on mosaics and to do the job as efficiently as possible, when gluing walls with such material, it is worth following the recommendations of experienced specialists.
For example, the film should be separated from the self-adhesive mosaic of the master only immediately before its installation. Otherwise, the material will be hopelessly damaged. Bitumen adhesive dries on such flexible plates in just a few minutes.
You should, of course, start laying self-adhesive mosaic tiles, like regular ones, from the bottom - from the floor of the room. If there is too narrow a strip left under the ceiling after laying the mosaic for a row, you can simply trim the tiles with scissors. If necessary, proceed in exactly the same way when installing sheets in corners.