Michel
13412 0 2
Michel August 6, 2016Specialization: plumber with 10 years of experience, computer repair specialist, powerlifting coach. I have extensive experience in construction, interior decoration, and making homemade furniture. Hobbies: sports
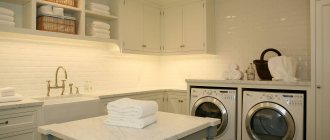
Crowding is one of the main problems of city apartments. In particular, the need to install an automatic washing machine, occupying a minimum of usable space, sometimes requires non-trivial solutions. In this article I will talk about how to place it in a combined bathroom, bathroom and even a compact toilet, and I will give a number of recommendations for connecting the machine to the sewerage system, water supply and electricity.
Washing machine in the bathroom of my house.
Bowl design
Owners of small apartments are offered many options for placing a washing machine in the bathroom or toilet, but there are few solutions for the toilet, and they require careful consideration in finding suitable accessories.
If space allows, you can use the basic ones:
- machine and washbasin under a common countertop (this will solve the drainage problem and make it easy to remove the washing unit and sink pipes from view);
- a sink above the washing machine is no less productive, but this will also require a washing machine of reduced dimensions and a bowl of a special design that does not interfere with the operation of the device placed under it;
- a closet in the toilet above the toilet is a great idea, despite the widespread tendency to install the machine on the floor, but even here you will have to think carefully about the mounting system and vibration protection.
Important!
You can find a lot of advice on how to install the device in any other convenient place, but the lack of space often leaves the owner with no other options. But modern industry will help you choose a washing machine of the required height, with a side or vertical tab, a sink of any size with an ergonomic shape, and building materials to disguise the system of pipes and hoses.
There is an interesting proposal to use the space between the toilet and the corridor. If you choose a narrow unit with front loading, the thickness of the wall should be enough to accommodate half, and the second part of the device will protrude just the right amount to make loading comfortable.
The most successful solution from a safety point of view is the one with a wall-hung toilet and an almost flat plasterboard box for masking communications. Then the washing machine, complete with a sink-lily, can easily be placed near the entrance. But here you need to carefully select the parts of the kit and think through ways to supply electricity and water.
You may be interested in: How to choose a geyser
Connection
How to connect the machine to all communications with your own hands?
Electricity
All modern washing machines use cold water for washing, heating it to the required temperature with heating elements. The exception is some rare Daewoo models imported to Russia in the early 90s. On the practical side, the presence of a heating element means that when heating water and rotating the drum, the power consumed by the device can reach 2.5 - 3 kW.
In addition, the washing machine operates in conditions of high humidity. If so, current leaks (in particular, the presence of a phase on a metal body) are quite real. If you connect the body of the machine when it is turned on to a faucet or a grounded bathtub, you will receive a very sensitive electric shock.
This has two practical consequences:
- For connection , a European socket designed for a current of 16 amperes ;
The permissible current is usually indicated on the front surface of the socket, between the holes for the plug pins.
The outlet is designed for a current of 16 amperes at voltages up to 250 volts.
- Grounding is required . Usually the earth is taken from the body of the shield. As a last resort, you can ground the outlet to a steel riser or cold or hot water supply. This is exactly how the machine in the Stalin building with old wiring, in which I lived for eight years, was grounded.
Grounding to the water supply. This is not entirely correct, but it is practiced.
Sewerage
The drain hose must be raised to a height of at least 50 cm from the floor . The instruction is related to the absence of a shut-off valve on the drain of a typical washing machine: if you lower the hose lower, the water will begin to flow out of the tank by gravity.
How and to what can I connect the drain hose?
- To a separate outlet of plastic sewerage with a diameter of 50 mm;
- To a 50x50x50 tee installed in the gap of the comb (indoor sewerage);
The machine is connected to the sewer through an oblique tee installed under the washbasin.
The bend and straight tee are usually equipped with a vertical pipe 40-50 cm high. Its upper edge is rigidly attached to the wall. The goal is to prevent the hose from falling below the notorious 50 cm above the floor.
- To a siphon with an outlet for a washing machine under the washbasin;
The hose is connected to the siphon.
- Finally, the hose with the bracket that secures it can simply be hung on the edge of the bathtub. Of course, in this case, washing cannot be combined with taking a shower.
An important point: the connection between the sewer pipe and the hose must be sealed , otherwise the room will be saturated with unforgettable aromas of wastewater. For sealing, you can use rubber sealing couplings sold specifically for this purpose, or any available material, even tape.
To seal the connection, I used polyethylene foam left over from insulating pipes in the basement.
I strongly advise against drilling a hole in the riser and inserting a hose into it. The tip of the hose sticking out inside the riser will collect any large-sized debris traveling through the sewer - paper, rags dropped into the toilet and other unappetizing things. Sooner or later this will lead to a blockage, and both the neighbors above and you will suffer: the slab floors are not airtight.
This connection to the sewer is not a good idea.
Water pipes
The standard hose for connecting the washing machine to the water supply ends with a union nut with a pipe thread size DN20 (3/4 inch).
Inlet hose for connecting the washing machine to the water supply.
The modern market offers many taps of this size.
A couple of recommendations for choosing a faucet:
- A ball (closed by turning the handle 90 degrees) is much more reliable than a screw (closed by a few turns of the knob);
- The larger the handle, the more convenient it is to open and close the tap. When idle for a long time, it turns with noticeable resistance, and the long lever of the handle will be very useful.
The photo shows a good, serviceable straight-through valve.
Instead of a specialized tap, you can install a regular ball valve with an adapter DN15 - DN20 on the outlet for connecting the machine.
Where can I install a tap to connect the machine with minimal modifications to the water supply connections?
- On the tank's liner. To do this, place a tee size DN15 or a standard straight-through tap in front of the flexible hose;
- On the liner to the washbasin. The connection is completely similar to that described above;
Connection to the water supply with a pass-through tap.
- In front of the wall-mounted faucet in the bathroom. The pass-through tap for connecting the machine is installed between the corner or water socket and the cam (eccentric) of the mixer. A so-called extension (pipe with external and internal threads) of the same length as the pass-through valve is mounted on the second connection;
Insertion in front of the mixer. Connection takes no more than half an hour.
- After the valves, you can cut into the steel liner by replacing the coupling on the outlet with a tee size DN15;
Instead of a coupling, a tee is installed.
- As a last resort, you can use a saddle for insertion - a clamp with a water outlet. With the cold water supply valve closed, a hole with a diameter of 6 - 8 mm is drilled in the pipe, then a clamp with a rubber gasket is attached to the pipe and equipped with a tap for connecting the machine.
Brass saddle for inserting into a pipe.
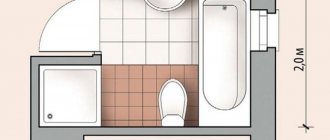
Toilet area 2 sq. m
According to designers working in limited space, 2 squares is too large an area to accommodate one toilet, so there are many successful and unsuccessful projects with the placement of a sink, shower or built-in cabinet.
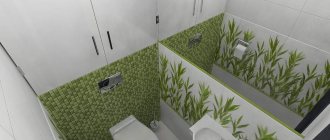
There are even options with a wall-hung toilet, washing machine, sink and hygienic shower.
However, you need to understand that all this is done in the style of constructive minimalism. In such an area, a toilet with a washing machine and a sink can only be placed in the three above options, and for this you will have to use components of a certain type:
- the sink above the washing machine can be purchased from one manufacturer in a ready-made kit, adjusted to the standard sizes;
- the standard height of 85-90 cm will not work here. This will create inconvenience for washing for children and small people, but there must certainly be at least a small distance between the bowl and the washing machine;
- a sink above the toilet in a small toilet is also a bad solution, because it is inconvenient;
- The best option is to purchase a washing machine with a height and width of up to 60 cm, and a depth of no more than 45 cm. Such equipment is more expensive, but it will justify its purchase by saving space and ease of placement.
Note!
The photo shows a sink designed to be installed above a washing machine. It received the name water lily because of its special shape: a flat bottom and minimal recess. Therefore, the drain in such models is often located closer to the rear wall to prevent splashing.
You can save space by choosing this item for a corner placement or a rectangular shape. The oval one will help avoid injury that is inevitable if you place the washing machine and the sink above it dangerously close to the toilet.
Offers from manufacturers differ in color and shape, but there is not much room left for limited space. You can place a heated towel rail above the toilet, but this is practically the only option to complement the minimalist, shrunken design.
Design options
The shelves are installed after the renovation, when the interior style has been chosen. Furniture for storage must be selected wisely, otherwise the dissonance will be very noticeable. The shelves above the installation look especially advantageous and original. Lightweight structures on the walls can visually make the room larger, which is especially important for a separate toilet.
Wide and open shelves visually conceal square meters. Separate small structures look more original and allow you to place household chemicals, toilet paper and decor. Small closed products are more neat and spacious in appearance. However, this design requires more space.
Floor metal shelving or systems with baskets look good in the bathroom. Shelves of this type allow you to place all the necessary items, including decor. One compartment can be left free to put your phone and other personal items. Glass shelves are suitable for a small toilet, they visually make the space light.
Toilet with washing machine and sink
According to some designers, there is only one option for this design - placing the washing machine above the toilet and a corner sink. However, this is an idea that creates difficulties in implementation - you will have to take care of creating a structure that is reliable enough to withstand the weight of not only the washing machine, but also its contents. This creates a considerable risk of injury for the person sitting on the toilet and discomfort when operating the device.
You may be interested in: Common methods of bathroom restoration
As an example, you can use the design of a small bath without a toilet with a washing machine and a sink. The most convenient option is a washing machine of non-standard dimensions with a complete sink from one manufacturer and a wall-hung toilet, which is moved to the place of a banal built-in cabinet that hides unaesthetic plumbing pipes.
The main advice from the experts is to carefully measure the dimensions of the room, draw up a layout diagram accurate to the centimeter and thought out from the point of view of ergonomic use. You will have to spend a lot of time searching for the right device and installing it, but this will bring the necessary space savings. In order not to waste time going to shops and supermarkets, you can search in online stores or on manufacturers’ websites.
How to install?
Disconnect all hoses from the water supply and place the equipment on its side. Clean the legs; they should be free of rust and other irregularities. Adjust the feet so that the washing machine stands level and does not wobble. To carry out this operation you will need a level and a wrench. By rotating the leg clockwise, it increases in the upward direction, and if you rotate it in the opposite direction, it decreases downward. Place the stands on the legs of the washing machine. Modern rubber products adhere well to the surface of any coating. Test the machine.
If the unit continues to rock, repeat the installation from the beginning again.
Choosing a style in 2022: ideas
Limited space, used with maximum economy, does not leave much room for choice of style. The main direction is constructive minimalism: no unnecessary details or objects, a calm palette of gray and white colors. Using decorative tiles made of natural stone or imitating it, it is possible to create a semblance of a loft style. If you place a contrasting panel on a free wall, you will get a modern or art deco look. Of course, for each style you choose, you will have to look for a matching sink and toilet. Their choice is already limited in size and shape, but with some effort you can find suitable ones.
If you have a limited budget, it is recommended to use economical offers, for example, photo or washable wallpaper, plastic. Light colors will visually expand a small room, textiles will create an inappropriate impression of being busy, but the rug will be appropriate from a design point of view and for reasons of safety and convenience. For hygiene purposes, it is better to use an easy-to-clean one that does not collect dust and dirt, with a cutout for a standing toilet or a rectangular one of the required size.
Variety of materials
The shelves should be durable and wear-resistant and not afraid of washing. Popular materials are as follows.
Drywall. The universal material allows you to create structures of any kind. Usually mounted on a metal profile for strength. When making it yourself, you first need to prepare the frame, and then attach sheets of drywall of the appropriate size. The surface is leveled with putty, then you can start decorating.
Tree. Only high-quality material is used, boards without stains or deformations. Before making wooden shelves, you must carefully sand the surface. Be sure to varnish the boards so that they do not suffer from external influences. The stain will allow you to change the shade of the wood, and the burner will give the effect of antiquity.
OSB. The sheets are much stronger than the previous version. It will not be possible to decorate products with carved monograms; the material crumbles. OSB boards have an interesting pattern, so you can not paint them, but simply varnish them or use stain, as is the case with wood.
Metal and glass. The fastenings are made from the first material, and the shelves themselves are made from the second. It is worth choosing glass at least 6 mm thick. Otherwise, the structure will not withstand the load and will quickly break. Fastenings can be purchased at a hardware store, and glass of the required size can be ordered at a workshop.
It is important to space the supports evenly. Metal shelving can be used without glass
It is convenient if they are equipped with wheels and can be moved at will. Cleaning the structure is very easy. The only drawback is the heavy weight.
Plywood. Shelves can be made from material 6-10 mm thick. It is noteworthy that plywood bends and allows you to create intricate shapes. You can make a shelf for your phone or magazines from plywood 4 mm thick. Self-tapping screws of suitable size are used for fastening.
Plastic. You won’t be able to make such a shelf yourself, however, stores offer a wide range of different sizes and designs. You can additionally decorate with paint or self-adhesive paper. A fairly budget option that is not afraid of high humidity.
Choice of colors: current colors
White is considered the most popular. If you watch a video with offers from construction supermarkets, most plumbing fixtures are of this color.
The designer still has the opportunity to decorate the toilet using decorative tiles on the floor and walls, drywall, and decorative plaster. If you use beige, golden, blue and light green, you can also choose plumbing fixtures in these colors, but this year the dominant colors are lilac, metallic, burgundy and blue.
On a note!
Don't forget that fashion changes. It’s better to choose a traditional color than to be nervous about the chosen acid-bright color and think about changing it.
The color scheme can be created using only a floor mat and a panel on the side wall - it all depends on the taste and competence of the home designer.
Placement nuances
Placing a washing machine in the toilet is a necessary measure. However, it is often not the most successful. However, in order for the machine to serve for a long time and to be convenient to use, you have to take into account some nuances. As for installation, it is undesirable to place the machine in an inconvenient place where repairs and diagnostics cannot be carried out.
At the same time, it is important to take care in advance about the reliability of the support . It is necessary to prevent the possibility of jumps associated with vibration due to unevenness of the base. The machine is placed in such a way that it does not interfere with the use of the toilet. At the same time, it is usually placed close to communications, thinking through the camouflage of wires and hoses.
Determined by the size, shape, volume of the drum. Whenever possible, they try to use niches. To prevent the interior from seeming overloaded, cars are hidden in boxes, covered with screens or doors. Whenever possible, they try to install equipment on the floor.
Beautiful examples
We offer several examples of successful placement of a washing machine in the toilet.
For information on how to place a washing machine above the toilet, see below.
Source
Features of operation
Manufacturers of household appliances produce two types of washing machines:
Wall-mounted washing machine.
Vertical instrument panels do not tolerate moisture well. When installing them near a sink, the service life is automatically reduced, and there is a risk of electronic failure. A built-in washing machine with standard fasteners for decorative doors lasts the longest.
On the other hand, washing machines contain consumables, the quality of tap water in the Russian Federation leaves much to be desired, and voltage drops are observed in the 220 V network. Therefore, the owner of a household appliance will inevitably have to call a technician more than once as the gaskets, hoses and their fastening units wear out.
During repairs, the machine moves out.
The machine will have to be pulled out for partial disassembly. Therefore, during installation it is better to take care of the maintainability of the structure.
Design techniques that visually increase space
The competent design of a 4 sq. m bathroom has its own nuances. The secret is in proper zoning and rational use of every centimeter.
The less furniture in the bathroom, the larger it seems. In this regard, minimalism has no competitors
- It is worth choosing simple furniture and plumbing fixtures. Overloading with details will complicate and visually reduce the space.
- Integrate a washing machine or combine it with a sink.
- Install a small bathtub or shower.
- Install a wall hung toilet. It takes up little space and makes cleaning easy.
- Use non-standard plumbing fixtures, including corner ones.
- Hide communications and meters under the cladding.
- Buy hanging closed cabinets. Better - with mirrored doors.
- Install a door that opens outward, saving space inside.
- Use 1-2 light colors of finishing materials and furniture. Do without contrasting colors, they visually take up a lot of space.
- Rely on the lighting system, glossy furniture facades and reflective surfaces.
Mirrored cabinets and photo wallpapers with perspective will make the bathroom visually twice as large
The owner's imagination is limited only by engineering communications. It is better to leave the toilet and bathtub in their designated places.