Planning residential premises is a very responsible task, especially when it comes to developing a kitchen plan with dimensions and furniture. This is more than just creating a diagram that will indicate where to put the kitchen unit or seating area.
No, it is the preliminary work on paper that determines how functional, stylish and comfortable the room will be, which is, in fact, the heart of the house or apartment.
If you don’t know what to put and where, how to place a set with everything you need in a small kitchen, we advise you to carefully study this article and then apply the knowledge gained from it in practice. So let's get started.
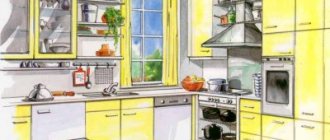
Kitchen plan with dimensions and furniture
The main rules regarding drawing up a plan for a future kitchen
Before you begin creating your kitchen layout, there are a few rules to learn that will help maximize the space's efficiency and usability. Let's look at them in more detail.
What rules must be followed to make the kitchen as comfortable and functional as possible?
#1 - Work triangle rule
This is the basic rule that needs to be taken into account when determining exactly how you will place your kitchen unit. So, according to the working triangle rule, you cannot arrange in a linear order:
- sink;
- stove;
- fridge.
On the contrary, these three points of the room should follow a triangular pattern, moreover, so that each of the points is located at a distance of no more than 180 centimeters in relation to each other.
What does a work triangle look like in the kitchen?
Think about this rule from a logical point of view, if you still haven’t been able to understand it, by considering the typical order of food preparation:
- food is removed from the refrigerator;
- they are then prepared for cooking by washing the mud, that is, in a sink;
- then, next to the stove, the ingredients of the future dish are mixed and chopped;
- Afterwards, the desired food products are sent to the stove.
Work triangle placement options
If you place the three main points of the kitchen further from each other, then you will spend several times more time and effort on:
- transportation of products;
- control of what is happening at any point;
- cleaning after cooking.
This rule is the main one, and with its help it is used and taken into account when planning all subsequent rules.
Work triangle in the interior
No. 2 – Rule for reasonable sink placement
So, first of all, the location of the sink is always determined. It should be built no further than 2.5 meters from the riser. Of course, you can set it beyond this indicator, however, in order to realize such an idea within the framework of a traditional urban dwelling, it is necessary:
- direct the water supply pipe at an angle;
- or install a pump.
Of course, this can only be done if the expected layout and thickness of the wallet allows it.
It is very important to place the sink correctly
In a private home, it would be wise to place the sink opposite the window, as this will have many positive effects:
- the ability to observe events happening outside the window while washing dishes, for example, thereby making this activity less boring;
- the opportunity to seriously save on electricity.
If you decide that you don’t want to wash dishes, but would rather spend money on a dishwasher, then this unit must be installed on one side of the sink:
- on the left if the owner of the apartment is right-handed;
- on the right if left-handed.
Placing a sink in a small kitchen
This way you will create the most comfortable and convenient space for yourself.
No. 3 – Rule for slab location
Next, you need to understand where you will place the stove or hob. According to the rules, it should be no further from the sink than a distance of 180 centimeters. The same applies to:
- ventilation;
- gas pipeline, if there is one.
It is better to place the stove one countertop after the sink, since this is where you will process washed food before cooking.
The length of said surface separating the stove and the sink should be about 90 centimeters - not too much, but also enough to do everything necessary.
It is convenient to place the stove in the area of a beveled corner
On the other side of the hob, according to safety regulations, it is also necessary to leave at least 40 centimeters of free space.
Please note: the stove should also not be placed near a window, at least at a distance less than 40 centimeters. This is contrary to safety regulations, and in addition, completely impractical.
No. 4 – Safe Distance Rule
So, it is necessary to correctly verify on the plan not only the location points of this or that item, but also the distances over which you will move while in the kitchen.
When planning a kitchen, be sure to take safety rules into account
So, the smallest width of passages in this room should be 120 centimeters. Thus, in this gap, 2 people can calmly, without interfering with each other:
- a person who is busy preparing food;
- a household member who came to the kitchen to pour himself some water or drink tea, for example.
In addition, this distance will be required so that you can comfortably and without incidents:
- load dishes into the dishwasher;
- remove food from the oven, refrigerator, cabinets, etc.
If the kitchen is a passage room, then you need to be even more attentive to the safety of distances
If the kitchen is a passage room, which is especially common in the layout of cottages and private houses, then this distance must be increased to one and a half meters.
If the kitchen is very small and is not a walk-through room, you can arrange meter-long passages in it.
No. 5 – Rule for proper placement of the refrigerator
So, the refrigerator must be placed as close as possible to the sink, and not from the stove, because:
- Most foods are washed before cooking;
- Then the refrigerator can be placed in the nearby built-in oven and microwave unit.
However, in small kitchens, the refrigerator can, in principle, be installed in another room located near the kitchen, for example:
- in the corridor;
- in the living room, etc.
The refrigerator must be within the working triangle
No. 6 – Competently bypassing the inconvenient nuances of the finished room
As a rule, the kitchen plan is drawn up already at the stage of the presence of erected walls in the apartment. And not always their architecture can be convenient for everyone.
So, let's see exactly how you can get around the inconvenient nuances in the table below.
Table 1. How to solve problems that arise when planning a kitchen arrangement
| Nuance | How to adapt a feature to your needs |
| Ledges | Sometimes kitchens are equipped with completely unnecessary projections at various points in the room. They can also be used to place cabinets, however, so that the furniture does not stick out, taking up the free space of the room, it must be made shallow, that is, the internal capacity must be reduced. |
| Niches | Niches that cannot accommodate any piece of furniture, such as a closet, can be filled with shelves, and things needed in the household can be stored on these shelves, for example:
|
| Excessively narrow or wide doorways | If possible, doorways can be:
|
| Kitchen space is too small | If you want your small kitchen to be equipped with all the necessary appliances, you need to choose mini electronics options. It’s even better to take the built-in one, as it allows you to seriously save space. Among other things, you can save space by reducing the following electronic parameters:
|
The disadvantages of any kitchen can be turned into advantages
No. 7 – Creating a kitchen plan simultaneously in professional computer programs and in reality
To ensure that no problems arise after installing furniture in the kitchen, you must use the following to create a plan for its location:
- real room;
- professional computer programs.
It is better to create a kitchen drawing in specialized programs
In other words, it is desirable that everything coincides in reality; the kitchen should be drawn at the beginning, for example, in one of the following free planners:
- program from IKEA;
- Planner5D;
- SketchUP Pro, etc.
Then, having sketched out a rough plan for furniture placement, go to your apartment or house and draw squares or other shapes directly on the floor and walls, replicating your furniture in full size. In this way you can:
- see the errors made in the calculations;
- confirm in the decisions made;
- come up with something new.
Kitchen project in SketchUp
No. 8 – Rules for arranging the dining area
Not every apartment is so large in area that you can fit a spacious kitchen and even a dining room into it. Usually, when eating, people sit at the table exactly where the cooking is done. That is why it is important to take into account some important nuances regarding the arrangement of the dining area.
1. So, first of all, it must be said that each seat has its own parameters, namely:
- 60 centimeters wide;
- 40 centimeters deep.
Please note: the above parameters are relevant for traditional furniture, but more comfortable chairs, for example, with armrests, will have a larger width and length, therefore, these parameters will have to be increased.
Dining area
2. From the edge of the tabletop to the wall, for comfortable movement of the chair and the person sitting on it, there should be a space of approximately 80 centimeters. If the space is smaller, the person will have to sit literally squeezing into the table, which will be harmful:
- for his digestive system;
- musculoskeletal system;
- psyche, since while eating the body should experience complete comfort.
Be sure to follow the recommendations regarding the distance that should be between the chairs and the table and the wall
Preparatory work
Preparing a kitchen for renovation means cleaning it and removing old finishes, furniture and appliances. It all starts with removing appliances and furniture from the kitchen, then dismantling the ceramic tiles, removing the baseboards and flooring.
Whitewash from the ceiling is not so easy to remove, so you will have to spend a lot of effort on washing the surface. The same applies to painted walls: in this case, a special paint solvent helps the best. You need to work with it with extreme caution, wearing a respirator, protective clothing and goggles. You can remove old wallpaper using a spatula; first, you can wet it a little with cool water.
At this stage excess partitions are also demolished , if these actions do not contradict the norms, but in general, any redevelopment must be approved in advance. If the plan includes replacing the door, then it is better to remove it at this stage. After all the old finishing has been removed, it is best to wipe the surfaces with a detergent solution and then with plain water. This removes all remaining dust and accumulated grease.
The cleaned surfaces must be carefully inspected, their general condition, the presence of cracks, defects, and unevenness noted. At this stage, you can make adjustments to the estimates if it turns out that some additional work needs to be carried out.
Main types of kitchen layouts
So, today we can distinguish 6 types of layouts for such an important space of the house as the kitchen. Each of them has many features and nuances, which we will discuss next.
Linear layout
This layout is considered universal and the most compact. It is very simple to design, since it has no corners, because it goes along one line. That is why it has another advantageous feature - reduced cost.
Linear kitchen
However, the disadvantages of this type of layout clearly include the fact that the linear arrangement of the headset is very inconvenient, since, as you might have already guessed, it violates our basic rule denoting the working triangle.
This type of furniture placement is suitable for:
- small kitchens (Khrushchev);
- narrow kitchens, the width of which is no more than 2 meters;
- kitchens playing the role of a passage room;
- spaces for cooking in studio apartments.
Exhibition version of a linear kitchen
A linear layout is the best option for students, very busy working people and other categories of citizens who simply do not have time to cook at home.
Interesting advice! The following will help smooth out the inconvenience of linear planning:
- placing the sink in the middle between the stove and the refrigerator;
- increasing the height of the headset elements so that they come as close to the ceiling as possible;
- the location of the linear set at an angle to the wide window sill, which, in fact, will add another work surface to you.
Linear kitchen: drawing
L-shaped layout
This option is very convenient:
- versatility;
- compactness.
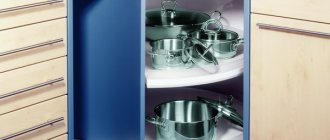
So, you can fit it into almost any apartment with any kitchen, because it allows you to use essentially “empty” space - a corner that is usually used as a place to install a flower or a brush with a dustpan. And if you install a cabinet there, you can make it deep enough to install:
- trash can;
- trays for storing root vegetables, etc.
L-shaped kitchen
Unfortunately, the L-shaped arrangement of furniture has a disadvantage - making such a set will not be cheap, since the corner element of the furniture row will need to be equipped with additional fittings, for example:
- carousel;
- basket;
- whatnot
In addition, such kitchens are always made exclusively to order, since the parameters of each apartment will be different in all cases.
L-shaped layout is suitable for:
- rectangular kitchens;
- small kitchens.
It is very convenient in this layout to place a sink or hob on a corner cabinet, especially if the corner is slightly sloping.
Corner element for L-shaped kitchen
Double row system
Using a double-row furniture placement scheme, it is convenient to create a working triangle, while using both walls of a narrow, rectangular room.
Two-row kitchen
The disadvantage of a two-row system is that this layout option will not work in a room that is too wide or too narrow, since in order to bring it to life, you need to have a passage in the kitchen about one and a half meters wide.
In addition, such a kitchen is characterized by the lowest degree of security, especially if it is a walk-through kitchen. But at the same time it is ideal for elongated and narrow rooms.
Variation on the theme of a two-row kitchen
U-shaped kitchen
This layout option allows the kitchen set to literally surround the cook, who at a convenient moment will be able to get the thing he needs out of the closet as quickly as possible. This kitchen is very spacious, however, it is considered the most cumbersome, since it requires a really large amount of space.
This kind of kitchen is perfect for large rooms, and sometimes even for Khrushchev-era apartment buildings, if they have wide and long window sills.
When planning the placement of a U-shaped set, keep in mind that the passage between the cabinets should be at least 100 centimeters and no more than 180, otherwise the room will become terribly uncomfortable.
U-shaped kitchen
Island kitchen
An island is the most functional solution for arranging a kitchen. Its advantages are as follows:
- it adds work space;
- allows you to divide the room into several zones, for example, for cooking or in the dining room.
Unfortunately, such an island can only be installed in a kitchen with an area of at least 18 square meters. This is the best option for a spacious kitchen.
Island kitchen
By the way, the island can also be used as a bar, storing drink containers and flammable liquids there.
One way or another, the island eats up a significant amount of free space, so don’t risk installing it in a small kitchen.
Carrying out the necessary measurements
To create a kitchen design project and calculate the amount of materials needed, you first need to know all the parameters of the room .
First of all, the width, length and height of the room are measured, then the dimensions of the window and door openings, as well as the distance from them to the floor and ceiling, adjacent walls. It is also necessary to measure the mezzanine, if there is one. In addition, measurements are taken of the location of all existing outlet groups, water supply and sewerage outlets, and ventilation vents. If there are any protrusions in the floor slabs in the kitchen, then this must also be taken into account and appropriate measurements taken. If you want to carry out a redevelopment , demolish some partitions, then you need to measure the adjacent room with which the kitchen will be combined.
The measurement accuracy should be as high as possible, and the error should be no more than 0.5 cm. Otherwise, you may end up with a door that won’t close, or a very inconvenient passage between the work area and the dining table, especially when it comes to a small kitchen, where every centimeter is accounted for .
How to assemble a kitchen set
After the renovation is completed and you buy the kitchen set, you will need to assemble it. Unfortunately, representatives of the company from which you bought it will do this for an additional fee, therefore, it is better to learn how to assemble the headset yourself.
Step No. 1 – prepare the tools
In order to assemble a kitchen with your own hands, you will need to prepare the necessary tools:
- a screwdriver so as not to tighten the fasteners by hand;
- drill with a set of drills;
- jigsaw;
- hex keys;
- hammer;
- building level;
- pliers
- cutter;
- corners;
- centimeter tape measure.
Let's prepare the necessary tools
Step No. 2 – cabinet assembly
So, first you need to install cross-shaped fittings for hinged doors on the side surfaces. It “fits” onto the self-tapping screws.
Also, rails are mounted on the sidewalls, which are needed for retractable segments. This needs to be done at the very beginning, because doing it later will be problematic.
Cross fittings
Then, wooden dowels must be installed in the blind holes. These segments help achieve the following effects:
- assemble furniture much more evenly;
- increase the overall strength of the structure.
We connect cabinet segments with wooden dowels
It is better to fasten the dowels using glue.
After the dowels evenly fasten several parts together, you will need to use a hex key to screw in the screw that will finally connect them. A plastic plug is placed over the screw, which comes with the headset.
Step No. 3 – screw the legs
If the structure has legs, they will need to be screwed to the intended joint with the cabinets, and, if they have a regulator, the appropriate height for placing the furniture will be determined.
Screw the legs and adjust their height
In the case when you bought an inexpensive set of furniture, the legs will not be adjustable.
Step No. 4 – fastening fittings for wall cabinets and assembling pull-out segments
Add adjustable canopies to wall hanging cabinets. These canopies are installed on the upper corners of each cabinet.
The walls for drawers that slide out are assembled by analogy with cabinets, namely: they are first tightened with wooden dowels and then with screws.
It is necessary to assemble all three walls, and then install a piece of particle board on the bottom.
We fix the kitchen facade correctly and quickly
The facade is attached to the retractable segments of the headset as follows:
- a screw is screwed into it;
- the flattened side is installed in a hole in one of the sidewalls;
- Afterwards, a sleeve is installed in the holes on the sidewalls and rotated so that the flat part of the screw is captured.
Now guide rollers are installed on the lower sides of the assembled kitchen unit element, which are then connected at an angle.
Step No. 5 - installing the kitchen in place
To begin with, install the side cabinets. Remember that communications for washing are carried out through them, so do not forget to make holes in the walls for them in advance.
After assembling the kitchen, it's time to put it back in place.
After the subsequent cabinets are attached, they are immediately produced. height adjustment. If necessary, cuts are made in the boxes.
Once the cabinets are installed, secure them together using:
- self-tapping screws;
- furniture screed of intersectional type.
For a built-in sink, you will need to cut a round hole in the countertop in advance. This will need to be done before the countertop moves to its final location.
Before installing the sink, you must first cut out the countertop
Fastening the built-in stove is done by analogy, however, it is best to do this at the end so that the equipment is not damaged.
The tabletop itself, after all the cutting out of the parts, is attached directly to the wall. It’s okay if there is a small gap left, then you can hide it with a plinth.
If you have a corner kitchen, then you will have to join two countertops, using a metal strip that will hold them in place, and at the same time close the through gap.
Assembly of retractable kitchen segments
Wall cabinets are hung on the wall at a distance of at least 60 centimeters from the surface of the countertop. Holes are first drilled on the wall, onto which planks with hooks are attached, serving as a support for hanging cabinets.
The doors are attached to hinges that are pre-installed on the cabinet walls using self-tapping screws.
Step No. 6 - finishing work
Household appliances, hoods and other kitchen elements are installed in the assembled kitchen. This is done strictly according to the instructions, and it is better by the hands of specialists if you do not have the appropriate skills. But if you are confident that you can follow safety precautions, then go for it.
The final stage is the installation of equipment
How to make a kitchen set yourself, what designs are the most convenient and reliable? More details in a special article.
Recommendations for renovation from scratch in a new building
New houses are different: the quality depends on the developer, finishers, and materials. In brick or panel houses, you should wait for the shrinkage time (from 2 to 5 years) - repairs during this time are inexpensive, it makes no sense to invest a lot of effort and money in it.
In monolithic structures, the final finishing can be done immediately, but with the use of various preventive measures such as expansion joints.
The sequence of actions is the same as described above, but with a single note for each item: “if necessary.”
The system described in the article is not ironclad rules, but only a set of recommendations that will help you make fewer mistakes when renovating your kitchen. Look and act according to the circumstances, but do not forget about the recommendations.
Let's sum it up
Independently planning the details of the furnishings of your future home is an exciting and responsible process that can drag you in because you are actually creating a picture of a future happy life in a new place in your head, and at the same time repel you, since after all, planning involves studying a lot of difficult and not for all interesting nuances. However, if you firmly take up the matter and approach it with all responsibility, everything will turn out just fine.
Everyone knows that a kitchen is needed not only for cooking, but also for relaxation, as well as pleasant gatherings with the whole family or with guests. That is why, even with limited space, it is necessary to ensure maximum comfort in this room. In a special article we will look at kitchen designs with an area of 10 sq.m.
Video - Correct kitchen layout and proper location
Calculation of required building materials
In order not to encounter the problem of shortage or excessive surplus of building materials, you need to calculate the required quantity in advance as accurately as possible. After the design project is ready and finishing methods are selected, it is necessary to calculate how much and what materials will be needed for preparatory work, rough and finishing. If difficulties arise, then at this stage you can contact specialists.
The estimate includes the necessary facing materials, primer, putty, possibly new sockets, wires, etc. It doesn’t hurt to think in advance not only about the quantity needed, but also about the price of all materials . This will help you plan your budget correctly and can indicate the need to save.
Door and lighting installation
If now everything in the kitchen is new and there will be new furniture, then you also cannot do without a new door, if it is included in the project at all. The door can be wooden, glass, with glass inserts; you can also opt for folding doors . If you cook a lot and do not want odors to penetrate into the rest of the apartment, then it is better to install a regular swing door , and materials such as plastic and glass are more preferable, because they do not absorb odors.
At this stage lamps are also installed , and it is necessary to provide several types of lighting: general, working, in the dining area, and also decorative.
Installation of skirting boards
Skirting boards in the kitchen perform both decorative and practical functions. For the floor, it is better to choose a plastic baseboard , since wooden ones behave much worse in conditions of high humidity in the kitchen. Another option is aluminum baseboard , which is also good for the kitchen. Calculating how many skirting boards you need is simple: add a meter to the perimeter of the kitchen and divide by the length of one skirting board (standard length is 2.5 m). You will also need to purchase additional corners.
A ceiling plinth is also installed . Today, a special kitchen plinth , which is installed between the wall and the countertop, and as a result, splashes and crumbs do not fall into the gap.
Communications layout
the water supply and sewerage system is
also equipped and remodeled, if necessary . They start with the electrical wiring, which requires three-wire cables in double insulation with a diameter of 2 mm. The walls are tapped in the necessary places so that the cable can be laid there, then the wire itself is fixed with masking tape and plaster. Cables are laid only at right angles. At this stage, you need to clearly know the kitchen lighting scheme and the location of sockets.
The water supply and sewerage system must be made of metal-plastic or polypropylene pipes: they are easy to install, durable, and are not afraid of temperature changes. After this, you can connect the gas hoses.
What are the main stages at the very start before repairs?
In this block we will briefly list the entire step-by-step program of where to start the repair, and below we will describe each stage and explain why the sequence is exactly that.
1. Carefully study on the Internet the stages of work that you plan to carry out. You need to read about everything you plan to spend money on. Without this base, every second master will try to “cheat” you, rip off more money than necessary, and do the work more carelessly and simply.
Therefore, at the first stage, we stock up on theory and information. Knowledge is power! Read about everything from electrics, wire sections to putty and decorative finishing.
You should know better than the masters how it’s all done, how much it costs and what it should look like in the end. Only in this case will the work be done to you with high quality and for reasonable money.
2. Calling the craftsmen and determining approximate prices for all types of work that you want to perform.
Offhand, the standard is as follows (this is not a sequence, but for now just a list):
- Dismantling partitions and doors
- Dismantling the floor covering
- Dismantling and cleaning (washing) walls
- Dirty ceiling work (cleaning, leveling, putty)
- Installation of a new window (usually, dismantling the old one is included in the price)
- Plumbing work
- Electrical work
- Replacing a heating radiator
- Leveling the floor (screed)
- Laying an “apron” on the kitchen work wall
- Installation of water tap and sink
- Painting work on walls (leveling, putty, “cobweb”)
- Painting walls (or wallpapering)
- Ceiling decoration (painting or hanging installation)
- Laying flooring and installing skirting boards
- Attaching a baguette to the ceiling
- Installation of lighting fixtures
That, in general, is all the starting work that involves a major overhaul. You may have other ideas: instead of a putty ceiling, you will want a plasterboard, figured or maybe suspended ceiling.
But that's not the point. You just have to calculate the work first, and only then, build on the amount that comes out.
And most importantly, do not forget the most important point: ask the craftsmen who will do this or that work what exactly you need to buy for this or that stage. Let's say what is needed to lay tiles? – tiles, glue, crosses, finishing grout.
What is needed to install “slopes”? - profile, drywall, insulation, aluminum corners. And everything like that.
And so on for every point, right down to the carnation!
Don’t hesitate to ask the masters and check their list with what they write on the Internet. Masters may miss some point, they are people too.
If you do not calculate every rivet, then many surprises and frustrations await you ahead. For each stage of work, it is necessary to purchase basic and additional materials, and few people take this into account. And it's not cheap!
And if you don’t count at such a moment, your money limit may run out faster than you think and you will be left alone with a bucket of putty... And this is scary for a beginner, believe me.
No, of course, if you are a master yourself and have experience, then this recommendation does not apply to you. We are talking about “mere mortals” who were not even close to using a spatula, mortar and drill.
3. Compiling a list of approximate consumables - after you talk with the craftsmen, you will already have more than half of the list in your hands. But think a little more and put in there what was not discussed with the masters: a window, a radiator, a chandelier, lamps, tiles, furniture.
4. The fourth step is a trip to the building materials hypermarket and a rough estimate of what you might need.
Attention! First of all, look around and write down the price for the basics (plasterboard, putty, wiring, pipes), and then just move on to the decor section.
Why is that? But because this is a very, very seductive department of the store. And you, well, you will definitely want to buy something like that. And you'll get excited about it, yes. And then you go to the important things section, realize that you don’t have enough and decide to save a little on the quality of tiles or wallpaper...
In general, if you follow exactly this sequence, then you will avoid the annoyance and unpleasant feeling when you want something, but it’s too much for you.
5. Next, you return home and sleep, putting the treasured list under your pillow. Why is that? And because overnight, you will certainly scroll through another three hundred and fifty-three options in your head and change your mind! And you will be extremely glad that you didn’t buy that laminate yesterday.
6. Now you can recruit the craftsmen you selected earlier and discuss the date when they will start work. At the same moment, you need to take out your wallet and immediately set aside the money that you will have to give them for the work.
Be sure to do this! If you miscalculate a little, you will have to stand there batting your eyes in front of the repairmen and whining about deferred payment. This is terrible and undignified. Don’t bring yourself to such shame because of basic carelessness.
7. After this, you can safely go to the store and buy what you need first. And, if the construction market is far from you, then you can buy material for all types of work in advance. Spend calmly, you have already set aside money for work and furniture.
Well, now, let's look at the order of repair work in the kitchen, so that you are aware of which specialists to call first, and which ones - at the very end.
Installation of furniture, appliances and sinks
Now you can finally install the selected set of furniture, and then install the sink. The best option for a kitchen sink is stainless steel, although sinks made of composite materials are also in high demand today. The next step is installing a refrigerator, dishwasher and other appliances.
All that remains is to choose the appropriate accessories for the kitchen . You can choose a tablecloth and curtains from the same material, hang photographs, paintings, a slate on the walls, place cute souvenirs, jars of spices, flower pots or something else on the shelves at your discretion.
Finishing work
When all communications are installed, you can proceed to finishing work. It’s better to start with the ceiling , so as not to stain the walls and floor while finishing it. For ceiling cladding, you can choose painting, a system of suspended or suspended ceilings using plasterboard or slats. It is extremely undesirable to use whitewash, because it will turn yellow very quickly. Stretch ceilings are an exception; their installation is carried out after finishing the walls, as this is a quick and completely clean process.
A lot of different materials are suitable for decorating walls in the kitchen . The most popular of them is ceramic tiles, which are often used to cover not only the work area, but also all the walls of the kitchen. In the work area you can also use decorative stone or glass skins, which look quite impressive. An option for the most daring is a metal apron. The walls in the dining area can be finished with washable paint - the simplest, cheapest and at the same time stylish option. You can also use wallpaper, but not all will do, only non-woven, vinyl, glass wallpaper, and liquid wallpaper. You can also use decorative plaster, stone, wooden lining and plastic panels to decorate the kitchen walls.
As for the floor covering , which is laid last, there is also a wide choice. You can combine different materials, dividing the kitchen into functional areas. Of course, the best and proven type of flooring for the kitchen is tiles, but under them, as well as under mosaics, concrete and porcelain stoneware floors, it is ideal to install a heated floor system. Often linoleum and laminate are used in kitchens, less often - wood and cork. An excellent modern option is a self-leveling floor: it is durable, practical and beautiful, and with its help it is easy to create a three-dimensional image.
Interior of a kitchen with a dining room in a small apartment: design options
In a small apartment, the kitchen and dining room are almost always combined, and usually in a very modest space. However, you have many options for interior decoration and kitchen design. Below we will look at a variety of finishing options for walls, floors and facades.
Neoclassical kitchen interior with open plan and elegant interior
The neoclassical style always pleases with various finishing options from gypsum elements, for example, pseudo-columns, moldings, friezes, medallions and modulons. Similar carved elements can be found in the design of the headset.
Fashionable modern kitchen with a small dining area in the kitchen-living room niche
In this modern trendy interior you will find natural marble in the design of the apron, countertop set and table. Notice how elegant the golden illumination of the working culinary surface looks. Despite the small area of the room, the designers here used dark material to decorate the floor and kitchen facades.
Fashionable white kitchen in loft style with a dining room with a table made of slab wood
The photo of the kitchen dining room interior above looks very modern. The project is made in loft style. The culinary area itself occupies an area of less than 7 square meters, plus the dining room, which is located next to the living room in an open-plan context.