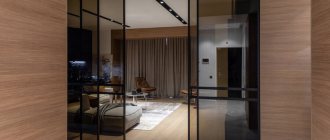
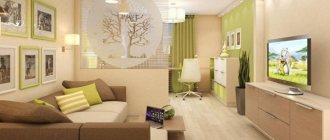
Wooden partitions are used to zone space in a room: separating the kitchen and dining room, enclosing a sleeping area or study, arranging a room for two children. Thanks to the warm beauty of natural wood, such false walls add comfort and nobility to the interior.
What are there
Based on the type of construction, wooden dividers are divided into two large groups: stationary and mobile.
The first category includes fixed structures, the elements of which are rigidly attached to the ceiling, floor and walls, and are also fixed to each other. These can be false walls and half-walls, vertical slats, patterned screens or shelving made from partitions. The main advantage of such systems is their neat appearance and stability; they are often used as an alternative to an entire wall. The second category includes any transformable models: screens, sliding and folding dividers. Such models are good because with their help you can easily change the structure of the room, separating zones or, conversely, forming a single open space.
Instagram @startdesign.spb
Instagram @evg.petrenko
Instagram @olgabondar_design
Instagram @design.karieva
Instagram @ma_gurova_design
Separation by appearance
- Solid sections have good heat and sound insulation and provide maximum privacy.
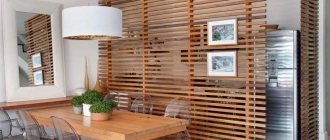
- Slatted - parallel vertical slats that also create privacy for the area, but at the same time allow air, light and sound to pass through.
- Openwork - carved continuous structures with patterns.
Instagram @klimina.design
Instagram @st.ar.studio
- Small rooms
13 top design techniques for decorating a living room-bedroom (when you have to combine)
EXAMPLES OF PARTITION DESIGN
You can choose a pattern for your partition or radiator screen in our catalog of ornaments. We have developed more than ninety patterns, which our designer adapts to the overall size of your product.
If you were unable to choose an ornament in our catalog, we will make an ornament according to your sketch or wishes.
WATCH A SHORT PRESENTATION ABOUT US
Zoning space with curtains: type classification
How the premises will be landscaped depends, first of all, on the original purpose of using its space. Zone isolation can be:
- full or partial;
Partial zoning with curtains
- temporary or permanent;
Permanent insulation with curtains
- functional or decorative.
Decorative zoning with curtains
Wooden carved models
Wood is a material that can be easily processed. You can make shapes of various shapes from it. Thanks to this, the variety of wooden partitions is incredibly large. Beautiful geometric shapes will create a pleasant look and effectively divide the room. Proper lighting will emphasize the elegance of such a partition.
Photo: archello.com
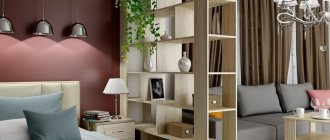
Wooden blocks
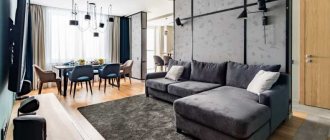
For an interior made in dark colors with leather elements, wooden zoning partitions are suitable. This can be a voluminous design that will not only partition the space, but also become an attractive element of the interior, which, thanks to its volume, will look quite interesting.
Photo: architizer.com
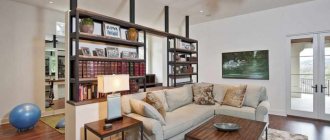
Closet
Furniture is well suited for zoning space in a room. You can separate the guest area from the dining room beautifully and practically with the help of a closet. It will not only visually divide the space, but will also be able to accommodate the things necessary for the kitchen and living room. It is better to choose this piece of furniture to match the tone of the walls so that it looks appropriate. By the way, the wardrobe, thanks to its design, will save space.
Photo: smalldesignideas.com
We have low prices
We have our own production with all the necessary machines and a painting shop. We manufacture and sell our partitions for zoning and screens for radiators - without intermediaries.
We make them from high-quality MDF and Laminated MDF (LMDF), in various thicknesses. We mainly use MDF with a thickness of 16 mm, but if necessary we can make partitions from MDF with a thickness of 16 mm or 24 mm.
We paint our partitions for zoning with non-toxic water-based enamels; it is safe for allergy sufferers, children and adults. We buy enamels made in Germany and Italy.
We have our own installation teams and delivery vehicles. Thanks to this, we do not inflate the cost of delivery and installation. Also, we resolve the issue of measurement and installation in Moscow and the regions. We ship our products by transport companies throughout Russia.
If you have temporary budget difficulties, you can go to our online store and order a partition for zoning, a cabinet, a rack or a screen for a radiator in installments.
Installment plans are available to HALVA card holders.
If you do not have a HALVA card yet, you can apply for one on the website: www.gethalva.ru
Each product is unique and is created in a single copy, according to individual sizes and taking into account your wishes. To calculate the approximate cost of a decorative partition for zoning, use the table below.
MDF UNPAINTED
Basic solution. Optimal for repair crews, builders and contractors. Convenient for on-site painting. Wholesalers receive volume discounts. Designers have special conditions for everything.
Thickness 6 - 8 mm 7,000 rub. / m2
Thickness 10-12 mm 8,000 rub. / m2
Thickness 16-18 mm 7,500 rub. / m2
Thickness 22 mm 10,000 rub. / m2
THE PRICE INCLUDES A U-SHAPED PROFILE FOR INSTALLING THE PARTITION
MDF PAINTED ON BOTH SIDES
The optimal solution for the manufacture of decorative room zoning partitions and carved screens. We make partitions from 16 mm MDF; Screens made of MDF 10 mm.
Thickness 6-8 mm 12,500 rub. / m2
Thickness 10-12 mm 13,500 rub. /m2
Thickness 16-18 mm 14,900 rub./m2
Thickness 22 mm RUR 16,500 / m2
THE PRICE INCLUDES A U-SHAPED PROFILE FOR INSTALLING THE PARTITION
MDF LAMINATED (economy!)
When making partitions and carved screens from LMDF, no additional painting of the material is required. Lamination is a thin, moisture-resistant film.
Thickness 6-8 mm 8,000 RUR/m2
Thickness 10-12 mm 9,000 RUR/m2
Thickness 16-18 mm 9,500 rub. / m2
Thickness 22 mm 11,000 rub. / m2
THE PRICE INCLUDES A U-SHAPED PROFILE FOR INSTALLING THE PARTITION
SLATT PARTITIONS FROM CHIPBOARDS
Budget slatted partitions made of chipboard for zoning space. An excellent solution for creating a cozy atmosphere in your home.
Chipboard 40x60 mm. average price 1700 rub. for one rail
MDF PAINTED ON ONE SIDE
MDF, painted on one side, is used to decorate walls in cafes, restaurants, etc. We usually use MDF, 8,10 or 12 mm thick.
Thickness 6 - 8 mm 9,500 rub. / m2
Thickness 10-12 mm 10,500 rub. / m2
Thickness 16-18 mm 12,000 rub. / m2
Thickness 22 mm 14,000 rub. / m2
THE PRICE INCLUDES A U-SHAPED PROFILE FOR INSTALLING THE PARTITION
SLATT PARTITIONS FROM BEAM
Acrylic plus brick
Sliding partitions for zoning space in a room can be decorated with more sustainable materials, such as brick. You can clearly set boundaries for them. It is permissible to decorate only the corner with brick, and sliding acrylic doors can serve as a continuation of the partition. This design in white will not clutter up the room.
Photo: queendecor.co
Design options
The partition may well play a purely decorative role. Partitions with a suspended vertical structure will create an effect of lightness and brightness. Plastic partitions for zoning space in a room do not always look cheap. Good quality and bright colors will make this interior element quite presentable.
Photo: tremontgrand.com
Installation of frame structure
If it was decided to choose a frame structure as the basis of the partition, it is assembled from an 8-centimeter block. The first step is to install the harness along the marking line. It will become the basis for vertical racks. In order to increase the rigidity of the structure, the step between the elements is kept within less than 60 cm. To further strengthen the future wall, you can also use connecting jumpers.
Carrying out marking
The first step is to indicate the thickness of the partition, which is applied to the floor, and then, using a level and plumb line, to the walls and ceiling. You can use a square that is laid on the floor and leans against the adjacent wall. A line is drawn along it on the floor and connected to a response point in another part of the future partition.
You can check the accuracy of the lines using a tape measure, which is applied in different parts of the room to the wall parallel to the future partition. In order to transfer markings from the floor to the ceiling, you can use a bubble level, which is first applied to the wall to mark the first point between the adjacent wall and the ceiling. At the second end of the future partition, the same work is carried out, and then the marks are connected to each other.
Wooden frame
To create a frame, the timber must be prepared by sawing into blanks. It is better if there is no floor covering where the lower beam is installed. You need to drill holes in the side posts and beams at the top and bottom, deepening them into the masonry or concrete to the length of the dowel. This is what will be used to attach the wooden blocks. When the frame around the perimeter of the future partition is ready, you can begin to fill it with vertical posts and horizontal lintels. If desired, the structure is supplemented with soundproofing material such as polyurethane foam or mineral wool.
Metal carcass
The guide profile must be strengthened on the ceiling and floor. If the base is concrete, the elements can be fixed using dowel nails. If other materials are available, self-tapping screws are suitable. We should not forget about the presence of a sealing tape between the profile and the wall. A step of 600 mm should be maintained between the guides.
The racks are inserted into the lower profile and the profile on the ceiling. Before attaching this element, you need to check its verticality. Only then, using a pair of self-tapping screws, can final installation be carried out.
Installation of MDF panels on a frame
The panels are cut with a saw, and to obtain right angles, use a bench square. Fastening should begin from the floor or corner. The first product is turned with the tenon down and leveled. Fastening is carried out with self-tapping screws. There should be 4 fasteners per panel.
In the place where the product will intersect with the profile, steel clamps are additionally used. You should choose 18mm self-tapping screws as fasteners. The following product must be installed with a tenon in a groove. The products are tapped with a rubber hammer.
Installation of MDF panels with glue
The panels can also be simply glued to the wall. It is necessary to start work from a corner or floor.
Attention! It is better if liquid nails are used in the work, as they dry quickly and are durable.
In order to speed up installation work, glue should be applied to the back side of several panels at once. They are left for a while, then pressed, torn off and glued into place only after 4 minutes. As soon as the panel is on the wall, press it well for 5 seconds and release.
Additionally, you can use three self-tapping screws that are inserted into the groove. The second panel must be inserted into the groove of the previous one. It is also torn off, left for 4 minutes and then pressed again. All other products are installed in the same way.
Flowers
Decorative partitions have different purposes. A wooden partition with indoor plants looks beautiful and fresh. It should be well lit so that the flowers feel comfortable. You need to carefully choose the material - low-quality wood can get wet from water, which will ruin the entire structure. And such partitions are installed for a long time.
Photo: lizardedizioni.com
Basic methods of installing MDF panels and the materials required for this
There are two main techniques for installing panels. One of them is the mechanical fastener that connects the sheathing to the frame. The second method is to use glue, but the surface of the wall should be as smooth as possible. Clamps are used to fasten the panels together. This method is good because it does not reduce the usable area of the room.
Another installation method is liquid nails. There is no need for lathing. Although this will make the fastening process easier, if individual elements are mechanically damaged, it will not be possible to replace them without damaging the cladding. Another installation method is to use not mechanical fasteners, but glue that connects the panels to the sheathing. If you choose a frame construction method, you will need a block or metal profile. When using mechanical fasteners, you should stock up on self-tapping screws.
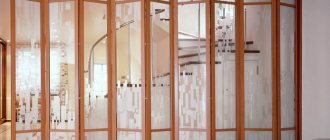
Glass
Calculate the exact cost of repairs using an online calculator
and receive a free detailed estimate for repairs
Calculate
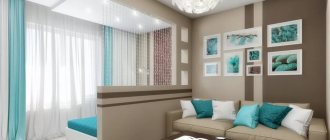
In a small apartment you have to accommodate different living areas. And in such cases, space division is also required. A good option for zoning a room into a bedroom and living room is solid glass, which does not visually “eat up” the space and leaves access to natural light. And the sleeping area, in turn, will be protected from unnecessary noise, odors and pollution.
Photo: thecelebrityhomes.com
Thick organza
Such a partition will not prevent light from entering the room, and it is dense enough that you can place accessories or a picture on it. Translucent fabric creates the effect of lightness and freedom of space. This option is inexpensive and easy to implement.
Photo: venidair.com