Preparing walls for finishing
A bathroom in a wooden house, like in any other, is usually tiled. If the house is made of timber, logs, or made using frame technology, you cannot immediately stick tiles on the walls - the surface does not allow it. The walls under the tiles are sheathed with moisture-resistant sheet material:
- Moisture-resistant GVL.
- Aquapanel from Knauf.
- Moisture resistant plywood.
Fiberboard and gypsum fiber board are also used, but for the same reasons (warping and fragility) it is undesirable to use them. The sheet material is attached to the sheathing, which can be made of a galvanized metal profile for gypsum board or wooden blocks. When using bars, they must be treated with antiseptic compounds.
Lathing made of wooden blocks is usually made to match the wood cladding (a bathroom in a wooden house can be sheathed with wood and then impregnated with protective compounds). They try to make a frame from a galvanized profile under the tiles. But this is not the rule. It’s just easier to attach wood to wood, and it’s easier to install gypsum fiber board and other sheet materials to galvanized sheets.
How to make a sheathing
When making lathing in a wooden house, it is worth remembering that it constantly changes dimensions. Several years after construction, it actively shrinks and takes on operational dimensions. But even then, throughout the entire period of operation, it changes slightly in size. This phenomenon is called seasonal fluctuations. Therefore, you should not firmly fasten the sheathing - it can break and all the finishing will fall off. If you do the finishing without taking this feature into account, the bathroom in a wooden house will be a source of problems - the tiles from the walls will crumble or burst.
Therefore, the sheathing strips are made a little shorter so that they do not reach the floor and ceiling. The second point is that they are not attached directly to the wall, but through special devices. For fastening wooden blocks there are metal corners with slots on one of the shelves. These are the fastenings for the floating sheathing device (pictured on the left). They are rigidly attached to the sheathing bar, and to the wall of a wooden house - through a slot using a self-tapping screw with a large flat head or a bolt with a washer. It turns out that when the wooden wall moves vertically, the sheathing on it will be in the same position.
The second way to make a floating sheathing in a wooden house is to make several through cuts about 10 cm long in the block using a hand router. Through this cut, fix the beam to the wall using the same wood grouse with a washer. To prevent the bolt head from sticking out, use a router to make a recess. Its depth is equal to (or slightly greater than) the height of the bolt head, and its width is the size of the washer (pictured on the right). For a newly built house, the fasteners are installed in the upper quarter of the cut, for an established house - approximately in the middle.
As for galvanized profiles, they are attached to the same corners for floating sheathing. The second option is perforated hangers. This type of fastening is not as reliable, but still allows some freedom of movement. Perforated hangers can be used in an established wooden house where movements are already small.
Tile base
Moisture-resistant sheet material is attached to the sheathing. The priority here is moisture-resistant drywall. Sometimes it is fixed in two layers - to increase the load-bearing capacity and for better heat and vapor insulation. Before laying the sheets of the second row, the joints of the first are puttied, and the gypsum board itself is positioned so that the seams of the two rows do not coincide.
But this is still a gypsum board - an imperfect base, since both cardboard and gypsum are hygroscopic, and their absorbency is reduced by impregnation. Therefore, for greater reliability, moisture-resistant plasterboard is also impregnated with a protective compound. For example, FLACHENDICHT. This is a waterproofing material that is specifically designed for waterproofing gypsum plasterboard and other gypsum bases.
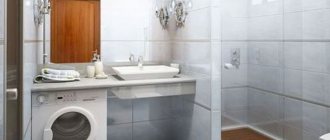
You can also use Aquapanels from Knauf. They are made on the same principle as gypsum plasterboard, but the core is cement with filler, and the “wrapper” is fiberglass. Both materials are not afraid of moisture without pre-treatment. Their difference is that they are made absolutely smooth, without recesses along the edges that gypsum boards have. They are joined end-to-end, and a special adhesive composition is applied to the joining edges. Immediately after installation, the surface is smooth and ready for further finishing. You don't even need to putty it. Moreover, one side of the aquapanel is made smooth - for gluing wallpaper or painting, and the second is rough - for laying tiles.
You can also use moisture-resistant plywood, GVL, as a base for tiles on walls in a timber or log house. They are also attached to the frame, leaving gaps in the seams, which are filled with silicone non-drying sealant.
Outdoor toilet diagram
The most common option for a country or garden toilet is a rectangular structure. It is also called a “birdhouse” because in the version with a pitched roof it is very reminiscent of it.
Project of a country toilet made of wood like “Birdhouse” (to enlarge the size of the picture, click on it with the left mouse button)
In the toilet drawing shown in the photo above, a 40 mm thick board was used for finishing. The construction is quite inexpensive. Doors can be made from the same boards, fastened with strips at the top, bottom and diagonally. The hinges can be installed externally, like barn hinges, decorating the building in a deliberately rough style.
Samples of country toilets: the drawings are the same, the design is different
Despite the fact that the building is utilitarian, if desired, it can be given an attractive appearance and the birdhouse will turn into a quite attractive small building. For example, you can make a small mill from this building.
Country toilet-mill - a little imagination and an unsightly building becomes a decoration of the site (to enlarge the size of the picture, click on it with the left mouse button)
The same birdhouse, but made from a log house - a completely different look. Everything will look especially harmonious if the building on the site is built (or will be built) also from logs.
Even the simplest log toilet looks almost exotic. Moreover, it can also be used as a winter option (to increase the size of the picture, click on it with the left mouse button)
For regions where wood is a luxury and it is irrational to spend it on building a toilet, the same structure can be sheathed with a different material. For example, the frame is sheathed with any sheet material - plywood, fiberboard, gypsum fiber board. You can lay finishing material on them outside - tiles or decorative stone. An even more budget-friendly option is to sheathe it with corrugated sheeting.
You can build a toilet in your dacha with your own hands from any material. This one is made from corrugated sheets (to enlarge the size of the picture, click on it with the left mouse button)
This is the type of toilet that is not difficult to build using bricks. They are usually made in half a brick. There are no difficulties even for an inexperienced mason. Offset masonry, cement-sand mortar.
Using the same project and drawing, you can build a brick toilet (to enlarge the size of the picture, click on it with the left mouse button)
Installation of utilities
The creation of communications begins with the sewerage system. It is necessary to use damping devices or leave compensation gaps that do not allow the system to move when the walls shrink. A gutter is made in the foundation for the sewer outlet. The pipe must not be tied to walls; it must lie on a solid base to prevent movement. Sewage pipes on the floor above the first are attached to elastic hangers to avoid depressurization. To prevent leaks into living spaces, the floor is made 3 cm lower than the level of other rooms. Sewerage is carried out, providing for the possibility of repairing or cleaning it. For drainage, plastic pipes with a diameter of 100 mm are used, which are quickly and easily installed.
In rooms with high humidity, which include the bathroom, wooden material is easily susceptible to mold and mildew. They are capable of completely destroying wooden structures in less than 10 years. Once fungus appears on wood, it is almost impossible to remove it. In addition to antiseptic treatment, ventilation plays an important role in preventing mold and mildew.
If one of the walls faces the outside, you can limit yourself to natural ventilation by making a hole in the wall under the ceiling. To increase the efficiency of such ventilation, an exhaust fan is installed. But still, its effectiveness is insufficient; it is better to install a full-fledged ventilation system. It requires special engineering equipment, which is quite complex and expensive. To avoid mistakes, it is better to contact a specialist.
A complex DIY device requires compliance with basic rules:
- the fan and ventilation pipes must be made of high-quality non-flammable material;
- ventilation ducts lead into holes that protect the structure from displacement during shrinkage;
- special brackets are used as support for ventilation parts, which do not allow individual elements to come into contact with the wood;
- the optimal place for placing ventilation equipment is the attic;
- The fan should be protected from moisture.
Forced ventilation in a wooden mansion must be equipped with fans of the highest class of fire protection. It is also necessary to install fire dampers to block the flow of air in the event of a fire. The electrical wiring is hidden in a metal corrugated sleeve.
The water supply in a wooden building is made perfectly sealed to avoid water leakage. Protection against freezing is also provided, especially if the house is not permanently inhabited. To do this, the floor in the bathroom is insulated, for example, with a vapor barrier film and expanded clay. The pipes themselves are protected from freezing by thermal insulation materials. A tap is installed at the lowest point to drain water when there are no residents for a long time.
Standard toilet
The standard type includes classic, rustic toilet houses with a dug cesspool. The main advantages of this type are the ease of construction and installation of the structure.
The installation of such a closet is made easier by the fact that ready-made toilets for a country house are available for sale on the market, in the form of wooden cubicles, which simply need to be placed in the designated place.
First, try to make the cesspool wider and larger, the preferred depth is two, two and a half meters or more. This will increase the time interval after which it will need to be cleaned. And if you are not at the dacha all the time, but only during the season or weekends, a spacious pit can serve you without cleaning for more than 10 - 15 years.
Carefully study the instructions on how to properly make a pit for a toilet; if necessary, insert concrete rings into it to prevent the soil from collapsing and falling off.
The second tip would be to locate the pit behind the toilet house; the structure should not be installed in the center, but slightly in front of it.
Thirdly, the provided ventilation outlet will help cope with unpleasant odors. The exhaust pipe is installed behind the cabin, it is laid vertically from the top of the pit, its length should be about 50-60 centimeters higher than the roof of the building. This will ensure a flow of fresh air inside, while unpleasant odors will go into the pit and rise up the pipe from it.
Selection and installation of plumbing fixtures
Often in the bathroom there is not only a bathtub with a toilet, but also a shower stall and a bidet. This is easy to do if the room space is at least six to eight square meters. A bathtub installed in the center looks good, which is only possible in very spacious rooms with a reinforced floor structure. In the case of a regular floor, all plumbing fixtures are installed along the walls.
If space allows, a large sink is preferable. For a family of more than three or four people, two washbasins are made. The bathtub itself is sometimes made of cedar or larch wood with special impregnation. In larger rooms a Jacuzzi is installed, and in smaller rooms a shower stall with or without a tray is installed. For very small rooms, a shortened bathtub, corner sink, or wall-hung toilet are suitable. When arranging a shower stall, care should be taken to ensure that the water does not stagnate on the floor or spread throughout the room.
What else to consider?
It is very important to properly prepare a bathroom in a wooden house before decorating and furnishing it. In order for a bathroom to withstand any load, you need to design it correctly
It is important to determine what equipment will be installed in it. It has already been said that there are heavier and lighter plumbing fixtures. The heavier the bathtubs, toilets and other products, the more the floor needs to be strengthened. It is also necessary to calculate the number of residents who will actively use this premises.
In order for a bathroom to withstand any load, you need to design it correctly
It is important to determine what equipment will be installed in it. It has already been said that there are heavier and lighter plumbing fixtures
The heavier the bathtubs, toilets and other products, the more the floor needs to be strengthened. It is also necessary to calculate the number of residents who will actively use this premises.
Before renovating a bathroom, you also need to calculate how much free space will be lost when installing the trim and ceiling. So, for example, when installing wooden panels or planning to cover the walls with plasterboard, you have to think about the fact that the room will be reduced along the entire perimeter by at least a few centimeters. If additional insulation of the room is done, then you have to subtract a couple more free millimeters from the total area.
Additionally, you need to take care of ventilation and vapor barrier of the room.
You also need to take into account such things as the placement of the necessary equipment and its connection. First of all, the most massive plumbing fixtures are installed. To begin with, allocate space for the bath. If desired, you can also make an additional podium under it, on which it will rise. If you are installing a bathtub with a shower, it is better to place it in the corner.
It is important that there is at least 70 centimeters of free space next to the shower stall, more is better. This will make using the bathroom more convenient
The arrangement of the bathroom does not end there. It is necessary to additionally consider the location of the pipe system and install mixers. Often the communications system is hidden under wall cladding or in the floor. You can also install boxes for decorating pipes.
In some cases, sockets are also provided in the bathroom. This is done so that you can safely use the washing machine and other devices. The outlet needs to be grounded, but you shouldn’t do it yourself; it’s better to entrust the task to professionals.
It is important to remember that if everything is done correctly at the preparation stage, the room will last longer and there will be no need to return to repair work
Sewerage
A bathroom in a country wooden house, combined with a toilet, requires a sewer system. According to the method of waste transportation, it can be gravity and forced. If you use the forced method, the waste is transported using a fecal pump, and with the gravity method, it is drained due to the correct slope of the pipe. In a private residential area, there are two options available.
The main condition for the proper functioning of a gravity sewer is strict adherence to the slope parameters. It should be uniform and constant throughout the pipe. The length of the horizontal section does not matter.
The most common mistake during installation is a very strong slope. The accelerated movement of wastewater prevents the pipe from filling with water, as a result of which the internal walls are not washed sufficiently. If the slope is too small, this is also a mistake, since the speed will be very low
It is important to strike a balance between speed and filling so that the system cleans itself. Otherwise, there will be plaque inside, which will spoil the drain and lead to blockages.
When installing a bathroom in a private house, the correct slope should be provided. If the pipe diameter is 40-50 mm, the optimal slope will be 3%, 80-110 mm - 2%. That is, with every meter the pipe drops 20 mm to the lowest drain point.
Sometimes it is not possible to make a gravity sewer. Then, in order to maintain the slope, the pipe is laid below the floor level or the upper end is raised very high. Using the first option leads to serious damage, while the other method can ruin the design of the bathroom and cause inconvenience during further use.
Then it is better to use pressure sewerage, the main part of which will be a fecal pump. With its help, the movement of drain pipes occurs from the bottom up, and the cross-section of the pipes is reduced several times. You can also purchase a toilet that has a built-in pump.
Why you should entrust the work to specialists
Despite the apparent simplicity of organizing the supply of drinking water to apartments and private houses, the water supply scheme is a complex engineering network, even within the same dwelling.
Therefore, installation of a water supply system is rightfully considered one of the most complex and critical types of work carried out during capital construction and reconstruction.
Developing a water supply , laying pipelines and installing plumbing fixtures require practical experience, as well as knowledge of physics and mathematics. Installing a drain, installing a water supply system, the price of which in our company is completely affordable, are all complex processes that require knowledge and skills. And if you entrust this work to non-professionals, the damage and costs will be very large. Therefore, you should not save on skilled workers.
Water supply installation
Houses made of wood shrink significantly, so before installing a water supply system, you need to take care of its flexibility. It is because of this property that it is recommended to use metal-plastic pipes for a bathroom in a wooden house.
They are laid taking into account possible shrinkage and must be fixed with special rubberized fasteners (can be replaced with clamps for plumbing equipment). Next, the pipes (and the base of the floor) are insulated using thermal insulation materials.
Cozy bathroom in a wooden house
To prevent premature rotting of floorboards, it is also important to provide a practical drain to remove excess moisture into the drain. For such purposes, a drain track with a dry seal is often used.
Another purpose is to protect against unpleasant odors from the sewer system.
The presence of a drain in the bathroom must be provided for at the planning stage
It is important to make a slight slope so that the water flows into the drain faster. Classic style
Classic style
Wood is afraid of moisture, and one of the most serious problems in a bathroom in a wooden house is condensation on the pipes.
To prevent damage to walls, you must follow several rules:
- Give priority to plastic over metal pipes. Plastic is a less thermally conductive material, so less condensation forms on it.
- It is necessary to completely eliminate contact between the surfaces of walls and pipes.
- To secure the pipes, you must use rubberized clamps.
Gray room
It is also worth considering the requirements for sewerage in wooden houses. All connections must be tight. Leaks can be detrimental to wooden floors. Freezing of pipes can also cause problems. To avoid freezing of water pipes in sub-zero weather, it is recommended to bury them in the ground. The depth depends on the level of soil freezing individually in each region. Before burial, the pipes are wrapped in thermal insulation material, usually glass wool.
Design and finishing of a bathroom with plastic panels for walls and ceilings + 110 PHOTOS. A quick and cheap way to decorate
The working process
- Before you start arranging a bathroom, you need to study the step-by-step instructions. The installation of a bathroom should begin with waterproofing. It is necessary to pre-impregnate the wood with an antiseptic. All surfaces are treated from the inside with a water-repellent compound.
- Then the metal frame is installed. It is covered with moisture-resistant material. The joints are also treated. The brand of composition and method of application are selected depending on the type of surface.
- Roofing felt is not the best choice for indoor waterproofing (high cost, not environmentally friendly). It is better to use a water-repellent mixture. Thanks to it, the surface is covered with a moisture-impermeable membrane.
- You can use rolled materials. Glued to the surface, they protect it from moisture.
The floor and ceiling are most vulnerable to moisture. You can additionally protect areas prone to it with ceramic tiles. It is glued to a leveled surface. A suspended ceiling will allow you to hide ventilation ducts and install lamps. The walls are sheathed with waterproof plasterboard, which is secured with self-tapping screws to a frame made of a metal profile. The frame is made from “box” profiles (two connected U-shaped profiles). Holes are pre-drilled in the slabs for installation of electrical wiring.
You can lay out ceramic tiles for finishing. A sliding frame is a structure that compensates for shrinkage. It is made according to markings on the walls made of metal profiles.
Gypsum fiber sheets are cut. They break easily along the cut line. Metal guides are cut with a grinder or special scissors. The frame is installed using self-tapping screws. The internal space is filled with stone wool. After covering with sheets, the seams are puttied.
Walls in a bathroom in a wooden house
Walls, like floors, are an excellent backdrop for arranging the necessary plumbing equipment in the bathroom. But here we should not forget that they must be properly processed to preserve them from the destructive effects of moisture for as long as possible.
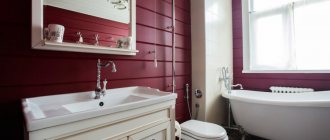
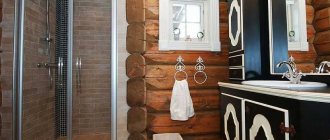
Special mixtures and varnishes are used to cover indoor walls. The principle of their use is similar to the treatment of floors in this room. The color scheme of the walls also depends on what design is intended here: sometimes the walls and floor are made in the same color, sometimes in contrasting shades. A special feature when choosing a color scheme for the walls is that they can be left in a natural color, because a wooden house is already beautiful in itself, and preserving the natural texture of the wood only adds beauty to the walls in the bathroom. The choice is yours.
Ventilation
A toilet in a wooden house with sewerage is impossible without good ventilation. It will not only remove odors, but also provide the proper microclimate in the room. Ventilation can be natural or forced. In the first case, air renewal is carried out thanks to free circulation through a hole in the wall or ceiling; in the second, one or more fans are used.
Natural ventilation can only be used if one of the walls of the bathroom is external. To create it, just cut a hole closer to the ceiling. It is covered on both sides with decorative grilles.
If the bathroom is located surrounded by other rooms or its area is significant, this option is unacceptable; you need to install a full-fledged system that provides air inflow and outflow.
Important! You should not try to make homemade ventilation; it is better to buy a ready-made one and entrust its installation to specialists. It's not a matter of complexity, but of safety. Ventilation is motors powered by electricity. Improper installation may cause a fire.
Development Council
Today, it has become easier to equip bathrooms, since the market is represented by a huge selection of furniture and plumbing fixtures. Modern wooden houses can be equipped with sinks, showers and cabinets of any configuration - it all depends on the material resources and imagination of their owner.
Plumbing
If the layout of the house provides for the placement of a bathroom on the second floor, then it is recommended to abandon the installation of heavy cast-iron plumbing fixtures, replacing them with acrylic ones. Installing a shower cabin will also help reduce the overall level of humidity in the room. In this case, it is advisable to use a hydrobox, which will ensure complete isolation of the surrounding space from the structure. A built-in cubicle model equipped with closing doors would also look good in a bathroom interior. The washbasin, shower and toilet (in a combined bathroom) should be in harmony with the finishing of the surfaces in the room.
Furniture
In spacious bathrooms, it is recommended to have a cabinet for storing towels and linen, a chest of drawers for various toiletries and shelves. In small rooms, it is enough to install built-in or wall cabinets. The main item in the interior will be a full-length mirror. An additional installation of a heated towel rail would not hurt; hooks for bathrobes must be attached. In addition, we must not forget about the laundry basket: in a small room it can be hidden in a closet, and in a large room it can stand separately, acting as an interior detail.
Furniture should be harmoniously combined with surface finishes and plumbing fixtures. You should not choose large-sized models; it is advisable to give preference to compact and multifunctional modules.
Lighting
To effectively highlight the beauty of wood in the bathroom, you need to install good lighting, with halogen spotlights being the best option. With their help, you can not only zone the space in an interesting way, but also perfectly illuminate the surface finish. In order for the spotlights to look harmonious in the room, all wiring must be hidden behind the suspended ceiling structure. Additionally, it wouldn’t hurt to install a sconce (near the toilet or washbasin) as the main light source.
Wiring
So, you laid new tiles on the bathroom floor and waited for them to dry. Now it’s time to move on to covering the walls - but before that it’s worth installing new communications in the room.
The bathroom is a room with constantly high humidity. Theoretically, it is possible to install electrical wiring in a given room both under the cladding and on top of it - just in the second case, you will need to buy cables with reliable insulation. However, in practice, it is recommended to lay power cables for light and electrical appliances under the cladding. Hidden wiring will look more aesthetically pleasing, and the risk of short circuits will be significantly reduced.
Is it possible to install sockets in the bathroom, or is it better to connect electrical appliances outside the room? Yes - but the sockets must be of a waterproof type and must be equipped with a ground connection. In addition, both power outlets and switches can only be placed in “safe” areas of the bathroom - away from sources of water, at least 60 centimeters from the sink, bathtub or shower.
Layout
Top tips when developing a bathroom renovation plan:
- It is better to arrange a room for water procedures on the first or basement floor. Plumbing fixtures are heavy; additional reinforcements are used to position them on the floor: wooden beams and screed.
- If the house consists of several floors and there is a need for a second bathroom, it is located symmetrically with the bathroom on the floor below.
- It is better to place the plumbing along the wall, this will reduce the load.
- We choose only plastic pipes for water supply that do not come into contact with the walls. This will help reduce condensation accumulation and avoid rotting processes, mold and mildew on the wood.
- We construct the floor a few centimeters lower (1-3 cm) than in the other rooms. Add a drain hole to the room plan. If the plumbing is faulty, water will not flood other rooms in the house.
- Don’t forget about ventilation: grilles at the bottom of the door, a gap between the door and the floor, a lattice air duct system on the wall (you can choose a model with an additional function - a humidity sensor).
- If the bathtub is on the ground floor, we bury the sewer pipes in the ground to prevent them from freezing in the winter.
The dark color of the wood can be obtained by staining or by covering the wood with stain. Source izba.spb.ru
Make an accurate plan for the placement of plumbing fixtures and sockets in the bathroom. Then move on to planning the arrangement of furniture and additional decor: mirrors, laundry baskets, shower curtains, vases of flowers. Assess the space of the room. Consider how best to arrange your furnishings to leave enough free space to move around in the bathroom.
Zoning space in “wet zones” with tiles helps combat humidity in a wooden house. Source izba.spb.ru
How to make a bathroom in a wooden house - stages and rules of construction
Convenience in the yard is becoming a thing of the past, and it is impossible to arrange a bathroom in the house without certain knowledge and skills of related professions. When constructing bathrooms, certain rules and sequences of actions are followed.
It is important to follow them so as not to commit rash actions and not to redo anything later
Sequence of construction work:
- determine the location of the bathroom, its dimensions;
- arrange sewerage;
- equip ventilation;
- connect the water;
- lay waterproofing;
- install plumbing;
- doing the finishing.
The functionality and ability to use the sanitary unit for a long time depend on compliance with the installation rules. Builders in a wooden house are faced with shrinkage, especially seasonal ones. This phenomenon should be taken into account when leaving free space or using dampers for communications. It is recommended to construct a bathroom in a wooden house using a sliding frame.
This is a metal profile product that does not react to shrinkage of the house. Vertical marks are marked on the wall with a cord, maintaining a distance of 10 cm from the floor and 40–70 cm from the ceiling. The space under the ceiling is subsequently used for installing ventilation and electrical wiring elements. Grooves are made on log walls, and strips of durable metal are inserted into them.
Vertical elongated holes for screws should be made in the metal strips so that they move freely along these grooves. Special washers are used for the screws for the profile; they are not tightened too much. The entire structure based on a metal profile should move freely vertically without reacting to shrinkage, which will protect the bathroom from deformation.
Practice has shown that for ease of use of a combined bathroom, it must have a minimum area of 3.8 m2, a separate bathroom - 3.2 m2, toilet - 1.5 m2. If space allows, larger bathrooms are installed or several are made. To build a home bathroom, it is recommended to adhere to the following rules:
- to facilitate ventilation of at least one of the walls, choose an external one;
- the bathroom should be located away from the kitchen and dining room, preferably under the stairs, not far from the bedroom or dressing room;
- the bathroom should not go into the living spaces, be located above them or above the kitchen.
Dry toilet
There is a huge variety of dry toilets on the market. A microorganism-based dry closet is an advanced plastic bucket that requires special biomass enriched with bacteria to be filled into its container to process waste.
The peat model differs from the previous one in the need to fill it with peat from a specially equipped container after each bowel movement. These two types of dry closets are mobile and can be moved from one place to another.
An electric dry closet, unlike the first two types, requires a direct connection to home communications systems. Its operating principle is based on the fact that waste is separated into solid and liquid.
Solid feces are thoroughly dried and automatically transferred to a special container; the liquid component simply goes down the drain. To drain the liquid component, a regular drain pit is sufficient, without the use of a septic tank.
Arrangement of a bathroom in a wooden house
When arranging a bathroom in a wooden house, you should take into account the dimensions of the room, the number of people living and regularly vacationing in the house, and the number of equipment actually needed.
Bath
An important element of the bathroom is the bathtub. One of the main criteria for choosing a bathroom is its weight. The lightest models are made of acrylic. Their weight is approximately 30 kg. Bathtubs made of cast iron are heavier, but they are strong and durable.
A bathtub made of real wood will look impressive in a country house. It will promote physical and emotional relaxation, but with regular use it will quickly lose its attractive appearance. A wooden bathtub should be well soaked in a special liquid that protects against moisture and bacteria, and covered with several layers of varnish.
Usually the bathtub is placed so that one side is adjacent to the wall. If free space allows, the bathtub should be placed in the middle of the room, and communications to it should be routed under the floor. It is necessary to leave 80-100 cm of free space in front of the bath so that you can comfortably get out of the font. It is recommended to install clothes hangers and heated towel rails at a distance of approximately 60 cm from the bathtub. Photos of a successful bathroom renovation in a wooden house are presented below.
Other plumbing
In addition to the bathtub, the bathroom is equipped with:
- Wash basin. Standardly mounted at a height of 70-80 cm from the floor. When installing it, it is necessary to take into account the height of each family member.
- Shower cubicle. Placed against any wall of the room. The most compact option is to install a shower stall with sliding doors in the corner of the room.
- Toilet. Installed if the bathroom is combined with a toilet. Leave at least 70 cm of free space in front of the toilet.
If the bathroom is large, then you can additionally place a bidet, washing machine, and other equipment. A photo of a spacious bathroom in a country house in a wooden house can be seen below.
Furnishings
If the bathroom has a small area, then only plumbing fixtures will fit in it. For a spacious bathroom you can choose various furniture:
- Wardrobe or chest of drawers for towels and linen;
- Basket for dirty clothes;
- Chairs and steps for children so they can reach the sink;
- Shelves for hygiene products.
A mirror is an essential element of any bathroom. It decorates the room, visually increases its size and allows you to comb your hair and apply makeup.
A bathroom in a wooden house can be decorated and equipped with your own hands. Following the recommendations of experts will help eliminate the occurrence of many problems: the formation of fungus, flooding of neighboring rooms and others. By choosing high-quality and beautiful materials, you can create an attractive design that will delight the owners of a wooden house for many years.
Designer things
The interior design of a dacha involves the use of a large number of decorative elements, including decorations from city apartments that have already gone out of fashion.
When a person does not have old things in stock, then an excellent move to decorate the house and liven up the atmosphere would be:
- flowers or artificial trees in massive tubs;
- light curtains combined with a lot of wood;
- antique lamps or with a minimum of decoration.
Paintings or copies of famous paintings look great in dachas. However, it is not recommended to store valuable paintings at dachas, because such housing is more susceptible to attacks by thieves and looters if it remains without owners for a long time. It’s good when a country house is located on the territory of a guarded village, but this is typical only for suburban villages near big cities. Otherwise, there is a high risk of robbery if the house is decorated with very valuable items.
Step-by-step instructions for self-arrangement
After planning and distribution of plumbing and additional equipment on the area, the first stage of work begins - installation of sewerage. When placing and arranging the sewer system, it is worth taking into account the features of a wooden house.
There are several installation recommendations:
- a metal pipe should not be used, since during seasonal or temporary subsidence of the frame base the metal is deformed. A more acceptable material would be plastic or metal-plastic. It is worth selecting pipe material with elasticity and resistance to low temperatures;
- sealing is ensured by using clamps and rubber gaskets at the joints. Flexible hangers and a stable fastening are also needed that will hold the channel when the building shrinks;
- the wall pass is equipped with a special gutter, which is protected by a metal frame. The primary base of a rigid type should be located on the floor of the first floor, while connection with the frame base of the house is excluded;
- pipe insulation must be carried out in accordance with fire and construction recommendations. Non-permanent residence may be taken into account in the form of a faucet draining water from the system. The tap is installed at the lowest point of the system.
After complete installation of sewer channels, ventilation is fully equipped. In wooden buildings it is necessary to eliminate moisture fumes from the room. When arranging a room in a wooden structure, it is necessary to lay full ventilation ducts with access to the attic space.
Standard ventilation openings during construction will not be suitable in this case, since they will not fully provide the required level of air exchange. The ventilation duct is laid through the ceilings. The fasteners must have compensation gaps for stability during shrinkage or seasonal changes in the frame shape.
Installation Features:
- direct contact of the system is eliminated by mounting on delivery using special brackets;
- fans are used that are protected from moisture;
- all materials used during construction should not be flammable substances;
- If desired, the ventilation system is powered by lighting, which allows it to turn on simultaneously with the lighting fixtures in the room.
The next stage will be complete waterproofing of the bathroom in a wooden house. This includes the arrangement of the entire room. Waterproofing is carried out comprehensively, since the entire wooden surface must be protected from moisture. A special waterproof and vapor-tight shell is created. In this case, the first stage will be treating the wood with an antiseptic.
Further work progresses according to the following plan:
- Waterproofing of walls and ceilings is carried out with a liquid insulating compound, which is applied with a brush. The waterproofing material can be bitumen or polymer. A special feature of a wooden surface is that in order to treat it, the liquid waterproofing must contain latex and an antiseptic. Several layers are created, after which the wall is equipped with waterproofing materials;
- the ceiling must be suspended or suspended. This will allow for good ventilation;
- the floor in the bathroom of a wooden house must be smooth and durable. In addition, the first floor is made using a concrete screed or polymer base;
- The first stage of floor insulation is carried out using coating mastic. After which the floor is lowered three to four centimeters below the main level of other rooms;
- thresholds are installed, the entire floor surface is covered with ceramic tiles or cork slabs.
After waterproofing the room, plumbing equipment is installed in pre-marked areas.
The last stage of arranging the premises will be finishing work. Requires the use of a waterproof waterproofing material. This stage completes the complete arrangement of the premises.
Construction work to improve a wooden house or sanitary room must be carried out by a specialist or under the supervision of a specialist who has the necessary experience. In addition, the use of high-quality materials, as well as stage-by-stage construction, allows you to bypass all the negative characteristics of a wooden structure.
Peculiarities
Nowadays, thanks to the development of technology and the emergence of effective, high-quality materials, the arrangement of a bathroom in wooden houses, brick cottages and apartments has no fundamental differences. At the same time, finishing the bathroom, laying utilities, connecting plumbing and electrical equipment do not impose any restrictions on the number or degree of complexity of the work performed. You just need to take into account the features of the wooden structure, as well as the properties of the wood.
The design of the residential property was developed by Giuseppe Arnone and Polina Orel
The main problem that arises when arranging a bathroom in a wooden house is the shrinkage of the log house. This process is especially noticeable in the first few years after the construction of the building. In addition to shrinkage, a change in the linear dimensions of wood is inevitable under the influence of seasonal differences in temperature and humidity inside and outside the house. But even later, when the building begins to be used under normal temperature and humidity conditions, the wood will still change size - swell and shrink. That is why, when designing and building a bathroom, it is imperative to take into account the very fact of deformation of wooden structures and predict its magnitude. Otherwise, the integrity of finishing materials and functional equipment is under serious threat, and with any significant distortion the bathroom will simply fail.
Left: the interior of the guest house was designed by Anna Belyaevskaya and Natalia Smorgonskaya from the Art-Style design studio. Right: a spectacular combination of tiles and wood in the bathroom of a half-timbered house (Architectural Bureau of Roman Leonidov)
It's no secret that wood, due to its organic origin, is susceptible to rotting, the catalyst of which is moisture. Therefore, when arranging a bathroom in a wooden house, you need to take care of the safety of the wood itself and provide the wooden elements with reliable waterproofing. Modern means of wood processing make it possible to protect it from destruction caused by dampness, mold and fungi. In addition, the bathroom must certainly be equipped with a forced ventilation system designed to remove moist air from the room.
A bathroom with warm wood-look tile floors is an original solution by the author of the project, Oksana Oleynik.
Finishing walls, floors and ceilings
After the reliable waterproofing is ready and completely dry, it’s time for finishing work. When choosing materials, you should take into account the characteristics of the room located in a wooden house.
What kind of floor should I make in the bathroom?
The basis for finishing the floor will be a concrete screed poured over the waterproofing layer. It should have a slight slope, thanks to which an emergency drain is installed in the floor.
All materials purchased for finishing a bathroom must meet the main requirement for any finishing material for a wooden house - moisture resistance
This is the first thing you need to pay attention to when purchasing. For floor finishing the following are most often used:
For floor finishing the following are most often used:
- laminate;
- porcelain stoneware/ceramic tiles;
- linoleum;
- moisture-resistant wood.
An elementary and far from worst cladding option is ceramic tiles. A wooden floor looks beautiful and organic in a bathroom. If you want to save money, you can get by with linoleum.
Laying hard types of floor coverings in wooden houses is carried out using a floating scheme. That is, they are not fixed rigidly to the base and between the walls of the building and the screed along with, for example, tiles laid on it, a gap of 1.5 - 2 cm is left.
A “floating floor” is necessary to compensate for the linear movements of wooden structures. The gap is closed from above with a plinth, which is fixed exclusively to the wall.
Features of wall decoration
When decorating walls, you need to take into account the characteristic features of natural wood. Under the influence of moisture and temperature changes, it shrinks and dries out.
To avoid deformation, the surfaces are prepared for subsequent finishing by installing lathing and securing a false wall on top. This structure is erected from moisture-resistant plasterboard or a sliding frame made of a metal profile, maintaining a ventilation gap.
This preparation will allow you to perform almost any type of finishing. But if you plan to use wood for cladding, then there is no need to build false structures.
Bathroom tiles can be combined with wood or special paint, creating beautiful combinations
The following finishing materials for bathroom walls are now in demand:
- Wooden lining. It is sanded and additionally treated with paints and varnishes. It is better that it is made of moisture-resistant teak or larch;
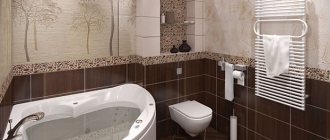
- Tile. Available in a huge range: smooth and embossed, plain, with ornaments, large or mosaic. It is attached with waterproof glue, and the seams are treated with polyurethane elastic sealant;
- Wall panels. These can be plastic plates or aqua panels. A sheathing for the ventilation gap must be installed under them.
A variety of materials for finishing allows you to realize any design fantasy. You can combine several types of materials, create color compositions, and play with textures.
Tiling is an ideal solution for bathrooms. It is durable, not afraid of water and easy to care for.
Those who want to tile walls made of logs or timber with ceramic tiles will have much more work to do. To do this, a frame is first built along the walls, allowing the finishing to move separately. A plasterboard base is laid over the frame, and tiles are laid on it.
Subtleties of ceiling arrangement
The ceilings of bathrooms located in private wooden houses are usually finished with suspended or tensioned structures made of glossy PVC panels and moisture-resistant plasterboard.
Suspended ceilings are valued for their numerous benefits. They are a powerful shield against moist air; under them it is easy to disguise elements of electrical and ventilation systems.
If the choice fell on plasterboard, then the profile under it should be treated with zinc and coated with additional corrosion protection. To ensure that a plasterboard ceiling retains its original attractiveness longer, it is covered with glass wallpaper.
Tension, suspended and slatted ceiling structures will allow you to realize any lighting ideas
Where to put the toilet in the country?
You cannot think about how to make a simple toilet in a country house without taking into account such important aspects as its location, especially if it involves the presence of a cesspool, the construction of which is prohibited if the groundwater is located above 2.5 meters.
The choice of location for construction should be based on a number of factors, such as the type of soil, the proposed foundation, distance from the house, etc. All these elements are closely interconnected and require a serious approach, because not only convenience, but also safety for you and the environment depends on it.
There are strict sanitary standards that prohibit the location of structures of this kind at a distance closer than 12 meters from the nearest housing, and the distance from a water source must be at least 20 meters
In addition, it is important to remember about the neighbors, who are unlikely to approve of the construction of a toilet right under their fence
In order to build a toilet for your dacha yourself, you should first decide how far you are willing to walk; in some cases, the distance of the toilet from the house only has a positive effect on the atmosphere of the dacha, and the proximity of the house to the cesspool can be completely unpleasant, for example, due to possible odors. At the same time, the location of the toilet must be accessible to the access of a sewer truck, because the maximum length of its hose is approximately 7 meters.
It’s good if it is possible to install the toilet in an inconspicuous and secluded place, for example, in the garden, where trees block it from public view
It is also important to remember that placing the toilet in a low area can lead to a faster filling of the cesspool, due to the fact that most of the precipitation will fall directly into it. And the location of such a structure at a height can make it susceptible to strong gusts of wind.
Once the location has been decided it is definitely necessary to decide what type of cesspool is suitable for it.
Do-it-yourself sewer system organization
When creating an individual sewerage system in a village building, it should be taken into account that the transportation of waste liquid can be gravity or forced.
They are characterized by the following:
- The gravity system operates under the influence of gravitational forces. It is enough to install the pipeline at the required angle, and the drains freely penetrate into the cesspool.
- For the pressure (forced) system, a special fecal pump is used, through which the wastewater moves.
Both of the above options can be used to create an individual sewer system.
If you decide to use a gravity sewer, it is important to maintain the slope correctly. Pipe digging is carried out in compliance with a uniform slope
Experts recommend not making a very steep slope. In this case, the pipeline will not have time to fill with water, resulting in poor flushing of the pipe walls.
If you are not confident in your abilities, then it is better to hire a specialist to carry out sewerage
A pressure system for transporting wastewater is often used if it is not possible to organize gravity drainage of liquid. By means of a fecal pump, forced movement of waste occurs. The equipment fits well into any toilet and ensures trouble-free operation.
What designs of toilets for summer cottages exist?
Such buildings can be divided into several varieties suitable for a summer residence:
- toilet house with cesspool;
- standard powder closet;
- factory biotool.
Toilet house with cesspool
For such a structure, a foundation pit is first dug. Then they build a cesspool by strengthening the walls with concrete rings, bricks, monolithic concrete, or installing a plastic container in the pit.
A toilet house made from scrap material is installed above the pit, in which a pedestal or toilet seat is placed. Such a toilet design for a summer house involves the accumulation of waste in a cesspool.
To eliminate the smell spreading from the cesspool, install a ventilation pipe
If the structure is not sealed, liquid waste partially seeps into the soil or evaporates. Filling a sealed pit occurs faster. When sewage reaches a certain level, it has to be removed. Cleaning is carried out either independently using a pump, or by calling a sewer truck.
Powder closet - a house without a cesspool
A house is also built for a powder closet, but without a cesspool. In this version of the country toilet, waste is collected in a container located under the toilet seat. For greater convenience, two “different-sized” tanks are installed. Small holes are made in the smaller one and inserted into the larger one, on the side of which a round outlet is made and a drainage hose is installed. It will drain excess liquid into the ground or into the drainage system. A container for the filler is placed next to the toilet seat. This could be sawdust, peat or dry soil.
Despite the fact that the filler partially suppresses odors, the powder closet requires the installation of a ventilation pipe
After visiting the toilet, the waste is sprinkled with litter. This reduces unpleasant odors and promotes the decomposition of sewage. As the tank fills, it is taken to the compost heap. The scheme for constructing a powder-closet-type toilet in a country house should take into account the method of obtaining the container. Basically there are only two of them. In the first case, the reservoir is removed from the toilet seat by lifting the seat. In the second, a small door is built at the back of the building, by opening which you can remove the drive.
If you don’t want the hassle, buy a dry closet
For those who do not have the desire or time to build a toilet, there are ready-made products. Manufacturers of dry closets have already taken care of everything. All you have to do is choose the appropriate option and install it in your room or house. If funds allow, you can buy a toilet along with a stall.
Whatever type of toilet is chosen, it is advisable to begin its construction by drawing up a diagram. It is necessary to indicate the dimensions of the structure and the location of all components. For example, the construction plan for a country toilet with a cesspool should be drawn up taking into account the width and depth of the pit.
Waterproofing, plumbing installation, frame cladding
Waterproofing is mandatory, especially if a bathroom is being built in a frame house. The walls are impregnated with antiseptic, only then a metal frame is made. It is sheathed with moisture-resistant material, the joints are coated and glued. Materials and methods of waterproofing depend on the quality of the surface being treated. They use roofing felt and install polymer floors, but these are not the best options - they are expensive and not environmentally friendly. It is cheaper and healthier to use a water-repellent mixture that creates a moisture-proof membrane. You can stick on roll materials that will protect the surfaces from moisture.
The floors and ceilings are most susceptible to moisture. After coating with a water-repellent agent or gluing roll materials, the most vulnerable areas are additionally protected with ceramic tiles. First, a flat base is created from moisture-resistant slabs, then tiles are glued to it. Proper waterproofing will protect the bathroom from moisture. It is better to make the ceiling suspended in order to hide ventilation pipes in it and mount lamps.
For convenient use of plumbing fixtures, you should leave space in front of the appliances. The bathtub or shower cabin must be placed so that there is a space of at least 70 cm between it and the opposite wall; the passage to the toilet must be 60 cm or more. The sink is located at a minimum height of 80 cm from the floor. A minimum distance of 25 cm should be maintained between appliances.
It's time to prepare the base for attaching the drywall sheets. The U-like frame profile is converted into a box-shaped one, attaching a similar one to it with aluminum rivets. Holes for electrical wiring are pre-made in the slabs. Drywall is secured with self-tapping screws. For final finishing, you can use ceramic tiles as a simple option. You cannot use ordinary drywall for lining a bathroom; use moisture-resistant one.
What kind of toilet should I build in my dacha?
Even if you decide to build a simple toilet in your country house with your own hands, you must not forget about the importance of its appearance. There are a number of types of cabins, in the form of a house, hut, hut, birdhouse
Ultimately, you can always experiment with shapes and do something completely unusual, however, in my article I will focus on the basic options, without going into the area of complex design.
So, what is the difference between the listed types of cabins:
1. When building a hut, you need to understand that it is strong, structural, has good resistance to precipitation and wind, does not require large amounts of materials, at the same time, it requires a lot of space and suffers from a number of inconveniences, primarily from cramped conditions. If you try to make it larger, the benefit from saving materials disappears. The design itself is primitive, and may not suit some summer cottages.
2. In terms of complexity of construction, a birdhouse is even simpler than a hut; it does not require large amounts of materials and takes up minimal space. However, it has a weak design, does not hold temperatures well, and is prone to drafts. Despite the shortcomings, such a design can be optimal if an outdoor toilet is intended for a summer residence.
3. In the construction of a house, you can achieve greater heat resistance and strength than a birdhouse. It also requires a little land and materials, but it is more difficult to install a water tank on it. This design allows the use of a variety of finishes and design elements.
4. The complexity of constructing a hut exceeds other types of cabins, moreover, it requires more materials. At the same time, its faceted shape allows you to create very durable structures that are well protected from adverse climatic conditions. In terms of functionality and ergonomics, this is one of the best options. And the design possibilities are almost endless.
When the type is finally chosen, it is necessary to determine the size of the toilet in the country.
For a birdhouse with a house, the ideal dimensions of the floor and toilet seat are at least 1.2 meters in width and 1.5 meters in depth. In the case of a hut and a hut, the depth can be left at 1.5 meters, and the width taken around 0.9 meters.
It is important that there is at least 40 centimeters of distance from the head of the person entering to the walls. In this case, the optimal ceiling height can be called several meters
In general, when the question arises of how to build a toilet in a country house, it is important to remember that many of its parameters will depend on your preferences. In this regard, the size of the toilet can be adjusted depending on your own height, etc.
Almost all of the types of cabins listed above suffer from a common drawback, namely exposure to gusts of wind if the toilet door is not closed. To combat this, you simply need to install the door on barn hinges. For more durable hut-type structures, you can use hidden hinges.
Water supply
In wooden houses, condensation often forms on cold water supply pipelines. Therefore, you should not use steel pipes.
The best option would be plastic pipes. Condensation usually does not form on them or is present in smaller quantities, which eliminates the risk of damage to the wood.
You can minimize the likelihood of the development of putrefactive processes in a tree in the following ways:
- do not install pipes close to walls;
- secure the pipes with rubberized clamps;
- thermally insulate the pipeline with tubular polyurethane foam insulation;
- install a drain valve that drains accumulated water on the floor.
Construction of a concrete base
The classic technology for pouring screeds is as follows. A layer of thermal insulation is laid, and a reinforced mesh or grid of steel reinforcement is placed on top of it. In the case where it is planned to install a water floor heating system, its pipes are fixed to the cells of the reinforcement frame, and then high-strength concrete is poured.
The best base for floor tiles is a cement screed
Of course, beacons must be installed before this. After the walls are plastered, ceramic tiles are laid on the floor surface.
A bathroom in a wooden house, equipped with a concrete screed made using this technology, will function for a long time and reliably.