When arranging a bathroom in a wooden house, 4 points must be taken into account: good insulation of electrical wiring, complete sealing of the floor covering, a modern ventilation system, selection of a suitable style for filling the room (furniture, decor, finishing materials).
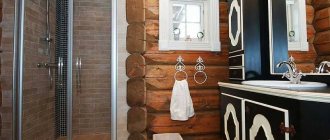
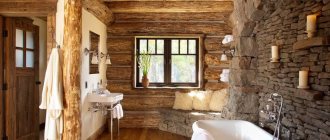
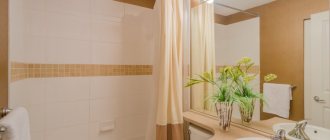
A simple combination of wood trim and tiles looks perfect in the interior of a country house bathroom Source izba.spb.ru
The rough texture of wood in natural light creates an atmosphere of unity with nature Source izba.spb.ru
Small decor in the bathroom of a wooden house can transform and fill the room with color Source izba.spb.ru
Layout
Top tips when developing a bathroom renovation plan:
- It is better to arrange a room for water procedures on the first or basement floor. Plumbing fixtures are heavy; additional reinforcements are used to position them on the floor: wooden beams and screed.
- If the house consists of several floors and there is a need for a second bathroom, it is located symmetrically with the bathroom on the floor below.
- It is better to place the plumbing along the wall, this will reduce the load.
- We choose only plastic pipes for water supply that do not come into contact with the walls. This will help reduce condensation accumulation and avoid rotting processes, mold and mildew on the wood.
- We construct the floor a few centimeters lower (1-3 cm) than in the other rooms. Add a drain hole to the room plan. If the plumbing is faulty, water will not flood other rooms in the house.
- Don’t forget about ventilation: grilles at the bottom of the door, a gap between the door and the floor, a lattice air duct system on the wall (you can choose a model with an additional function - a humidity sensor).
- If the bathtub is on the ground floor, we bury the sewer pipes in the ground to prevent them from freezing in the winter.
The dark color of the wood can be obtained by staining or by covering the wood with stain Source izba.spb.ru
Make an accurate plan for the placement of plumbing fixtures and sockets in the bathroom. Then move on to planning the arrangement of furniture and additional decor: mirrors, laundry baskets, shower curtains, vases of flowers. Assess the space of the room. Consider how best to arrange your furnishings to leave enough free space to move around in the bathroom.
Zoning space in “wet zones” with tiles helps combat humidity in a wooden house Source izba.spb.ru
Features of bathroom organization
Modern comfortable houses have practically no restrictions for installing plumbing equipment of any configuration - everything depends only on the owner’s imagination and his financial security. The latest technologies, offering screeds on joists, make it possible to place sanitaryware, various plumbing fixtures, and heated floors in the bathroom of a wooden house. The room is tiled with ceramic tiles, less often with stone, all pipes are neatly hidden. Technical or design problems usually do not arise if the work is done correctly.
The design is carefully thought out - when sewer pipes and drains are laid correctly, water will not get where it shouldn’t, the wood will not become damp, and the surfaces will not be deformed. Every family member will feel comfortable in a comfortable, beautiful interior. High-quality equipment and suitable materials will help realize any idea.
You need to start work with a waterproofing device - the convenience and reliability of operation of bathroom equipment depends on it.
Waterproofing the room
High humidity and frequent temperature changes destroy even the hardest wood, giving rise to the development of mold and fungi. Walls and floors require multi-layer, comprehensive protection - if the pipes are accidentally damaged or one of them turns out to be of poor quality and a leak occurs, then without serious consequences.
The most commonly used methods of waterproofing a bathroom:
- lining - roll materials with bitumen and additional components are used. These include roofing felt, roofing felt, and bituminous glass steel. They are produced self-adhesive and mounted with a gas torch. Installation is quite simple, but a very flat plane is required. Further finishing is usually carried out immediately;
- painting is the most economical, but not very durable and unreliable method. Two or three layers of bitumen varnish are applied to the floors;
- cast - very durable and effective. The floor is filled with a continuous waterproof layer of waterproofing compound. Installation is carried out using hot or cold material;
- plaster – a coating in several layers, which is coated on top with two or three layers of polymer solution. The method is very simple and widely used;
- backfill - filling the floor with crumbly waterproofing material.
When working with coating, first carry out preparatory work - screeding the floor, cleaning the surface, priming. Afterwards, the mixture is prepared - the dry composition is poured into water, mixed thoroughly, applied evenly over the entire floor with a brush, roller, and in some places with a spatula. The layer should come out 2-3 mm. Waterproof tape is glued to the joints of the walls and the floor, then it and the area around it are additionally coated again. The coating is applied twice with an interval of five to seven hours, but only after the previous layer has dried - when the last one has dried, the subsequent finishing is carried out.
When waterproofing in rolls is selected, the floor is first measured and the corresponding piece of material is cut off. The bituminous base of the rolled material is heated with a burner, the protective coating is removed, and glued onto a flat surface. In order for the layer to be securely fixed, it is carefully smoothed with a special roller, the joints are coated with sealants, and taped. Afterwards, you can finish the floors, walls, install plumbing, etc.
The floor level in the bathroom is 2-3 cm lower than in other rooms.
Laying the floor, its features
The floor is made of several layers, its structure is strengthened as much as possible, especially if the bathroom is located not on the first floor, but above. The strength of the floors is made sufficient so that the equipment located in the room does not fall down - a standard-sized bathtub filled with water weighs on average 150-250 kg.
To begin with, distribute the space between the lags. The first layer is a waterproofing film, on which a layer of gravel and sand, 17-18 cm thick, is scattered and compacted well. The second layer is expanded clay, it is compacted, poured with concrete, and dried. After this, moisture-resistant plywood, 20-50 mm thick, is mounted on top of the beams and secured. A waterproofing film material is placed on top, leaving an allowance of 10-20 cm, to protect the corners between the floor and walls.
Then the floor screed mixture is poured, having previously placed the beacons, which are removed after drying. A slight slope is made towards the drain or left, connecting a hole in the floor with a pipe. To prevent small objects and debris from getting into the hole, it is equipped with a special grill, and a cork is used as protection against unpleasant odors. The screed is sanded with a machine and coated with a waterproofing compound.
The finishing coating is carried out at the request of the owner. This may be tiles, dense linoleum, moisture-resistant laminate, porcelain stoneware, wood with special impregnation, etc.
Room ventilation
The temperature and humidity in the room directly depend on the correct installation of ventilation. The structure is installed at the upper corner of the pipe and is led out through the ventilation hole. It is often connected to an air duct so that the flow goes out into a pipe located on the roof; a special fan is mounted for greater air flow. With its help, the bathroom space dries out quickly. In order for fresh air to enter the house, a gap of 12-17 mm in height is made between the threshold and the door.
When the air exchange system is not organized correctly, condensation forms on the surfaces, due to which the finish is damaged by fungus and mold, which leads to its irreversible damage.
Arrangement of communication systems
It is advisable to plan water supply and sewerage in a wooden house at the project stage - special holes are made in the foundation for supplying and draining water through pipes. It is more difficult to do this in an already built structure, since you will have to drill the foundation, which sometimes leads to its cracking. The arrangement is carried out in two approaches: first, the structure is installed in the ground, where the pipes enter the building, and when the rough screed is poured, everything that is required in the bathroom is installed, with a supply to each device.
The pipes are laid along the subfloor so that they are not visible, and they serve for a long time. To do this, holes are drilled in the walls. The sewerage system is installed at the “correct” slope, the risers are assembled, and then the remaining parts are assembled. The installation of heating radiators, heated floors, and water supply is done when all sewer pipes are laid along the required paths. Sometimes heating and water supply pipes are laid around the perimeter of the walls, covered with decorative boxes.
When the pipes cannot be extended to the desired point due to the small thickness of the ties, the plumbing fixture is moved to a more convenient location.
Wall finishing materials
To decorate the walls in a house made of logs or laminated veneer lumber, ceramic tiles imitating natural wood, plastic panels, and lining are usually used. They are impregnated with special compounds that prevent swelling, mold, and fungal development. Materials are sometimes combined with each other. It is also important to organize waterproofing of the bottom of the walls, to a height of 20-25 cm.
Wood finishing is most suitable for a house made of logs or timber. Often used:
- oak;
- beech;
- ash;
- elm;
- nut;
- teak;
- larch;
- cedar;
- Cork tree.
The waterproof coating of wooden surfaces should be renewed every 2-3 years.
Ceiling decoration
Waterproofing is also important here. The ceiling is usually decorated with wood materials and waterproof plasterboard - this allows it to be leveled as much as possible. Less often they are painted in light colors or made stretchy. Sometimes mirrored ceilings are installed, but maintaining them is a lot of trouble. When covering the ceiling with clapboard, a lath is made onto which slats are attached - this creates additional ventilation. If the material is laid diagonally, this will visually expand the space.
The ceiling should be several tones lighter than the floor, but when decorated with wood, it is allowed to match the color of the walls.
Electrical wiring, lighting
Lighting in the bathroom is provided using a central ceiling lamp, local ones - above each plumbing fixture and mirror. All of them can be built-in. You also need at least one socket to turn on a washing machine, hair dryer, and electric razor.
When installing electrical wiring, follow some rules:
- corrugated pipes are used for laying wires;
- twists, junction boxes, connections in the room are prohibited - only whole wires are allowed;
- switches and sockets are installed at least 70-80 cm from the water source, 85-95 cm from the floor level;
- wires to sockets, fans, switches are routed separately;
- Only electrical appliances with a high class of protection against water are used.
Sockets are equipped with special covers, sometimes a special mirror is used - a dressing room, with LEDs around the perimeter.
Style selection
The design of a bathroom in a wooden house should match the overall design style of the apartment. The atmosphere in the room depends on the choice of style. You can create a “house on chicken legs” from a famous fairy tale, or turn your home into a standard palace, a Russian hut. All rooms in a wooden house should be compatible with each other or at least complement each other.
At the style selection stage, you should decide what additional finishing materials will be used. On walls and ceilings, wood can be covered with any material using plasterboard sheets of different thicknesses. To cover the floor, use a concrete screed where appropriate. This way you can create any modern and retro interior in the bathroom. For adherents of the naturalness and primitive beauty of wood, with minimal use of additional materials for cladding, the following styles are suitable: Russian, Italian, eco-style, loft, country and Provence.
Combinations of natural stone, linoleum and tiles merged into a single design of a wooden bathroom in the loft style Source izba.spb.ru
To better understand which design suits you best, think about your interests and hobbies. If you are an active and risky person, choose a bold, avant-garde, bright interior. If you prefer calm and balance, modernism with notes of minimalism, Japanese style. Or maybe you miss your “grandmother’s” country house from childhood - then filling the room with Provence will come to the rescue.
Choosing a style is always an individual matter. No tests will determine a suitable interior better than you can do it yourself. Look at some examples of decorating a bathroom in a wooden house. Decide which ones you like best.
Pay attention to the dimensions of the room. In small houses, it is better to exclude the classic style, which is intended for large rooms.
A small bathroom in a wooden house, decorated in country style, looks cozy and presentable Source izba.spb.ru
Selection and installation of plumbing fixtures
If several people live in the house and the bathroom is large enough, you can install both a bathtub and a shower. Some people prefer not to waste time, so they shower more often. Others like to soak in the bath. Residents' preferences should be taken into account.
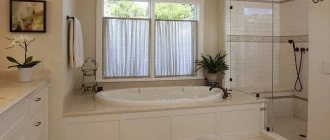
The size and shape of the bath depend on the dimensions of the bathroom
If there is not enough space to install these two elements at the same time, then a standard combination of a bathtub with a curtain is used and a shower riser is installed.
A shower allows you to save water, plus you can do it yourself
Instead of a curtain, you can install a glass partition. This is a more expensive option and requires maintenance, but it looks very beautiful and elegant indoors. The glass can be frosted, completely transparent or with a pattern. Depends on the preferences of the home owners. Of course, the curtain is more convenient to care for, because it can simply be washed in a machine. But the glass partition is more sophisticated.
Plumbing fixtures must be in harmony with each other and fit the chosen interior style
The washbasin and toilet are installed in the desired location. If the bathroom has a window, then it is not advisable to install a washbasin under it. A mirror or cabinet with a mirror surface is usually mounted above the washbasin.
Finishing walls, floors and ceilings
At the planning stage of the room, you should decide whether additional materials will be used for cladding, or whether the wood will remain exposed. The style of the future interior and the amount of the spending budget depend on this. Let's consider which materials are more suitable for a bathroom located in a wooden house:
- Floor. The constant humid climate of the bathroom requires reliable waterproofing. Rough finishing includes several stages: applying a primer layer to a clean floor, degreasing the surface, and moisture-resistant coating. Then sheets of plasterboard are placed on the pre-constructed frame, and a screed is made with cement. A screed is recommended if the bathroom is located on the ground floor, so that the floor does not collapse due to its large mass. On the second floor, additional wooden beams are used and the distance between them is reduced. Laminate, linoleum, and ceramic tiles are suitable for finishing the floor. These materials are the most moisture resistant. The tiles are used if they are screeded with cement, so they are practically not used for finishing the floor in the second floor bathroom.
- Walls. If the house is built from calibrated wood, you can preserve the natural appearance of the logs in 2 stages: sanding (using a sanding machine) and tinting (with stain, glaze with wax, vegetable dyes using etching). After this treatment, the wood becomes resistant to moisture and more textured. If you decide to use additional cladding materials, you will need a frame made of plasterboard or gypsum board sheets, on which tiles or plastic panels are subsequently attached.
- The ceiling can be made suspended if wooden beams do not suit the style. The structure is erected in the same way as in the case of walls, using a frame. Such a ceiling can easily hide ventilation and electrical wiring. Suitable materials for finishing: moisture-resistant plasterboard, plastic panels, cassette tiles, slatted structures made of metal or wood, stretched PVC sheets.
Using frames, you can tiling a bathroom in a wooden house with tiles and natural stone Source izba.spb.ru
Arrangement of the floor in the bathroom - what materials are used
There is a fairly wide list of materials that are used in floor finishing. The main thing is to take care of waterproofing. When a concrete screed is made during renovation, it is impregnated with a solution that insulates the lower floors from moisture. Even if water spills on the floor, the ceiling on the lower floor will not be damaged.
It is possible to install high-quality floor waterproofing both on a concrete base and on wooden floors
The most commonly used materials are the following:
- Laminate.
- Porcelain tiles.
- Ceramic tiles.
- Linoleum.
- Moisture-resistant wood.
The simplest, most reliable and at the same time affordable option is porcelain stoneware. It is more reliable than linoleum, will last much longer and looks beautiful. Finding the right color, texture or pattern is not a problem.
The photo shows wood-effect porcelain tiles in the bathroom of a country house
If your main desire is to save money, then linoleum will do. There is one peculiarity when installing a hard floor (tile, ceramic, wood) in the bathroom. The tiles are not installed flush against the wall, but a small gap is left, a maximum of two centimeters. The gap is closed with a plinth, but it is attached exclusively to the wall.
Color selection
Psychologists say that the color we perceive visually can influence the nervous system. In a wooden house, many choose to finish the bathroom exactly in the color of natural wood.
The tree has strong energy and has a lot of shades. If you do not use additional finishing materials, the color can be selected from the following types of wood, based on the healing qualities of the material:
- oak - replenishes strength, relieves fatigue;
- cedar, larch - cope well with anti-inflammatory diseases, increasing the body's immunity;
- pine - calms, helps restore the central nervous system;
- spruce - strengthens breathing, treats diseases of the ENT organs;
- alder - normalizes the cardiovascular system;
- beech - monitors blood circulation;
- Rowan - preserves family values, has a positive effect on mood;
- willow - relieves headaches;
- beech - fights migraines.
The tree can be soft yellow, white, beige, dark red or brown. After covering the wood with stain or special paint, it acquires any desired shade. It is important to decide which color scheme makes you feel joy and comfort. A person uses the bathroom every day; the correct design and decor of the room can lift the mood, give strength and confidence.
Correctly selected decorative elements in a wooden house transform a boring and small bathroom Source izba.spb.ru
Italian style
Italy is a luxurious country where the sun always shines. When choosing materials, Italians give preference to naturalness. Color scheme: white is more often used, which adds space to the room. The bathroom is no exception. Let's consider the 2 most popular room designs:
- Naturalness. We place large wooden beams on the ceiling, leaving the walls in their original, log form. The floor is covered with moisture-resistant laminate. It is better to take valuable wood species that are durable and durable: walnut, oak, ash, alder, beech.
- Aristocratic. We lay ceramic tiles or mosaics on the floor and walls. Snow-white or gold columns and false windows with a Venetian pattern look great in such a room. We decorate the ceiling with plasterboard or make it suspended.
Italian-style furniture has an elegant texture. You can install a bathtub on golden twisted legs or buy a round Jacuzzi. For decor, the following would be suitable: a mirror in a gold frame with artistic painting, a hanging chandelier with imitation candles. On the walls, with the classic design of the room, paintings with precious stones and frescoes look beautiful.
You don’t have to live in Italy to enjoy the beauty and luxury of a bathroom in a wooden country house Source www.homify.ru
Laying ceramic tiles
Start working only after the concrete surfaces have completely dried, this will take at least two days. Be sure to prime the dry screed to improve the adhesion coefficient.
Padding
- Mark the placement of the tiles. Please keep in mind that the seams on the floor and walls must match completely. The axis of symmetry of the layout of the tiles on the floor is located in the middle of the front door, and not in the middle of the room. This is an axiom for laying tiles in any room.
- Start laying tiles from the floor, prepare a special solution for gluing, and fully follow the manufacturers' recommendations.
Applying the solution to the floor
Applying adhesive to tiles
- Place the first row against the far wall, gradually moving towards the exit. Constantly check the position with a level, control several tiles at once.
Laying tiles
Wedge installation
Checking the evenness of floor tiles
Tiles on the floor, wedges used to align the seams
Practical advice. Trimming the tiles should be done at the invisible junction of the wall and the floor. As a rule, in the place where the bathtub, plumbing fixtures, washing machine and other equipment will be installed. If this option is not possible, then cutting the tiles is done symmetrically on both sides; this method somewhat complicates the process of laying the flooring.
After the tiles on the floor have dried, you can remove the crosses or wedges and clean the glue from the tile joints. The joints are sealed with a special putty; match it to the color of the tile. Use the same method to lay tiles on the walls, carefully checking their position.
Laying tiles on walls
Leveling wedges
Two walls are tiled
Grouting joints
Wall tiling
Holes for socket boxes
The last stage of arranging a bath is finishing the ceiling. You can use cheap plastic panels; they are not afraid of moisture, are easy to install and are quite durable. In addition, there is a huge selection of different types of panels, which makes it possible to create any interior in the room. Plastic panels are fixed to a metal frame. If you want to make the frame from wooden slats, then they need to be impregnated at least twice with effective antiseptics. Read the shower drain under the tiles on the website.
Ceiling finishing
Construction work has been completed, plumbing equipment can be installed and furniture can be arranged.
Eco style
The name of this style speaks for itself. The main thing in an eco-interior is naturalness, safety and simplicity. We choose calm sand shades. We remove unnecessary, intrusive accessories. We leave only the necessary plumbing fixtures, wooden shelves and a mirror. Paintings and posters will be superfluous in the design, but wicker baskets are just the thing. The room should simulate being in nature. You can add green colors to your interior using indoor plants. If the microclimate of the bathroom does not allow placing a live flower, replace it with an artificial composition (for example, vines hanging down from the walls, a carpet with imitation of evergreen grass). The walls can be lined with natural stone or left with a wood texture. Suitable for flooring: laminate, ceramic tiles, marble. The ceiling looks beautiful from wooden slats.
An eco-style bathroom will fill a wooden house with harmony and comfort Source yandex.ru
Modern
The Art Nouveau bathroom combines modernity and architecture. To decorate a room, curved lines and shapes and muted shades are suitable. For filling, 2-3 colors are usually used. For example, the floor is made of brown tiles, the walls are half made of mosaic tiles and timber, the ceiling is made of light wood panels or plasterboard. A traditional bath can be replaced with an innovative shower. We take the sink and toilet hanging, without unnecessary parts. We add lighting: illuminated stained glass windows, chandeliers on a long base. It is better to put the doors in an arched shape. Mirrors look good in an artistic metal frame. This style is thought out down to the smallest details. All decorative elements and furniture should fit well together.
We choose in one color scheme: containers for storing accessories, handles for towels, toilet paper holder.
Art Nouveau is relevant everywhere; a bathroom decorated in this style looks equally good in an ordinary apartment and a wooden country house Source izba.spb.ru
How to highlight the bathroom design?
Wood finishes pair beautifully with modern furniture. The harmonious combination of rustic simplicity of wooden finishing panels and stylish modern furniture looks very beautiful and interesting. Glass shelves and tables, a cabinet with a porcelain stoneware top, metal elements in the decor, all this goes perfectly with the wooden finish.
This style is always in fashion
You can also purchase furniture made from sustainable wood. Oak resists moisture best. Oak furniture can last a long time in a humid environment without pre-treatment.
Professionals give recommendations without which it is simply impossible to create a comfortable environment in the bathroom:
- When choosing a color palette to decorate a room, you should stick to the golden mean. Too many dark shades, or, conversely, an excess of flashy colors will only irritate.
- The walls and ceiling in the bathroom (only in the bathroom) can be made the same color. Or make a smooth transition from one color to another without separating the ceiling line.
- Waterproofing is a mandatory stage in finishing a bathroom in a wooden house.
- For finishing it is recommended to use several materials. For example, the lower part of the wall is decorated with plastic panels or tiles, and the upper part is decorated with lining.
Waterproofing is a mandatory stage in finishing a bathroom in a wooden house.
Suitable Bathroom Styles:
- Classic . This style is always in fashion. It is distinguished by an abundance of decorative elements, smooth flowing lines and elaborate furniture. For this style, a large full-length mirror in a thick wooden frame and wooden furniture are suitable.
- Minimalism . The opposite of the previous option. A minimum of furniture is used, and only the essentials. Clear shapes, strict lines. Calm monochromatic colors.
- Country . Warm shades and wooden furniture are used. Country is great for the bathroom due to its simplicity and elegance.
- Antique . In a wooden house, this design will look as harmonious as possible. Curtains with floral patterns and heavy fabrics, shabby wooden furniture are chosen, and pastel shades are used for decoration.
- Modern . Exquisite room design, combining clear and light lines. Repeating elements, the use of modern materials, a harmonious combination of beauty and comfort.
- High tech. The use of glass, wood and steel is implied. The style is characterized by unusual shapes and sizes.
I want to spend a lot of time in a room like this.
Provence
By decorating the interior of a bathroom in Provence style, you can easily move to a country estate in the French province. The filling of such a room is always romantic and functional. When choosing a color scheme, it is better to give preference to calm, light shades: white, beige, turquoise, blue. Natural materials are used to decorate the walls and floors: lining, wooden beams or siding. The ceiling looks great with wooden beams. Small decor takes almost the most important place in the design of the room: an aged mirror frame, lace on the curtains, stained glass windows, decoupage-style clothes hangers, hand-made accessories (a cup for toothpaste and brushes, a wicker laundry basket), antique furniture (chest of drawers, wall cabinet, sink cabinet). An excellent addition would be rounded faucets with large valves, gold or silver. We choose oval or round sanitary ware.
A bathroom in a wooden house filled with Provence style interior looks elegant and harmonious Source vannayasovety.ru
Ceiling
The ceiling in the bathroom of a wooden house is usually made suspended - from moisture-resistant gypsum fiber board, which is puttied and then painted. Another option is to make a tension one, an aluminum slatted one, from PVC panels, and hem it with a beautifully processed board. The problem is not this, but how to prevent steam from entering the ceiling. For this purpose, vapor-tight membranes are used. They are usually attached to the ceiling with staples from a construction stapler.
The main task when installing a vapor barrier is to ensure tightness. To do this, the material is placed on the walls, the membrane strips are laid overlapping and taped twice with double-sided tape. All fastener installation locations are also taped with tape. Everything is done carefully.
Decorating a bathroom in a house: how to make a ceiling
The second component that ensures a normal microclimate is good ventilation. In the bathroom of a wooden house it should be both natural and forced - with a fan. With this approach, the fan in the bathroom will turn on at those moments when natural ventilation cannot cope.
Loft
A bathroom in a wooden house can be extraordinary. Decoration in the loft style will emphasize the individuality of the owner of the apartment. The loft combines the textures of untreated wood and stone tiles - these are the main 2 materials for finishing walls, floors and ceilings. After renovation, the premises look like an industrial plant or an abandoned warehouse. This interior is suitable for bold and extravagant personalities. Plumbing fixtures can be placed anywhere to make the space feel even more relaxed. “Brutal” lamps with a rough metal shade or without it at all are suitable for lighting. If there is enough free space in the room, you can put a bench made of pallets. Plumbing fixtures made of chrome or other metal will fit perfectly into such a bathroom. To give the interior a little warmth and coziness, we place a carpet with a vintage pattern on the floor.
A loft-style bathroom is an ideal solution for a small country house Source izba.spb.ru
Color spectrum
The main material of a bathroom in a private house is wood, so all its shades are preferred. The presence of bright contrasts is allowed, but not more than 5-7% of the entire design. Often there is a window in the room, then the color is chosen taking into account the availability of daylight. If the window faces south, rich, cool shades are chosen; to the north - exceptionally warm and light. It is preferable to make the floors darker than the walls to create the impression of stable support for the feet, furniture, and plumbing fixtures; the ceiling is the lightest.
The most suitable combinations:
- milky white with coffee;
- beige with light green;
- pink-yellow with violet;
- silver with copper;
- biscuit with pale purple;
- brilliant yellow with chocolate;
- swamp with turquoise;
- vanilla with brown;
- olive brown with wisteria;
- pebble with terracotta;
- smoky white with iron brown;
- pear with graphite black;
- melon with light gray;
- willow with tea green;
- garnet with caterpillar;
- linen with chestnut.
It is advisable to use no more than two or three colors in one room. If there are several bathrooms in the house, they are decorated differently.
Minimalism
The interior of a bathroom in the style of minimalism is modern, practical plumbing fixtures and multifunctional interior items. An ottoman that doubles as a laundry basket or a mirror behind which hides a cabinet for a toothbrush and other accessories would be appropriate in the bathroom. Minimalism is characterized by design in light colors with a slight accent of gray or black. In terms of finishing materials for walls and floors, ceramic tiles or marble are more often used. The tile is chosen without a pattern. It is better to make the ceiling suspended or made of plasterboard, with spotlights. To increase the space in a room, it is advisable to use one or even several mirrors. Plumbing fixtures include wall-mounted bathtubs, shower cabins, compact wall-hung toilets and sinks.
Choosing plumbing fixtures and furniture
The choice of furniture and fixtures leads to the completion of the bathroom design. At this stage, you should be guided only by your wishes. You only need to take care of strengthening the wooden floorboards so that they can withstand the load of a full bath.
A standard set of plumbing fixtures for comfortable use of this room:
- toilet (for a combined bathroom);
- sink;
- bath or shower.
What types of equipment to choose and how to place them in the room depends on the size of the bathroom.
The choice of furniture and fixtures leads to the completion of the bathroom design
For a large room, you can choose a corner bathtub, or place it in the middle of the room.
If the floorboards are not reinforced, to reduce the load on the floors, plumbing fixtures are placed along the wall.
For a small room, it is more important to choose a shower stall that will save space. And if you choose a wall-hung toilet, you can save another couple of centimeters of usable space.
If the room is spacious, you can place a closet for linen and towels, shelves or a chest of drawers for toiletries. A mirror is an essential element of the bathroom. If there are children at home, do not forget to have a special ladder that will help them easily reach the washbasin.
Don't forget about the laundry basket. In a spacious room it can be a separate interior detail. In a small room, the laundry basket is usually hidden in the closet.
Country
This style brings you to the American “village”. The walls and ceiling remain wooden; tiles or wooden boards with a protective coating are used on the floor. Country loves small details and homemade decorations. You can hang several paintings of flowers in a wooden frame or a straw hat. Place an unused bicycle under the sink. Towels with bright embroidery will also look beautiful in such an interior. Mirrors are often chosen to be simple, rectangular in shape, with a forged frame. The lighting can also be framed with a metal frame. Hooks and hangers should imitate antiquity; it is better to choose alloys made of copper or bronze. For furniture in the room, you can place wrought iron chairs or restored wooden armchairs. We choose simple plumbing fixtures, without unnecessary decorations. The bathtub is suitable for an oval shape with curved or straight legs. We leave the space under the bathtub open (there is no need to sew it up with a special finish). If the room is large, it is appropriate to install a wooden vintage wardrobe or chest of drawers.
A country interior in a country house looks magical; to decorate “wet areas” you can use tiles with a rustic pattern; they go well with the texture of wood Source eto-vannaya.club
Essential bathroom furniture
Furniture is most often selected from wood, but combinations with glass, metal, and plastic are possible. Furniture items you will need:
- Worktop under the sink;
- Chest of drawers or dressing table with chair;
- Hanging cabinets;
- Base cabinet;
- Open shelves.
Spare towels and bathrobes are stored in the closet, and cosmetics and detergents for daily use are stored on the shelves. Laundry baskets are placed on shelves or directly on the floor. Everyday towels are hung on hooks located on the walls, or laid out and hung on metal or wooden frames. Convenient organizers for combs, hairpins, and other necessary little things are attached to the wall or cabinet. Items that are rarely used are stored on distant shelves under the ceiling.
When there are small children in the house, they need a small bench to reach the sink.
Japanese style
Japan is a calm and very modern country. Its culture contains the wisdom of the times and innovative technology of the 21st century.
The traditional Japanese bathtub is actually made of wood, its name is ofuro. It will be the highlight of your interior design if you choose this as a plumbing fixture.
A Japanese-style bathroom is designed for comfortable rest and relaxation. The room does not like flashy shades and sharp lines. When choosing a finishing color, it is better to choose soft, natural tones: sand, beige, brown, olive, gray. Often in this style, bamboo, marble, and ceramics are used to decorate walls and ceilings. The ceiling can be made of slatted, suspended or plasterboard sheets. We approach the selection of plumbing fixtures with special attention. A Japanese-style bathtub can be lowered to the floor. It is better to make the toilet and sink suspended. Space zoning is suitable for such an interior. For decoration, the following are used: screens (shoji), candles, stones, paintings with hieroglyphs or sakura, lamps in the form of lanterns.
A bathroom built into the floor looks very original; such a composition will definitely highlight the room and fill it with Japanese notes of peace Source inhomes.ru
Rustic
When decorating the floor and walls of a bathtub in the Russian style, we give preference to the natural type of wood: untreated, rough logs or wooden boards covered with stain and wax. The ceiling may have large wooden beams. A Russian bath resembles a bathhouse, so the ventilation system here must be especially thought out. Rustic combines rustic style and modernity. You can choose a bathtub made entirely of wood (bathtub) or place a corner shower in the room, with a built-in ventilation system. The following compositions are suitable for decor: a fireplace, a mirror in a wooden frame, a clay jug on a shelf, a fur carpet on the floor, a birch broom in the corner of the room, painted towels with Russian motifs. An excellent addition would be a sink built into a wooden cabinet. We choose gold or silver plumbing fixtures, less often white. If the bathroom is large, you can experiment with space, an imitation of a Russian stove will add color to the room.
The rough texture of wood coated with wax or stain looks great in the Russian interior of a country house Source izba.spb.ru
Secret 4. Installation of plumbing – everything is in your head
At this stage, the finishing itself is completed with your own hands. And in order for the bathroom to be used, all we have to do is install all the plumbing.
- Let's start with the largest element - the bathtub. We attach the legs to the bowl in advance (if the bathtub is acrylic, then the entire metal frame), bring it into the room and install it along the wall.
Siphon, overflow system and other pipes that are attached under the bathtub. It's better to install it in advance too.
Option with an acrylic bathtub in a frame made of false beams
- We align the legs, leveling the bathtub, and then finally move the structure towards the wall. We close the gap between the side and the wall with molding and fill it with moisture-resistant sealant.
- We connect the siphon under the bathtub to the outlet of the sewer pipe in the floor, after which we install a screen covering the side walls of the product.
- We connect a mixer to the cold and hot water outlets on the wall. We check its functionality and the tightness of the connection by supplying water to the system.
Stylish sink in a wooden case
- We attach the sink to the wall to the mortgage. To fix the product, I use anchors, which I screw into the embedded beam; on a clapboard paneling, even a thick one, the sink will definitely not hold.
If our sink is heavy, then we need to either use long fasteners that will go right through the insert and be fixed in the load-bearing wall, or choose to install the sink in a cabinet. Moreover, the second option seems to me more preferable, since under heavy load even thick anchors become loose over time.
- We attach a siphon to the sink drain, which is connected to the outlet of the sewer pipe.
- We check the tightness of all connections: it is very important that water does not leak anywhere, otherwise the wood (even treated with an antiseptic) may begin to rot.
Interior design with shower stall