Bathroom floor tiles should be chosen taking into account the characteristics of the space. It is important to consider that the bathroom is a place of high humidity and constant temperature changes. To avoid the appearance of fungi and mold, as well as the rapid deterioration of the material, you need to pay attention to all the characteristics of the product.
Tile is the best flooring for the bathroom, both in terms of practicality and its design capabilities.
How to choose the right bathroom flooring
To make the right choice when buying tiles, you need to pay attention to a number of important parameters:
- Hardness. This parameter is measured on a Mohs scale of 1 to 10; the higher the number, the harder the material. The floor covering must correspond to an indicator of at least 7 points.
- Wear resistance. This parameter is measured on a five-point PEI scale. For flooring, it is better to use tiles with a III PEI index.
- Moisture absorption. Here, less is more. Optimally – no more than 4%.
- Slip level. The slip resistance index must exceed 9 points.
- Heat resistance and resistance to cleaning agents.
- Hygiene. If the material meets this characteristic, then it is not afraid of accumulations of microbes and bacteria. However, regular maintenance and cleaning is still required. Treating the seams with a high-quality mixture protects the bathtub from the appearance of fungus.
Tiles must be taken with a margin of 5–7% of the total quantity - approximately this amount of material is spent on cutting
Choice of colors and designs
The most practical solution will always be flooring in a light color scheme. On such a floor, traces of dried water drops and stains are not visible. If a dark floor needs to be thoroughly washed, then a light floor can simply be wiped and cleaned with cleaning products once a week.
For a small bathroom it is better to choose a light flooring
On dark-colored tiles, various marks, splashes and drops of water are always very visible. If you do not have the desire and ability to clean every day, then it is better not to purchase such material. Although it looks quite stylish and original.
The color and design of floor tiles are selected depending on the style of the bathroom.
The same goes for glossy black tiles, which are so popular among lovers of elegant solutions. Stains on such a coating will appear literally from every “splash”. And every time after taking a bath or shower you will need to wash the floors.
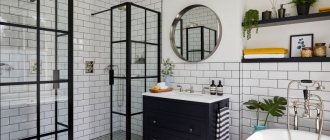
An interesting design solution would be to combine matte and glossy tiles. It is better to lay the matte one where splashes of water fall, and the glossy one - in more remote places
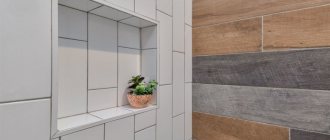
The bathroom floor, decorated with wood tiles, looks original
If you still really want to use dark colors in the design of the bathroom, then you can put dark tiles where water does not get in, and put light tiles in the area of the bath, shower, and washbasin. This way you can make an original and practical color scheme.
Green tiles will make your bathroom interior luxurious and cheerful.
Yellow color gives warmth and comfort, goes well with white walls
Purple tiles are suitable for a large bathroom
Shades of blue represent purity, freshness and pleasant coolness.
Red tiles look harmonious when paired with white, which reduces the negative impact of aggressive red color
Laying technology
The process of laying floor tiles in the bathroom is the same for any type and type of ceramic.
There are two main methods:
- rectangular or classic, which is considered more economical and no more than 10% of the original material is waste for trimming. This type can go “seam to seam” or with the joints shifted relative to each other;
- The diagonal one is more attractive from a design point of view, but the peculiarity of the location requires an increase in the number of tiles from the required coverage area to 1/5.
In addition to the flooring material itself, you will need the following tools:
- seam separators;
- glue, mastic for gluing;
- joint grout;
- building level;
- spatula to create a ribbed surface;
- tile cutting device;
- rubber hammer;
- rags.
Before installation, a number of preparatory works are carried out. First of all, this concerns the preparation of the rough surface. It should not only be as smooth as possible, but also have a low level of heat loss. A waterproofing layer must be installed.
First, the old coating is dismantled. Installation on old tiles is strictly prohibited. It will not be able to provide the required level of rigidity and will contribute to the gradual destruction of the new decor.
Preparatory stage
After dismantling, you can begin arranging the floor. If necessary, it is insulated. For this purpose, polymeric materials are used - penofol, expanded polystyrene. Mineral wool is unacceptable in this case, since it has a high hygroscopicity rate.
Sequence of preparatory work.
- Cleaning the concrete surface from debris and dust.
- Alignment. It is best to use special building mixtures. It is important that they are designed for so-called “wet” rooms.
- After the leveling layer has completely dried, it must be primed. This will improve the adhesion of the glue and the base material.
What to lay tiles in the bathroom on - concrete screed or leveling mixture? It doesn't really matter. They should fit well with the glue that will fix the ceramics. This is the determining condition for selection.
Waterproofing
High humidity is the most important problem. To solve this problem, it is necessary to use modern waterproofing means. It should be taken into account that a layer of material will have to be applied not only to the floor, but also to the walls of the room.
Although the tiles are not installed under the bathtub, this area will still need to be treated. Constant moisture can damage the rough surface. Several types of materials can be used to insulate it:
- Bitumen mastic. It is recommended to purchase models with plasticizers and other additives. Application method: coating the floor and walls. They must first dry well;
- Waterproof rolls made of polymer compounds. They are budget options, since there is a high probability of the insulation layer shifting while pouring the leveling mixture. Most often, polyethylene film with a thickness of 200 microns is used;
- Cement-polymer mixtures. They are applied in several layers. In this case, the likelihood of moisture penetration is minimal. Disadvantage: increased load and floor height;
- Rubber hydrobarriers.
Regardless of the type of material chosen, it is necessary to consider the technology of its installation. After installation, it should not move or change its configuration. It is applied not only to the floor, but also to the walls of the room. More information about this stage can be found in the video tutorials on laying tiles in the bathroom.
Process Features
Before starting work, check the original floor covering and level it if necessary. To do this, you can use either a cement-sand composition or a self-leveling mixture.
- The screed can dry from 5 days to several weeks. However, you cannot begin cladding until it is completely dry. After the screed has completely dried, the entire surface of the floor is waterproofed with special coating impregnations. Polymer or bitumen mastic is suitable as waterproofing, which is applied not only to the floor itself, but also to the joints with the walls. To improve the quality of adhesion between the base of the floor and the tile adhesive, a primer is also used. The base is also primed for self-leveling mixtures.
- Bathroom adhesive is used with special polymer additives that increase water resistance. The amount of glue depends on the smoothness of the floor and is usually about 7 kg per 1 m2 if the thickness of its layer is 1 cm. Dilute the adhesive mixture according to the instructions with water and stir using a paint mixer or a drill with an attachment. It is important that there are no lumps or bubbles with the finished adhesive solution.
Advice:
You should not cut the tiles in advance. It is better to do this when the base has been laid and you can see what size pieces are needed.
- An important step in laying ceramic tiles is marking the floor itself. To center the room, horizontal and vertical lines are drawn passing through the center. Using these lines as a guide, the tiles are first laid out without glue so that the edged parts are in inconspicuous places and the seams do not move.
- At the next stage, the glue is applied to the base of the floor only in a small area. A notched trowel will make the adhesive surface wavy. which will be an additional cohesive factor. Begin laying from the corner farthest to the door. The first tile is placed and lightly pressed into the adhesive mixture, and for better subsidence, tapped with a rubber hammer. Then lay the next one, focusing on the markings, and so on until the end of the row. Separators will help create even seams. Each row is checked with a level for absolute horizontalness. This is how all continuous ceramics are laid and only after that the cut parts are glued.
- The last, but very important, especially for the bathroom, is the stage of grouting the tile joints. They use special grout with a water-repellent effect - fugue. The grout mixture is applied with a rubber spatula, and with any sharp tool it is filled into all the cracks so that the seams are deeply filled. Silicone sealant, which is additionally coated with the seams, will only increase the strength of the coating.
Advice
If a bathtub floor tile has an unsuitable water absorption rate, its surface is covered with primer, which will impart certain water-repellent properties.
It is not difficult to tile the bathroom floor with mosaic ceramics. Small pieces of ceramics are glued to the base - these are carpet mosaic cards. The installation process differs in that temporary lighthouse rows made of solid ceramics are installed along the walls. The mosaic is covered with cement mortar and laid with the base facing up. Start work from the corner, carry out in rows. As the coating is formed, the lighthouse tiles are removed, and their place is taken by a mosaic. The top base is removed after the adhesive mixture has completely dried. To do this, it is moistened and removed with a spatula or scraper.
Sizes and shapes
The choice of bathroom floor tiles in shape is very diverse and unlimited. On sale you can find not only square or rectangular options, but also products in the form of honeycombs, puzzles, wavy elements and all kinds of polygons.
Pebble flooring is an excellent solution for a bathroom in an ethnic or marine style
There is an opinion that non-standard shaped tiles significantly complicate the installation process. However, today this is not at all the case. If you abandon such stereotypes, you can create a truly unusual and original design using non-standard forms.
The flooring in a spacious room can be laid out in the form of a carpet
A very impressive coating comes out when using the patchwork technique, when a combination of tiles with different patterns is laid on the floor.
Kaleidoscope - a colorful option with a chaotic arrangement of color spots
Checkerboard styling looks good both in the traditional black and white palette and in multi-colored variations
Advantages and disadvantages of using mirror tiles for a bath - photo examples of interiors
Mirror tiles are not very often used in the design of bathrooms for two reasons: during transportation and installation, this material is quite susceptible to damage. Also, in order for such elements to retain their original appearance over a long period of time, the room must have high-quality ventilation.
When installing mirror tiles, special care must be taken not to damage the rather fragile surface of the material.
However, provided there is a good ventilation system and careful handling during the installation process, this material will be able to please its owners with the following positive characteristics:
- long service life;
- resistance to chemical elements (alkalies and acids);
- fire resistance;
- variety of tile colors: the bathroom can get any look.
Features of installing mirror tiles
Laying mirror tiles yourself is easy. However, this process requires knowledge of certain subtleties and nuances that will allow you to achieve the desired result. For fixation, you can use silicone or liquid nails. A glass cutter is used to cut elements.
An example of partial use of mirror tiles in a bathroom shower stall
Here are a few more recommendations that will make fixing the tiles as easy and efficient as possible:
- The back side of the tile must be rough. For this, you can use bitumen and coarse sand if its surface is smooth and opaque. In the case of working with transparent elements, bitumen can be replaced with liquid glass;
To decorate a small bathroom, you should use small tiles in the form of a mosaic, which can be emphasized with the help of mirror elements
- the selected adhesive composition should not contain acids, as this can cause darkening;
- the width of the seams between the elements should not be more than 4 mm;
- in the process of laying the first layer, it is very important to pay attention that it is oriented horizontally;
- After laying the tiles, it is advisable to wait a few days and then grout the joints with neutral silicone. At the same stage, you can polish the mirror surface.
The presence of a high-quality ventilation system is a prerequisite for installing mirror tiles so that the surface is always glossy and does not fog up
Following these recommendations will make the surface even and smooth. And in terms of service life, mirror tiles will be in no way inferior to ordinary tiles.
Helpful advice! In order to keep the mirror tile intact after removing the protective film, you need to avoid contact of the surface with sharp objects, as they can cause irreparable damage.
Mirror tiles must be combined with other materials so as not to create a “cage” effect in the room
Characteristics and types of floor tiles
There are several types of tiles:
- ceramic;
- stone;
- glass;
- metal.
Let's look at the features of each type.
Ceramic (tile) is a very popular look and is suitable for any room. It is strong and durable, resistant to moisture, temperature changes, and also does not limit the apartment owners in the choice of color and design.
Ceramic tiles have high wear resistance and attractive appearance
There are different types of such tiles:
- clinker;
- Cotto;
- Cottoforte;
- earthenware
Stone tiles are not at all picky to clean and are very durable. It also has several subspecies:
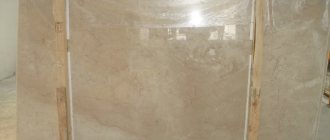
- marble;
- granite;
- sandstone;
- from slate.
Stone coating can be a good option for finishing a bathroom floor in a country house
Glass bathroom floor tiles look very elegant. It is expensive, but the quality matches the price. The tiles are very safe, since a special production technology reduces the chances of slipping on such tiles to zero. For lovers of original solutions, the Austrian manufacturer offers glass options with constantly changing patterns inside. This creates a floating effect that looks very impressive.
Glass tiles are highly resistant to moisture and are easy to clean. A significant disadvantage of glass coating is low resistance to strong mechanical stress.
Metal tiles are very durable and are perfect for use in home decoration. Can be combined with tiles.
A floor made of metal is rightly considered the most durable, but also the most expensive.
Choosing tiles depending on the type of house
For Khrushchev
Most often, Khrushchev houses have a combined bathroom (the bathroom is combined with a toilet), so the space is very limited and cramped - about 3 sq.m. Because of this, in Khrushchev it is better to give preference to light, medium-sized tiles, without large patterns. The height of the ceilings in such a bath will be visually increased by combining two colors of tiles - light in the upper part of the walls and dark in the lower part.
For a panel house
In a panel house, the bath and toilet can be combined, but as a rule, not. The tiles for the toilet can be the same as the bathroom, or they can be in contrasting shades. It's a matter of taste. But it’s better to choose the same size in both places, so that the rooms are in harmony with each other.
For a private home
A private house built according to an individual plan assumes that you yourself determine the size of future premises. Therefore, the bathroom here can be made spacious and bright. This will allow you to use even large tiles to decorate walls without compromising the visual perception of space. It is better to use porcelain stoneware for the floor, since temperature changes can occur not only indoors, but also outside.
Marking
Floor tiles for the bathroom should be selected depending on the specifics of the room and the compliance of the characteristics of the tile with these features. The characteristics of a product can be “read” from the markings on the packaging, but not everyone knows how they are deciphered.
The symbols on the packaging will tell you about the quality of the tile, its scope of application and operating features.
- The sole on a black background indicates that this material is suitable for floors, but not for walls or ceilings.
- The snowflake indicates the frost resistance of the material.
- If the sole is shown on a shaded background, then these are products with an increased level of durability and can be used even where many people regularly pass by.
- The color of the marking indicates the type of product. Red color is a first-class product, blue or green color is a low-grade product.
Laying tiles on a wooden floor
The tiles can also be laid on a wooden base. In this case, you won’t have to wait until the screed dries. However, it is worth remembering that it is not recommended to glue tiles onto a fresh wooden floor, since during operation such a surface will “move” for some time and shrink due to the fact that the wood will breathe. You should also take into account that a wooden floor will not breathe normally under the tiles; it may begin to collapse.
Tile on wooden floor
On a note! If the wooden floor has just been laid, then tiles should not be laid on it immediately. It is necessary to wait about 2-3 years for the floor to finally acclimatize and “get used” to operating conditions.
The tiles can also be laid on chipboards or plywood. Drywall can also be used. However, all materials must be protected from moisture.
Laying tiles on plywood
Quality of floor tiles
Defects can be found even among the most famous and reliable manufacturers. However, it is precisely such companies that will never pass off a defective product as good. If the batch turned out to be not as high quality as it should have been, it is also sold, but with a special mark. Such a product is marked as a second category product and sold at a low price. The second category means that the batch's products have noticeable flaws.
“Raznokaliber” – different thickness of joints when laying “Raznoton” – different shades of tiles in one box
“Cobweb” – appears 1–2 years after installation
Whether to buy such a product or not is a personal matter for everyone. However, a manufacturer that does not hide the imperfections of its products can be trusted.
A good product should have a smooth front side, without cracks or smudges. The base of high-quality tiles will be a natural clay color.
Classification by size
Usually the tiles on the bathroom floor are larger than those on the walls. The most popular sizes are 30*30 or 35*35. The largest size is no more than 60*60 cm.
Standard sizes of floor tiles
As a rule, a square shape is chosen for bathroom flooring, and rectangular products are purchased for decoration.
Preparation of tools and materials
To lay tiles on the floor you will need a number of tools, the purchase of which is important to think about in advance:
- rubber spatula;
- crosses-separators for tiles - necessary for the formation of neat seams (their thickness will depend on the quality of the tile used. The better the quality of the tile, the thinner the crosses can be);
- construction level;
- small rubber hammer .
What you need to lay tiles in the bathroom
You can also purchase the tile itself, tile adhesive, and a means for grouting joints between individual coating elements. The tile should be:
- with a low level of absorption, minimum porosity;
- non-slip;
- resistant to chemicals;
- whole;
- with a high-quality printed pattern.