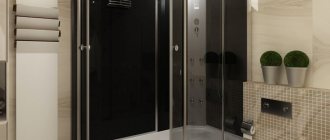
When planning renovations in a new apartment or wanting to update the interior design of an old apartment, owners often doubt whether their home will look as intended. Today it is possible to seek help from professional designers who can put on paper all the customer’s wishes, however, their services are far from cheap.
An example of an apartment layout in 3D
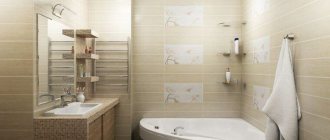
There is another way to solve questions about planning the future interior, and it involves using special free software that allows you to develop a 3D design of an entire home or a single room, for example, a bathroom layout or a kitchen layout. The construction boom has contributed to the emergence of many non-professional programs for creating interiors, the functionality of which is quite sufficient for inexperienced novice designers.
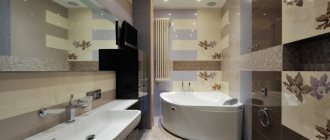
When creating the interior of a house or apartment, it is very important to provide for many nuances: the location of furniture and interior items, the presence of the necessary lighting zones, the color of the walls and floor, etc. It is not very convenient to keep all this information in memory, but having at hand created in a 3D program model of the home, you can visually evaluate your ideas and easily edit any details. Each of the programs presented on the Internet has a number of features that contribute to the emergence of its target audience.
Layout option for a one-room apartment in 3D
Let's try to understand the intricacies of how these utilities work and find out which software to give our preference.
Home Plan Pro
This program can be used to solve many problems, from thinking through the design of a bathhouse, bathroom, kitchen to planning a country house. It won’t take much time to understand the interface of this program, however, it is necessary to take into account that this software does not support the Russian language, so basic knowledge of a foreign language will be useful.
Armed with ideas for renovations and the Home Plan Pro program, you can safely take on creating an interior, and the results will not take long to arrive.
This program comes with a free trial period of one month, which is enough to get the planning done. After this time has expired, you can purchase an official license or reinstall the software again.
An example of developing a private house project in the Home Plan Pro program
Google SketchUp
The functionality of this program from Google is customized to solve many problems. With its help, you can implement three-dimensional models of objects of varying complexity on a computer screen. It is worth noting the possibility of posting the finished result for public viewing by fans of this software, who, in turn, can give their assessment or advice.
Three-dimensional models of a bathroom, kitchen, entire apartment or country house - this is not the limit for Google SketchUp. Using this software, you can design a landscape for the courtyard of a private house, create your own model of furniture, or even develop a three-dimensional model of your own car, in general, everything that comes to the designer’s mind. As for the complexity of the work, users should not have any problems in this regard. You can understand the work and features of the program in literally two hours.
Apartment interior design in Google SketchUp
Naturally, without due diligence, the program itself will not create a room design, however, the knowledge you will need is not as much as that required to work with professional programs.
A big advantage of using this software is the many video tutorials that are presented on the official website of the developers. Studying them step by step can turn a beginner into a trained user in a very short time, even taking into account the fact that the videos are in English. You can also find Russian-language video tutorials created by domestic fans of Google SketchUp.
What to consider when choosing a furniture arrangement method
Several universal rules will help you correctly arrange furniture in a room, which can be taken as a basis, taking into account the functional purpose of the room, its size and configuration, the location of window openings and doors, and the level of illumination.
You can determine the dimensions of the furniture by arranging it on a plan on a scale that will clearly show how much free space is left and what pieces of furniture it is advisable to discard
Step-by-step instructions for arranging furniture in a room
Table 1. Instructions for arranging furniture
| Illustration | Recommendations |
Step 1: Draw a floor plan to scale | The choice of furniture designs depends on the size and planning features of the room. If there are niches or protrusions, it is better to make furniture according to an individual sketch. Determining the size will allow you to plan the room and furniture to scale, which can be moved, selecting the optimal location, taking into account the distance between individual elements, the availability of free space for opening doors and drawers, communication connections in the room, which should not be blocked by furnishings, making it difficult to comfortably and safe movement around the room. |
Step 2: choose a functional dominant | Depending on the purpose, each room has a functional dominant. In the living room there is a TV, a fireplace area or an accent composition that attracts the main attention. In the bedroom there is a bed, in the dining room there is a dining table. |
Step 3: choose the optimal number of furnishings | It is important, even in a small room, to maintain the optimal distance between individual elements and not pile them up. If the room is small, then the emphasis is on its purpose; secondary furnishings are selected depending on the availability of free space. Thus, the workplace can be built into a wardrobe or niche, the bedside table is replaced by a console plane with a hinged lid. |
Step 4: choose a rational way to use the free space in the corners of the room | You should not ignore the corners in the room - you can place various functional items in them: TV - cabinet, shelving, dressing table, wardrobe, floor lamp. |
Step 5: consider the optimal distance between furnishings | When creating a relaxation area in the living room, it should be taken into account that the optimal distance between furniture is from 0.6 to 0.8 m. Too close or, conversely, too far a distance will create discomfort. |
Step 6: Use Visual Techniques to Expand Space | Don’t forget about ways to visually increase space - both the design (shape and color) of furniture and additional techniques can help with this: paintings are hung as high as possible, window decoration is done so that there is enough natural light in the room. To enhance the effect of free space, mirrors or mirror panels are hung opposite window openings. |
Note! The feeling of overload in the interior is created by small details in large quantities. Minimalist styles, on the contrary, visually increase the space. In a small room, it is recommended to choose light furniture in a laconic design.
Light furniture visually makes the room more spacious
The role of ergonomics
One of the most important tools used to create a functional, comfortable and safe living space is ergonomics. This science is used in the manufacture of furnishings and their arrangement in space, taking into account the anthropometry of a person and his actions.
Note! Ergonomics involves taking into account the anthropometric, psychophysiological and physiological characteristics of all family members and even the characteristics of keeping pets. This allows you to create a unique, rather than standard, living space that meets the needs of an individual person.
Choosing furniture parameters taking into account human height
Thus, in families with children, they take into account the physiological characteristics of younger family members, equipping the premises with additional hangers, shelves, chairs, tables, stands for the sink and toilet, and additional railings on the stairs, corresponding to their height. The situation is also the same with elderly family members - the space for them should be comfortable and safe, for example, handrails are installed in the bathroom, and the personal room of an elderly person in a two-story house is equipped on the ground floor.
Organization of communication connections in living space
When purchasing standard finished furniture, it should be taken into account that it is produced taking into account the average values of human anthropometric parameters. Some items are customizable. Often this is life-size children's furniture: chairs, desks, cabinets, beds, the size of which increases as the child grows.
Life-size furniture for schoolchildren
When making furniture to individual sizes, you must take into account the data of the person who will use it. It is important to choose the right height of a chair, bed or sofa, legs of a dining table or work table, and the height of a hanging shelf or mezzanine.
The main measurements you will need to take include the following.
Table 2. Basic measurements
| Illustration | Description |
Height of the knee from the floor surface | Required to select the seat height of the chair, which should be located on the same horizontal level as the level of the knees of a person in a sitting position. |
Available space at arm's length in a seated position | Required to create optimal parameters for a workplace or recreation area. Ensures that necessary items are accessible while sitting. |
Available standing space | Required to select the optimal height of the shelf or mezzanine. The most frequently used overhead shelf should be positioned at a height less than 20 cm from the highest point of reach in a standing position. |
The height of the palm of the freely lowered arm in a standing position relative to the floor surface | Required to determine the optimal height of switches. |
The height of the eye level of a sitting person relative to the floor surface | Required to determine the optimal location for the TV, while your head should be held straight or slightly lowered. |
Ergonomic requirements must be strictly applied when organizing the workspace in the kitchen. So, the distance between the hands and the tabletop should be 15 cm. The height of the working surface is calculated by bending the elbows at an angle of 90 degrees.
Kitchen furniture parameters depending on a person’s height
The basis of the kitchen work area is the refrigerator, sink and stove - it is in this sequence that they organize the correct technological process. Their arrangement forms a working triangle, in which there should be enough space for movement between the main elements.
Work triangle in the kitchen
Sweet Home 3D
You can make a design for the interior of your home, arrange furniture, and also find out whether a certain color of wallpaper is suitable for the selected floor covering using Sweet Home 3D software.
3D layout of a one-room apartment made in Sweet Home
In order to be sure of the correct design decision, it is very useful to develop a 3D model, and this program is a great way to do this.
Options for arrangement of furnishings
The correct arrangement of furniture in the interior shapes its visual perception and the overall atmosphere of the room, making it strict, restrained, light, cozy or at first glance chaotic. In any case, the location of each item must be strictly determined to ensure an organic combination between them.
Furniture arrangement options
There are several basic principles for arranging furniture:
- Symmetrical method.
- Asymmetrical method.
- Circular arrangement.
Symmetrical arrangement
With the symmetrical method, pairs of objects are used, installed at the same distance opposite each other relative to the central element - fireplace, TV, coffee table, carpet, chandelier. The function of the central element can also be performed by a window opening or a corner of the room.
Nowadays, few people use incandescent light bulbs; they have been replaced by energy-saving and LED analogues. But they are still on sale, and are very inexpensive. And many people have accumulated a lot of old, burnt-out lamps of various types and sizes. If you like to create new interesting things from unnecessary trash and scrap materials, we suggest you see what you can make from them in a special article.
Symmetrical arrangement of paired furniture in the living room
Furnishings should not be large. In a square-shaped room, this method of arrangement will create a harmonious atmosphere and some severity. Bedside tables made in the same style along the edges of the bed or armchair near the fireplace will create a laconic and cozy living space.
Option for circular furniture arrangement
The arrangement of furniture in a circular manner is also done in relation to one central element - a carpet on the floor or a massive chandelier, coffee or coffee table. In this case, the furnishings are installed in a circle. They can be made in different styles, differ in shape, size and decor. This arrangement method is relevant for large rooms with semicircular walls.
Asymmetrical way of arranging furniture
The asymmetrical arrangement method is widely used in rooms with irregular layouts, as well as in kitchens and children's rooms, where it is not possible to install paired furniture and it is important to organize several functional areas. But, despite the apparent randomness of the arrangement of furnishings, they should all occupy an optimal position relative to the selected focal element - a TV or fireplace.
When arranging furniture, it is important to maintain the optimal distance for its comfortable use.
Note! A harmonious composition can be created by combining furnishings with small objects. For example, a floor lamp and an armchair, a decorative flowerpot and a coffee table.
Color Style Studio
This program is distinguished by its professional slant, however, it can be easily used by beginners thanks to its simple interface. Using Color Style Studio, at the planning stage, you can select the necessary color scheme for a separate area of the apartment (bathroom, living room, etc.), country house or office.
A very convenient feature of this software is the ability to upload photos of the premises that need to be updated. Next, you just need to select the required area, and the program itself will replace the color with the desired one, especially since the color palette is very rich.
The only negative is the need to purchase the program, however, there is the possibility of using a trial version, which is quite enough for one-time planning.
Home interior in Color Style Studio program
IKEA Home Planner
This product was released by a well-known furniture manufacturer to make it easier for you to choose the right model. Using this software, you can create a three-dimensional model of an apartment or a separate section of it, for example, the zoning of a kitchen or bathroom in a house, and visually see whether IKEA furniture will look against this background. The finished layout can be saved in the .bmp extension and subsequently printed on a printer.
It is worth noting that this software is configured specifically for IKEA products, so you will not be able to load other furniture.
Due to the fact that this manufacturer has plenty of furniture and various interior items, there is no need to worry about this limitation. In addition, the program interface allows you to send the finished project to the technical support of a nearby company store, whose specialists will help you create the design of the room and assist in completing the purchase.
IKEA's online planner is completely free, so you don't have to spend extra to design your home.
Arranging a nursery
Contrary to the conventional wisdom that a nursery should be cute first and foremost, I want to argue and say that this room should be functional and safe first and foremost. Think about what could be dangerous for your child and eliminate these things first. The stop list includes such things as:
- natural mirrors (replace them with special plastic ones intended for children);
- all kinds of sockets (insert blockers that you can buy at IKEA);
- handles from plastic windows that need to be pulled out, first adjusting the safe ventilation mode;
- insufficient lighting (place night lamps and other light sources).
Safe room for baby
Functionality
The functionality of a children's room is especially important for a baby in the first years of life - in this case, you should carefully consider night feeding and the trajectory of the mother's movement through all the obstacles that may be encountered along the way. A sufficient amount of light, a feeding area with a comfortable rocking chair next to the crib will make life calm not only for the mother, but also for the baby.
Multifunctional and comfortable children's room
Many experts recommend that you keep your baby's crib away from windows, as temperatures tend to be cooler near windows and there's also the risk of your baby tearing off blinds or curtains. Placing a baby crib near the interior wall of the house will be a warmer, calmer place and inaccessible from outside noise. Also make sure that any lamps or accessories are kept at a safe distance so that the child cannot remove them or they will not fall while he is sleeping.
Free space around the baby's crib
Of course, above all else, you want the children's room to look perfect and have the "wow" factor. The crib is the key focal point in a nursery and is the first thing people pay attention to. I recommend, if other factors allow, to place the crib somewhere where it can be seen in the doorway.
Placing the bed for mommy's comfort
There are several different options for crib placement, depending on the size of the room and the look you want. First of all, you can place it in the middle of the wall with the headboard against the wall. This is perhaps the most common location and allows for other pieces of furniture to be placed on both sides. In larger rooms, the crib can be placed in the middle of the room.
Place the crib as convenient for you
Much of the atmosphere that makes a nursery special comes from the accessories. A tasteful piece of art, a few pillows and a cute rug will be the icing on the cake in any child's decor, as long as the structure is in place. Add a couple of paper lanterns and a small potted flower.
VisiCon
With the help of this software, you can carry out both professional tasks in interior design and simple ones associated with a banal change of wall color. A simplified version of the program will help beginners in the design business to furnish an apartment as a whole or a separate section of it. For successful work, the user may only have basic knowledge of using a personal computer, so it is possible for almost every person to plunge into the world of interior design.
Creating a house plan in VisiCon
The program contains a large number of different textures, colors, decorations and furniture, so the apartment owner will be able to very accurately recreate the look of his dream home. The three-dimensional viewing function makes this software very useful for those who doubt the correctness of their decisions, and the ability to print the finished result on a printer will allow you to provide a design project to the construction team.
LESSON 22. Drawing a room (constructing a frontal perspective)
Have you ever imagined what your room would look like if you moved your bed or chest of drawers? Or what would your living room look like if you moved the sofa, chairs and TV? It takes a lot of effort to rearrange everything and just see what your “design project” will look like. This wonderful blog tutorial will teach you how to draw a room, hallway, or foyer from frontal perspective , so you can decorate the interior to your heart's content!
Of course, at first this lesson may seem simple and uninteresting to you, but it shows the basic steps of building a frontal perspective of a room , which will lay the foundation for the correct construction of any room in the future.
In this lesson, we'll learn frontal perspective : it's a drawing technique in which all objects are related to a single central point in the drawing. This perspective is also called “single vanishing point perspective.” Not to be confused with angular perspective, although they are based on the same principle. Only angular perspective uses two vanishing points in your drawings with specific alignments to create depth.
I won't explain how to draw furniture in this tutorial. For now, let's concentrate on drawing a truly large three-dimensional space that you can fill in yourself with your imagination.
1. Let's start the drawing from the back wall of the room. Draw two horizontal lines parallel to the top edge of your notebook and two vertical lines parallel to the side edges of the paper. It is very important.
2. Place an anchor point in the center of the resulting square.
3. Lightly draw a guide line diagonally through the corners of the room and straight through the anchor point in the center. You can use a ruler or the edge of paper.
Get 10 free video lessons
Ten free video lessons from the Kalacheva School drawing school are available immediately after registration.
Using promo code REFPART
— 10% discount on all courses with teacher verification until the end of 2022!
Get
4. Also easily guide the second guide through the opposite corners of the room directly through the center anchor point.
5. Now erase all the lines inside the square, leaving only the anchor point in the center.
6. Lightly mark the location of the front door. Notice how the concept of size is used. The bottom edge of the door is drawn larger to create the illusion of proximity. Draw the floor, walls, ceiling, always keep the size rule in mind.
7. Using the center reference point, lightly draw a line through the near edge of the door to this very point. This point will become the positioning point for almost every line in this drawing.
8. Draw a window on the opposite wall, starting with two vertical lines. Don't forget to make the near line longer.
9. Once again, focusing on the center point, draw straight lines - the top and bottom edges of the window. It turned out well, didn't it?
10. Horizontal and vertical lines are used to draw door and window slopes. Draw horizontal lines to indicate the thickness of doors, windows and stairs.
11. Now draw a vertical line to define the slope of the window.
12. This step is very important in this tutorial. Using a center reference point, lightly draw the top and bottom lines of the window. Voila! You've created a window in frontal perspective! Now let's work with the stairs.
13. Using the back wall as a reference, draw horizontal and vertical lines to create the far edge of the staircase. Remember in step 1 how I said about the importance of the first horizontal and vertical lines? And that's why. All other horizontal and vertical lines must be parallel to the first, otherwise your drawing will visually fall apart.
14. Time to use the center anchor point again. Draw each corner of the step using this point. Lightly sketch lines away from the center, like in the illustration below.
15. Erase all extra lines. Sharpen all edges to create a focal point in your drawing. Shade your drawing according to the light coming from the left window and from the ceiling. If there is a light on the ceiling, where should the shadows be? You can add parquet flooring and a row of light bulbs on the ceiling. Redraw this several times, experimenting with different doors and windows.
LESSON 22: PRACTICAL TASK
Try drawing your room. Sit at your desk, on your bed, or on the floor where you feel comfortable and have the best view of the room. Position your canvas so that the vertical edge of your sheet aligns with the far corner of your room when you close one eye.
Draw everything you see: the edges of walls, ceilings, floors, windows and furniture. Try not to move your paper. Place it on the scanner and make a copy.
Use a pencil to color the copy and add color. Pay attention to "secret" shadows, drop shadows, and real-world occlusions, and how placement, size, and occlusion have a visual impact. Funny?
Be inspired by example!
Share your interiors on VKontakte in this album!
If everything worked out for you, then move on to drawing a city street in frontal perspective!
Materials from the book “You can draw in 30 days” by Mark Kistler were used.
Book in Russian by Mark Kistler “You will be able to draw in 30 days.”
Drawing ideas for every day