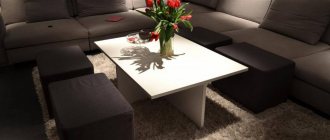
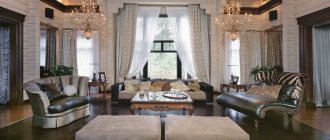
The coffee table, despite its traditionally small size, has quite a lot of functionality. This piece of furniture is usually located in the living room seating area, near the sofa or armchairs. It was originally intended for placement and storage of newspapers and magazines, receiving the appropriate name. Today, at the coffee table you can work with a laptop, sit down with a cup of coffee in the company of unexpected guests, and place all sorts of necessary little things: keys, phones, remote controls.
Modern coffee tables for the living room
Currently, coffee tables have several varieties. A classic option for performing the original function - storing magazines, newspapers and correspondence. A variety intended for eating, a small feast, in fact, a mini-version of the dining table. A side-mounted coffee table for accessible placement of important small items and items while relaxing. The decorative version, the main function of which is to decorate the interior, on the surface of such a table there is a place for stylish accessories and objects. Folding transforming tables are especially popular.
Ceramic tile
There are no limits to the imagination of modern designers and a variety of materials are used to achieve a certain goal.
If none of the above methods for decorating a coffee or coffee table suit you, pay attention to the following unusual methods.
You can decorate the surface of any table in an original way using ceramic tiles. The only difficulty is to select the required quantity according to the size of the table. You can decorate it in different ways: lay out an original panel in the center, framed with monochromatic elements, or come up with a geometric pattern (zigzag, checkered pattern, squares, herringbone) - such decor will look original and fresh.
How to decorate a coffee table with ceramic tiles: master class
For work you will need:
- the tile itself or a panel made from it;
- adhesive composition (you can use liquid nails or dilute special tile adhesive);
- spacer elements “crosses” (the smaller they are, the thinner the joints between the tiles will be);
- you can use any grout, but epoxy is more practical and reliable;
- rubber spatula for applying grout;
- notched glue spatula;
- sponge;
- several clean napkins (both wet and dry).
First, decide on the pattern of how you will lay out the tiles: it is better to lay them out on a flat surface so that the pattern on the panel matches. The tiles should be laid the way they will lie on the table.
Then the material needs to be prepared: wipe the tiles from dust with a napkin - the back part should be dry and clean. We hope you have already prepared the surface of the table.
Apply the adhesive composition to the surface of the table with a notched trowel, laying each tile on it, carefully pressing down with your hands so that there are no bumps. Place crosses between the elements. Wipe the adhesive off the face of the tiles as needed.
Please note: you should not apply glue to the entire surface of the table at once, otherwise it will have time to dry by the time you reach the last tiles.
After gluing, leave the table to dry for at least a day.
The next step is to fill the joints with grout. We hope you have chosen the appropriate composition and read the instructions on how to use it. Fill all the seams with a rubber spatula; remove excess with a damp sponge. As you fill, remove all spacer crosses from between the tile joints. If necessary, create seams using either your gloved fingers or a rubber spatula.
Once all the seams are filled, remove excess grout from the face of the tiles with a dry cloth, being careful not to touch the seams. Leave to dry for at least a day. Wet cleaning of the table can be carried out according to the instructions on the grout packaging.
Transformable coffee table for the living room
Ergonomically and beautifully, the transforming table combines three main functions. In one position it turns into a full-fledged dining table, in another it can be used as a work or desk. The third position allows for use as a side table. The materials for such a table are wood or its high-quality imitations.
Tables made from natural materials
Tabletop made of cut wood, stone and wood, wood and glass connected to each other. Here are the main fashion trends.
Folding coffee table for the living room
This type of coffee table is necessary, first of all, to save space. When assembled, it has minimal dimensions, and when disassembled, the useful surface usually doubles. Also for a small living room, there is an option for a coffee table that folds like an ironing board: it can be stored assembled and, if necessary, unfolded for use.
How to decorate a table with stickers
Surely many of you have seen decorative vinyl stickers in stores intended for interior decoration. But who said that they can only be glued to walls? This method of decoration is the simplest and least expensive in terms of time and finances.
However, if you decide to choose this method, it does not mean that preparing the table surface can be neglected. It will also have to be sanded and primed, and maybe even painted, creating a certain background for the ornament. The selected elements are glued onto a dry and clean surface and carefully smoothed. If necessary, the decorated tabletop can be varnished.
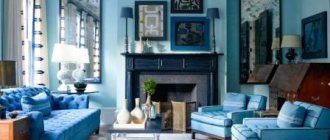
Stylish coffee tables for the living room
These tables are most often made to order or are the result of the creative process of interior designers. The material for such tables is both traditional: wood, glass, plastic, and non-standard: old pieces of furniture with an updated design, wooden pallets, large stones, old suitcases and even car tires painted with multi-colored paint.
Decorating a table with wood
As strange as it may sound, any table, even a wooden one, can be further decorated with the same wood. However, this requires some work skill (the ability to cut it to size). Or order a cut at a workshop.
To turn a regular old coffee table into a fashionable one with a wooden top, you need to:
- Take all measurements: for correct cutting you need to know the width and length of the tabletop.
- Cut (can be done in production) wooden lining or ordinary beams, clean if necessary.
- Cover with stain or varnish of the desired color. In the meantime, prepare the table itself: clean it and coat it with primer.
- Using liquid nails or any glue intended for wood, glue the planks to the table, place a weight or secure with clamps.
- If necessary, seal the seams between the planks (you can use epoxy grout or a sealant of a matching color).
Another way to decorate a coffee table is to stick wood cuts on the tabletop - such a decoration looks original and unusual. The space between them is filled with epoxy resin. By the way, they can also be placed under glass.
Another way to give an old table base the texture and color of wood is veneering . But for this you will need sheets of natural wood veneer (not all construction centers have them). Such sheets are mounted on a prepared tabletop using PVA glue and smoothed with a hot iron through sheets of white paper.
Thus, using different shades of wood veneer, you can lay out a pattern or ornament. If desired, the surface is varnished for protection.
Please note: during the process of gluing veneer, air bubbles may form, which must be removed immediately: just pierce the problem area with a needle and “blow off” the air, then go through it again with a hot iron.
If you don’t have the opportunity or desire to tinker with natural wood, you can go a very simple route, but your table won’t last long: go and buy a self-adhesive PVC film “like wood.”
Coffee tables for the living room made of glass
The glass coffee table is distinguished by its special sophistication, transparency and beauty. The entire table can be glass - from the base or legs to the tabletop, or it can only be the surface of such a furniture element. There are three main models of glass tables: solid or monolithic, sliding, folding. Each model, made in a unique design, becomes a unique and sophisticated piece of living room interior. It is important that this original design fits laconically and appropriately into the chosen interior style.
Glass
There are several ways to use glass to decorate a coffee table.
- Option 1: using glass with photo printing. Glass with an applied ornament or photo printing is simply glued to the base, and the legs can be painted in any color. Frosted glass with ornaments will be original.
- Option 2: bars are attached around the perimeter of the tabletop, on which the glass is laid. Any items for decoration are placed under it: colored sand, buttons, beads, shells, pebbles, memorable items. It is better to attach glass to the bars, but for this you need to make holes in it (it is better to order glass where they can do this).
- Option 3: very thick glass is used, simply placed on the tabletop, and photographs, compositions of dry leaves, fabric or paper are placed under it. Since the material is very heavy, there is no need to fasten it; with its weight it will tightly press all the elements.
You can decorate the glass with your own hands: on the back side (the one that will lie on the table) any design is applied through a stencil. This move is relevant if your table has a glass top, but you want to update its appearance. You should choose colors that contrast with the table; you can use both stained glass and acrylic paints - they are more resistant to moisture and safe, since they do not emit toxic substances into the air.
Coffee table for the living room on wheels
A very convenient and mobile option, easily moving not only around the room, but throughout the house, depending on the needs of the owner, providing comfort and functionality. Tables on wheels also come in several varieties. Tables on side posts provide fairly good stability, which ensures maximum safe operation.
Tables with four legs, having various geometric or arbitrary shapes, are also stable and original, which is very beneficial when embodying the chosen interior style. Multi-tiered shelves with open and closed shelves provide additional storage space for things and necessary small items. Tables with several multi-level tabletops look original. Some of the features and details of the listed coffee tables can be combined to create a combination and versatile living room table.
What helps improve the functionality of the table
Wheels on the bottom of the legs. With their help, it is convenient to move the table around the room without fear that the legs will scratch the floor covering.
Pull-out drawers and storage niches. They are convenient for having the necessary items on hand. They store magazines and newspapers, remote controls for equipment and books, and other small items.
Devices that are mounted on a table for a laptop or phones.
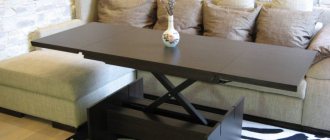
Lifting tabletops or retractable ones, which are used if you need to get a larger table area.
Large coffee table in the living room
A small coffee table in the living room is a common and familiar occurrence. But in what cases is a large table preferred? First of all, in the case when the living room has a fairly large area and a small table would simply not be appropriate in such a large space. If we talk about the height of the table, here, first of all, they are guided by the personal preferences of the owners and, of course, compatibility with the interior of the living room.
Coffee table color
The question of choosing the color of such a product usually does not raise much doubt: the shades of modern and classic models in a room decorated in a variety of styles will be organic.
Considering that most often such furniture is made of wood, glass and metal, the tones will be unambiguous:
- Natural wood color . This is a choice not only in favor of retrospective trends, but also modern ones, where natural materials are valued. Dark shades of solid wood look luxurious. In light colors, on the contrary, such furniture, alas, is not so impressive. Especially in cubic forms with a massive wooden frame, it is the rich range of expensive types of wood that looks especially stylish.
- Transparent designs are another sophisticated option . Such models visually do not take up any space, they look light and unobtrusive. Original and simple products, although they look different, still remain transparent, and therefore make the situation easier.
- A coffee table in a living room interior made of artificial or even natural stone is a particularly luxurious option for furnishings in any style . If a natural mineral has an exceptional pattern and unique texture, then an artificial one can be monochromatic - in a wide palette of shades. This is used by designers working in various styles. The natural texture of stone is appropriate in classic, modern, and Mediterranean interiors. But an artificial monochromatic mineral is applicable in modern design styles. Such models can be monochromatic or combined - for example, the base is made in a dark color, and the tabletop is made in a light color. The ideal duet, which does not lose its relevance, remains the combination of white and black.
Round coffee table for the living room
Most tables have a traditional square or rectangular shape. However, the round table is in no way inferior in beauty, and in matters of safety it surpasses the usual forms. A table with this shape is especially indispensable when embodying interior styles where rounded lines are welcome. The main materials for making round tables: natural wood, durable plastic, transparent or frosted glass, and even stone of natural or artificial origin.
Decorating a coffee table with coins: master class
How to beautifully decorate an old coffee table at the lowest cost? Use coins! A very original decor will give a boring piece of furniture an updated and unusual look.
To work you will need:
- a lot of old (or not so old) coins, preferably of the same shade;
- liquid nails or any other strong adhesive (for example, “dragon” or “titanium”);
- baguette for pictures or ceiling plinth (for a frame around the decor);
- notched spatula;
- epoxy resin.
The first step is to carry out all the manipulations with the table: remove the old paintwork, sand and prime it. If desired, coat with paint of the desired shade.
Then we cut the baguette so as to lay it around the perimeter (saw at an angle of 45 degrees). If you can’t do it yourself, you can order a ready-made “frame” from a framing workshop. We mount our edges to the table - they will not allow the epoxy to spill over the edge of the table, we fix them with clamps until the glue dries. If necessary, we paint it the same color as the table itself (but you can leave it in a contrasting color).
Before fixing the coins, it is advisable to arrange them in the way they will be glued, so that they can be rearranged if there is empty space. We glue the coins to the tabletop with liquid nails, starting work from the edge. Let the glue dry.
The next step is to use epoxy resin or glaze. We will not recommend any specific brand; any hardware store will tell you what is available and for what purpose it is intended. We dilute the solution according to the instructions and fill the entire surface of the table. Using a notched trowel, spread the resin over the entire surface. Small bubbles may form during the process, you can leave them or try to blow on them to make them disappear.
Please note: the room in which you work with epoxy must be well ventilated, or you can move the table outside.
We leave our table to dry. An unusual piece of furniture is ready!
Oval coffee table for living room
Oval-shaped coffee tables for the living room fit perfectly into any interior. They are very practical and comfortable, safe and ergonomic. The favorite models of coffee table fans in the interior are made of real wood or high-quality and durable glass. The oval shape is relevant in many interior styles; only the design and decoration of the table will differ in each style: classic, country, Provence, shabby chic or Scandinavian. You will not regret choosing an oval table for the interior of your living room!
A coffee table is by no means the most important and basic piece of furniture and interior design. But in many everyday and everyday situations, sometimes it is irreplaceable. And some designer or self-made coffee tables amaze with their originality and beauty, complementing and decorating the stylish interior of the living room.
Ways to decorate tables
To decorate the table we will use four main techniques:
- Decoupage. A method of transferring and fixing an image to the surface to be decorated.
- Mosaic technique. The table is covered with numerous pieces of different sizes and colors. In cases where the level of skill allows, they add up to a picture.
- Craquelure. A method of artificially aging a surface due to the formation of small cracks on it, which everyone has seen in old paintings.
- Painting. Decorating the table with handmade drawings. Those who do not have artistic talent should not be afraid of this technique. You can work with stencils.
The materials used to cover the tables include shells, glass, and wooden fragments. A richly decorated element will look beautiful on its own and you should not overload it with additional decor in the form of souvenirs, vases, trinkets and books.
Decoupage
To decorate a table using the decoupage technique, you will need PVA glue, varnish, sandpaper, primer and a “carrier” for the picture. It can be napkins, pieces of fabric, photographs and even old wallpaper. If the table is made of wood, then it is first sanded or sanded so that the surface is perfectly smooth. Then a layer of primer is applied. After it has completely dried, the table is greased with PVA glue. Then they apply a drawing or picture, fix it and wait until the composition “sets”. To fix the image, it is successively coated with several layers of varnish. It is recommended to decorate only wooden or plastic surfaces using this technique. On a glass table, only a lace pattern will look original. Such an element can be placed in a living room decorated in a light Provence or shabby chic style.
If pieces of thick fabric or wallpaper are used, they must be carefully smoothed so that after drying there are no unsightly wrinkles left. Secure unruly fragments with pushpins. By the way, metal hats sometimes fit into the decor and remain after processing.
Mosaic
First you need to prepare the table. Its surface is cleaned and treated with one layer of spray paint. After it has completely dried, the places where the mosaic pattern will be laid out are greased with special glue. You can use both pieces of old tiles of different colors, and special mesh tiles, which are already divided into many small fragments. After the pattern is laid out, it is given time to consolidate. Then the seams are treated with grout, after which the entire surface of the table is washed. If the designer decides to leave areas untreated with mosaics, then before finishing work with the joints between the fragments, they must be covered with a cloth or sealed with masking tape.
The mosaic table will look great in the garden. It is often complemented by a set of chairs decorated using the same technique.
painting
To decorate a painted table, you only need a brush, paints, a stencil and varnish to fix the design. If the surface is wooden, then it is first prepared:
- Remove the layer of old paint, if any.
- The surface is polished, thereby removing irregularities and defects that can distort the image.
- Cover with a primer to ensure better adhesion between the wood and the paints.
- If necessary, the surface can be painted in a neutral background color (usually white).
Then a stencil is applied to a separate area. If necessary, it is fixed with buttons. The rest of the surface is carefully covered with masking tape or cloth. Now you can apply the drawing. After the paint has dried, the tape is removed and, if necessary, the contours of the image are outlined with a thin brush. This will have to be done if the stencil does not fit tightly to the table and part of the pigment “spreads” beyond its boundaries. As for the color scheme, it is recommended to use contrasting combinations:
- White and black, red, blue.
- Yellow and green.
- Purple and grey.
- Red and pink.
The choice of shades depends on the overall color composition.
Craquelure
The craquelure technique is an artificial aging of the surface. A special composition (PVA, gelatin, vinegar, egg whites) is applied to the not yet completely dry layer of paint. These substances contribute to surface cracking. Exactly the same cobweb decorates paintings by famous masters. No amount of restoration can save canvases from forming a network of cracks years later. The surface is prepared in advance (washed, sanded, primed). Then a layer of paint is applied. While it is still wet, you can complement it with a second contrasting color and cracking compound. The combined options look very original.
The craquelure technique is often combined with decoupage. Flower bouquets, portraits or landscapes in oval frames against a cracked background look great and are incredibly similar to decorating antique furniture.
Mirrors
A mirrored table will be a great addition to modern style, hi-tech, minimalism and even loft. This piece of furniture will emphasize the rigor and elegance of the decor. Making it yourself is quite simple. To work you will need:
- Silver paint.
- Liquid Nails.
- Mirrors cut to size to order.
- Durable chipboard box.
The mirror table will not have shelves inside, so you will have to store everything you need right on its surface. So, the base box is covered with a layer of silver. This paint is sold in cans, is easy to apply and dries quickly. After this, mirrors are attached to the surfaces. They are simply “planted” on liquid nails. To prevent the fragments from falling off before they stick, they are secured with tape. After complete drying, it is removed and the surface is thoroughly wiped. Simple tables are decorated with five mirrors exactly according to the number of edges, but the number of modules can be increased by decorating only the top, that is, the tabletop, with a single piece.
Shells
Of course, you can decorate ready-made “two-tier” tables with shells, but a homemade model will look much more original. At any time of the year and in any interior, it will evoke warm, pleasant memories of summer and the sea coast. To work you will need:
- Sheet of impact-resistant glass.
- Silicone gaskets.
- A rope or twine from which its likeness can be woven.
- Shells, pebbles, starfish.
- A sheet of plywood is identical in size to glass.
- Thick bamboo stems.
- Fasteners
Four bamboo stalks are attached to the plywood base around the perimeter. The edge of the sheet is decorated with a twine rope. It can be nailed with small nails or placed on staples. Then the bamboo and twine are coated with a layer of varnish. Next, you need to prepare places for attaching silicone gaskets. The plywood bottom is decorated with shells, stars and other “seafood”. Then the glass is fixed on top. The legs for such a table can be sawed off from an old one.
Wooden blocks
A table decorated with blocks is ideal for styles that use everything natural. To make the original decor you will need a base box. It is noteworthy that its bottom should protrude beyond the walls by about 2-3 cm. This indentation is necessary to secure the lower part of the pads. So, use a tape measure to measure the distance from the bottom to the top of the box. Add 2 cm to the resulting value - this will be the height of each block. After they are prepared and processed, the elements are attached to the lower protrusion with glue along the entire perimeter of the base. They are also glued together to ensure greater strength. Then the table top is created. To make it, blocks 2 cm high are used. The bottom of each is coated with glue and fixed to the surface of the base. After this, the cracks are covered with grout, and the table itself is varnished.
Veneering
If the coffee table is completely satisfied with the design of the owners, but its surface is already slightly worn out, then layers of veneer are applied to the old layer of wood. This natural material has an original pattern and is distinguished by a rich range of colors. Veneer is fixed using cold and hot methods. For the first, you will need special equipment (at least a press), but for the second, PVA glue, a sheet of paper and a hot iron are enough. The surface is cleaned and prepared for the procedure. Then it is covered with glue. After it has dried, the veneer is applied to the desired area, covered with a white sheet of paper and a hot iron is passed through it. Unsightly air bubbles may form during the process. You need to get rid of them in time. It is enough to pierce a hole with a thin needle and press lightly to deflate the bubble. Then the area is re-treated with a hot iron.
Combined table decoration
We have already discussed one option for combining techniques (decoupage and craquelure). The designer's capabilities are not limited to this. The tables decorated with mosaics and partially painted look original. Typically, both techniques are used when applying different fragments of the same design. Shells can be laid not on plywood, but on a mirror bottom. Visually, the amount of sea wealth will increase, and if you add glass that has been polished by waves for a long time, the decor will sparkle and shine. Wooden blocks can be combined with a smooth veneered or glass countertop surface.