The most important thing in renovation is the design project. It is from the moment you accept the design of the room that you can consider that you have begun renovation. Interior design will help you in many matters. Interesting interior ideas for designing a bathroom are perhaps the most important thing that is needed even before the renovation begins, because if you act according to the plan, things will go faster and easier. It is worth deciding on the style, material, plumbing and furniture. In the variety of furniture and materials, you will definitely find something that you like.
Where does the repair begin?
Interior materials
- The main and relevant material for the design of the project is ceramic tiles . It is durable and can imitate various materials. The pricing policy for ceramic tiles varies: from budget options to elite exclusive models. The color range is quite wide, so it is possible to realize almost any idea. In addition to color solutions, there is also an imitation of natural materials such as wood. Such tiles look unusual and exclusive.
- Mosaic is a very convenient material for interior design; it hides surface unevenness. Mosaic fits perfectly into the interior of the room, bringing a certain mood, idea and sophistication to it.
- Natural materials. At this time, it became possible to use environmentally friendly materials such as wood. Such materials are specially processed so that over time they do not lose their original appearance and look good in the interior.
- Plastic panels. The most budget option. Large selection of panels, huge range of colors. But there is also a significant drawback - the possible occurrence of mold and other microbes under the panels of the room if it is damp and insufficiently ventilated. But there are also advantages: it is easy to decorate walls with such panels yourself, regardless of the size of the room.
Dismantling of plumbing and finishing materials
Dismantling the old coating
After drawing up a preliminary project and purchasing the required amount of building material, you can safely begin dismantling the old plumbing and finishing, which requires replacement during renovation. It is recommended to begin dismantling by removing the plumbing, since it will interfere with the removal of old cladding from the walls and floor of the room.
The work stage in this case will be structured as follows:
- We disconnect the drainage system from the plumbing elements and close this hole from dirt and construction debris;
- the water supply system is shut off and the washbasin and toilet are disconnected;
- the bathroom, toilet and sink, along with all the furniture, are removed from the room to free up space;
- all old water pipes are cut down to the main shut-off valve;
- using a hammer drill, hammer or spatula, remove all the finishing down to the concrete base.
It is important that if the plumbing pipes cannot be replaced, they must be protected from damage when the trim is removed. You can see how to remove old tiles in the bathroom renovation video below.
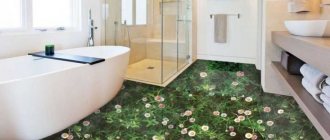
Gallery: bathroom interior design (25 photos)
Ceramic tile
For a stylish design of a small room, you should choose lighter colors; they will visually enlarge the space. But don’t get carried away with white, because it is easily soiled and requires a lot of attention to cleaning. And being in a white space for a long time is not comfortable enough, since there is a feeling of a hospital and a desire to leave the room.
It is better to give preference to glossy ceramic tiles; due to their specularity, they will reflect light and create the effect of more space. But, naturally, it has its drawbacks: it gets dirty quickly. And she needs constant care, otherwise the water drops will be visible. The matte surface is less easily soiled, and drops and stains are less visible on it.
Layout features: drawings in m
You should approach the issue of bathroom planning responsibly and think carefully about the layout. For this purpose, a planning project is drawn up.
- The first stage is to take measurements. The drawing indicates the location of pipes, communications and drains.
- The second stage - to expand the space of the bathroom, you can combine it with a toilet.
- The third stage is to think about what equipment may be needed in the bathroom and where to place it. This could be a washing machine, urinal, shower stall.
- The fourth step is to consider installing portable communications. It is very convenient to move plumbing equipment with flexible hoses and pipes to the right place.
Using such communication, you can get rid of the leakage problem, since new technologies ensure the strength and reliability of the pipes.
It is best to consider several options for a layout project in a program for designing an apartment and planning renovations, so that you can then select the most optimal one.
Design of a standard bathroom with a combined toilet
If you have a combined bathroom, don’t be upset, but there are more ideas for decorating the space. Of course, this option is not entirely convenient if there are many people living, since it is impossible to adapt to everyone’s needs. And to avoid any awkward moments in a shared bathroom, you should use a screen. Its essence is that it completely hides the person and all the noise; sliding ones are usually used. Or you can buy curtains: this is, of course, cheaper, but the feeling of the presence of another person when you wash will not go away. For a feeling of privacy and tranquility, you should take a screen and not worry that someone is with you.
How to install an acrylic clawfoot bathtub
Most well-known bathtub manufacturers supplement their products with special fasteners and installation parts. Supports come complete with models manufactured by Jika, Roca, Riho and others.
How to properly install an acrylic bathtub with legs yourself:
- On the bottom of acrylic bathtubs, which are mounted on legs, there are characteristic protrusions for connections. To attach the legs, you need to turn the bathtub over and attach the supports included in the kit to these protrusions;
General diagram of installing legs on an acrylic bathtub - To give the structure rigidity, the legs are also connected to each other. To do this, they are tightened with nuts and secured with studs;
- After this, the drain is processed (a siphon is connected to it). The water outlet does not need to be touched until the bath is installed on the floor. When all the preparatory work is completed, you can begin installing the bathtub;
Connection diagram of the bathroom to the pipeline - The legs are installed on the floor, using a level to check the evenness of the installation. If one corner is too raised, then, as stated above, all other corners rise. This is done very simply: the bathtub is turned over and some legs are adjusted to the desired level;
Adjustable legs for bathtub installation - For strength, we recommend lightly hammering the plastic supports with a hammer and a rubber working surface.
Acrylic and glass bathtubs must be handled very carefully. Plastic is subject to deformation under impact loads. When the installation process is completed, they begin to install the mixer, washing machine and other consumers.
Video: complete video instructions for installing a bathtub
Installing an acrylic bathtub on bricks
Let us immediately note that this method is quite rarely used for installing plastic bathtubs. For acrylic plumbing, not only ideal evenness is important, but also the complete absence of shock or other loads that contribute to deformation. Brick supports are quite difficult to install with your own hands so that they evenly distribute pressure over the entire plane of the bathtub.
Step-by-step instructions on how to install an acrylic bathtub on bricks:
- The height at which the bathtub will be installed is determined based on the size of the bathroom and the size of the liner. The optimal height is considered to be 3 bricks;
Parallel scheme for laying bricks for a bathroom - The classic chess pattern is used for installation. To implement this, the floor is leveled and the first row of bricks (2 pieces) with cement mortar is laid on it. 2 more pieces are installed on top of them, but in the opposite direction. So up to the required height;
Brick laying pattern - If you don’t have to take exact measurements of the bathtub to install a sliding frame system, they are required for bricks. In addition, you need to calculate the location of the supports so that there are no sagging points. For example, 4 brick supports at each corner and two in the central part;
- While the solution hardens, you can start connecting the water supply system. If this is not a model with hydromassage, then all work is performed according to the standard scheme. From the sewer there is an adapter and a siphon with an overflow, and from the water outlet there are pipes for installing a mixer.
Connecting a siphon to water pipes
After laying the bricks, you need to wait until the mortar hardens and only then install an acrylic bathtub on them. Of course, the appearance of brick supports leaves much to be desired, so a variety of options can be used for their decoration. These are tiles, decorative panels, a screen (as for a frame), etc.