Bathroom renovation is a costly undertaking that requires not only material investments, but also some skills. Not everyone can handle this on their own; most prefer to leave this task to professionals who offer turnkey services. Even if you have to hire a team, you need to know the main stages of repair. This will allow you to control workers, create a room design, plan your time, and purchase materials.
Bathroom renovation.
Work order
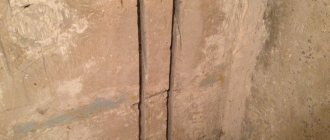
We beat off the tiles. To do this, use hammer drills with special attachments. The tiles must be removed carefully; moreover, they may be useful in the future for decoration. We remove tiles from the walls and floor;
It is necessary to turn off the taps; if water is needed, you can attach a hose to the tap. The bathroom also needs to be disconnected from the sewer and removed.
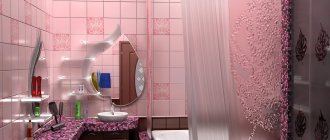
Wall decoration with PVC panels
The cost is slightly more expensive than the first method, but in terms of design indicators it is much better. And the preparatory work is greatly simplified; there is no need to remove old coatings, level the walls and seal cracks in them. The sheathing for the panels can be made from wooden slats or special plastic profiles with clips. We recommend using the second option. The cost of plastic additional elements has almost no effect on the cost of repairs, and the work is greatly simplified. In addition, the plastic profile is not afraid of moisture, which is very important for bathrooms. Wooden slats need to be impregnated with antiseptics - an additional waste of time.
Selecting panels for finishing
Calculate the number of panels needed, make a reserve of 5–10%. If you have little experience, and the bathroom has a lot of utilities, to close which you will need to trim the panels, then take a reserve of 10%. At the same time, estimate the number of starting profiles, external and internal corners. They are sold at a standard price, cost a penny, and there is no need to save money.
Parts for mounting plastic panels
Step 1. Installation of the sheathing
The panels are arranged vertically, the sheathing must be made horizontal. The distance between the planks is 50–60 cm. Make markings on the wall, making sure that the lines are parallel. The sheathing is fixed with dowels, drill holes with a drill and hammer drill, use drills with pobedite tips. To prevent the floor from getting dirty with construction dust, cover the area near the wall with film or paper. Once all the holes are made, remove it immediately. Don’t leave cleaning for later; practice shows that no matter how carefully you work, garbage will definitely spread throughout the bathroom.
Make the holes a few centimeters deeper than the length of the plastic part of the dowels, otherwise you will not be able to insert them all the way, dust will interfere. First, drill the two outer holes, attach the profile, then fix it in several more places. The horizontal distance between the dowels is 60–70 cm.
The pitch of the lathing along the bathroom wall should be 40-50 cm
How to fix elements in one plane?
- Check the condition of the wall with a plumb line, pay special attention to the places where plastic profiles or slats are attached.
- Fix the two outer elements below the level and re-check their position. If there are large recesses where the profiles are attached, then use pads made of different materials. The dowels must attract the profile along the entire plane; there cannot be a gap between it and the wall at the attachment point.
- Stretch ropes between them, two at the ends of the profiles or slats are enough.
- Install all other profiles under the rope; use it to control the position of the slats.
Step 2. Installation of plastic panels
Installation of PVC panels for walls
Panel installation diagram
Take measurements of the wall in at least three places. If they have a spread of no more than a centimeter, then the work is noticeably simplified - all panels can be cut to size at the same time. To do this, you need to find out the shortest one and use it to cut all the others. Stack the panels in stacks of 5–10 pieces. on a flat plane and use a grinder with a metal disc to cut it. A discrepancy of up to one centimeter will be hidden by the ceiling and floor profile. It is installed at the top between the wall and the stream and at the bottom at the junction of the wall and the floor. Place plastic corners on the sides.
A starting corner is installed in the corner. Attaching the starting profile with a stapler. Installing PVC panels. The installation of panels in the opposite corner is completed by installing a special part - the finishing corner.
Professionals finish walls without corners and very precisely cut panels at an angle of 45°. But for this, in addition to extensive practical experience, you need special tools. They are expensive, and it is not economically feasible to buy only for finishing one bath.
Place the first panel and check its position. Everything is fine - secure it with clips. If you have wooden slats, then secure them with staples. Both options provide sufficient reliability of fixing the panels. The first one is mounted - install the second one, press it against the first one until it clicks. It indicates that the elements are connected by a lock. Continue working using this algorithm until the last plastic panel remains. Immediately insert the ends into the corners.
How to attach panels to clamps
Take the exact dimensions of the last panel and cut it lengthwise. You can cut with a mounting knife or grinder. If you use a knife, the operation must be done in two stages. First, cut the top and transverse stiffeners. Second - bend the panel, at the bend on the second side, use a mounting knife to completely cut off the required part.
Finish the remaining walls in the same way. Practice shows that it is better to make the area near the bathtub from ceramic tiles. You don’t have to cover the entire wall, just an apron. The main thing is to close the area that constantly gets water during water procedures.
Wall paneling
Video: Finishing bathroom walls in 1 day with plastic panels. Inexpensive DIY bathroom renovation
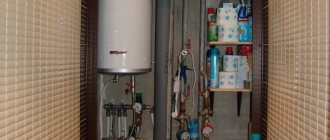
Installation of water supply
It is better to choose pipes from polypropylene. This is a modern material, it does not deteriorate or deform due to temperature changes.
Before installation, it is necessary to measure all the parameters of the bathroom so that there is enough material. It is necessary to install hot and cold water pipes and connect them to switches.
To hide wires and pipes, you can drill a place for them in the walls. And then, place the pipes there and plaster them. It is better to plaster the walls with a wide spatula. After filling, you need to wait 3 days, and then you can start laying tiles.
Design of a small bathroom in an apartment
If you are renovating a small bathroom, then a well-designed design will help make it stylish and comfortable. The correct design in a small bathroom depends on proper planning and selection of colors, which should preferably be in light colors. Since space is limited, it is necessary to carefully consider the location of plumbing fixtures and interior elements.
In old Khrushchev houses, the toilet and bathroom areas were separated by a partition. If your apartment still has this layout, we recommend dismantling it, thereby increasing the usable area of the room. Having completed this step, a common space will appear, the following techniques will help you properly arrange it:
- The entrance door to the bathroom should open outward;
- If the bathroom has a rectangular shape, then try to install the bathtub against a short wall;
- Refusal of a full bath and installation of a shower;
- If your bathroom has a sink, then you can choose its corner version;
- If you have a washing machine, it is advisable to either move it to the kitchen, or hide it in a niche in the wall, or purchase a top-loading washing machine, which takes up less space.
Interesting ideas for renovating a small bathroom are shown in the photo below.
Installation of water supply
If there are ceramic tiles on the walls, then the walls need to be leveled to make it easier to lay them. It is necessary to choose the right adhesive that will fit the tiles and will not deteriorate from moisture.
The glue is applied with a spatula, then leveled with a comb and a tile is placed on it, which needs to be pressed down. The tiles must be laid slowly, over the entire surface. The tile system on the floor is exactly the same.
Special crosses are inserted between the tiles to ensure that the seams are even and uniform. After we have laid our tiles, we need to wipe off any remaining adhesive from them.
Next, we stir the grout and rub the seams with a spatula, preferably a rubber one.
After the grout has dried, it is necessary to remove its remains from the tiles. When the tiles are ready, you can attach the faucets and heating pipes.
Many beginners do not know how to make a bathroom with their own hands. It is necessary to draw up a design project, which includes:
- The procedure for carrying out repair work;
- List of required materials;
- Sketches from several points;
- Detailed diagram of water supply communications;
- Dimensions of the room for equipment selection.
Where to start renovating a bathroom
Bathroom renovation always begins with a project, a work plan and the purchase of materials.
But depending on the reasons why the repair is being done, the action plan may differ.
Emergency repairs
Emergency repairs are urgent measures taken due to a flood, fire and other destructive circumstances. This cannot be foreseen, so the costs will be unplanned and the time to eliminate the consequences is limited. But even in such conditions, a plan is necessary in order to immediately purchase everything you need and complete the repairs in a short time.
The features of this repair are as follows:
- reduce timeframes: do not change the layout and do partial restoration only in areas of damage;
- take into account financial capabilities: buy materials within your means;
- attract helpers: acquaintances who understand repair issues, professional builders;
- remove excess moisture during flooding: the longer the structures remain wet, the greater the amount of damage;
- make a step-by-step plan and follow it.
In case of flooding due to the fault of neighbors or the HOA, it is necessary to draw up a damage report before starting work.
Scheduled repairs
It’s easier with planned repairs, because... there is time to save money, choose design and materials. The sketch should reflect not only the design, but also the location of plumbing fixtures and sockets. Materials must be purchased in reserve. The tile will have to be cut, so it will take slightly more than the square footage. When purchasing, you should check with the store whether you can return the leftovers and how to do it correctly.
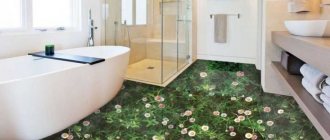
Ceramic tile bathroom
Some types of repairs require the involvement of specialists. Installing plumbing yourself and replacing pipes can cause leaks and then repairing the damage will cost more than the services of a plumber.
Major repairs imply the following sequence of work:
- dismantling of equipment and old building materials;
- dismantling partitions and boxes;
- surface preparation;
- installation of pipelines and sewer communications;
- solving the problem with electrical wiring;
- installation of plumbing (bathtub, toilet, sink);
- surface repairs (laying tiles, installing panels, finishing the ceiling);
- decorative details (curtains, shelves, etc.).
Major bathroom renovation.
Dismantling and reconstruction work is labor-intensive and costly; they can only be avoided in cases where the repairs are carried out from scratch. This happens in new buildings and private houses during commissioning. In apartment buildings, when they are handed over, they do not always even have a rough finish.
Small bathroom renovation
Small rooms have very little functionality, so in order to place all the necessary devices in them, you need to make a proper plan.
To ensure that the bathroom has everything you need, you need to arrange everything compactly. Make shelves above the sink and hangers on the walls nearby.
To visually enlarge the space, you need to use shiny wall cladding. It is better to make the ceiling in the bathroom glossy with your own hands and add mirrors to the walls.
The procedure for repair and finishing work
Preparation of materials
1) Select the types of finishing materials.
Having your sketch in hand, select tiles, ceramics, paint or other materials in the desired colors in the store/online.
There are a few things to keep in mind at this stage.
- If you plan to install a heated floor, the following coatings are suitable: porcelain stoneware, clinker tiles, terracotta enameled monocottura. Or laminate marked “for heated floors.”
- The monochromatic trend allows you to paint all walls and ceilings with waterproof paint. However, in this case it is better to decorate part of the wall near the bathroom or the wall of an open shower corner with tiles, wall panels made of colored glass or plexiglass.
- Using special online options, you can visualize different layout options for tiles or PVC panels, and quickly calculate the quantity and/or area of materials of the desired brand. That is, immediately complete steps 2 and 3.
An example of how one of these services works in the video:
- Please note that it is more practical to install PVC lining in the bathroom vertically.
2) Make markings on the walls.
Clearly mark the areas of floors and walls that will be covered with different types of finishes, and the areas of the floor where major plumbing fixtures will be located.
This will help you make thoughtful and original zoning and perform the next stage - calculation.
3) Calculate the finishing area.
And at the same time the cost of finishing slabs, paint, flooring. To this you need to add the cost of materials for rough finishing, which we will discuss below. At the same stage, it is worth ordering plumbing fixtures and the required volume of materials that will be delivered from afar.
Let's move on to practice. Bathroom renovations:
4) Ceiling preparation.
In most cases, finishing the bathroom in a new building starts with waterproofing the ceiling.
Initially, you need to repair small cracks (if any) and treat the ceiling with an antifungal compound. Then - with a mixture for penetrating waterproofing and paint, maintaining between all stages the time recommended by the manufacturers of the compositions.
If you are going to make a suspended ceiling, the painting step is skipped. It would be better to do the installation later.
5) Replacement or installation of communications.
Electrical wires are attached to the walls with clamps before the plastering stage.
Distribution boxes can be mounted on walls (in this case, nests are made for them) or on the ceiling if you plan to install a suspended structure.
If you are doing a comprehensive renovation in a new building, it is better to schedule this stage for the day when the wiring will be installed in the entire apartment.
As for water communications, installation and distribution of pipes is the only stage that is best left to the craftsmen. Especially if you are moving a bathtub or toilet, or completely renewing cast iron lines in an old home.
6) Preparing the floor.
In order to prepare the floor for decorative finishing, first perform the following operations:
- inspect the surface, repair small cracks;
- make two-layer waterproofing;
- insulate free areas of the floor (excluding areas allocated for a bathtub or shower);
- on a layer of insulation, make the following cake: two layers of polyethylene for additional waterproofing, concrete screed with reinforcing mesh;
- if you plan to lay a heated floor, it should be installed in those areas where you do not plan to place plumbing fixtures and furniture, in a screed;
- The screed with a heated floor is filled with an additional layer of self-leveling composition.
Depending on the type of solution and the thickness of the layer, the screed will dry from 4 to 14 days. After this, you can trim the base and proceed to the next stage.
If the project provides for a floor drain, it must be temporarily fixed at the design site before the stage of laying insulation and connected to the sewer.
7) Installation of the bath.
Two days after completing the flooring work, you need to install the bath bowl (if it is planned in the project) with a siphon connection.
If the bowl is made of thin steel, it is advisable to first trim it with foil-foamed polyethylene foam for noise and heat insulation.
If you plan to hide the bathtub with a decorative screen, you need to make a brick partition after this stage. Cover the screen later.
 Rough plaster walls.
During this stage, it is better to temporarily protect the floor screed with a sheet of plywood or chipboard.
In a new building, if possible, it is advisable to carry out this work in parallel with the rough preparation of the walls of adjacent rooms.
The plaster dries from 4 to 14 days, and you should start the next stage no earlier than this period.
9) Decorative wall decoration.
Since bathroom walls are most often tiled, we will describe the most rational technology for laying it.
- If the bathtub bowl is mounted near the wall, the first row of tiles is laid above its side.
- Then finishing should be continued from this row, from bottom to top.
- Lay tiles on the remaining walls from top to bottom, but do not add the last strip near the floor (we will return to it later).
10) Laying flooring.
If you are using traditional practical tiles, porcelain tiles or clinker tiles, start laying from the area under the bathtub to the walls.
A day after installation, grout the joints.
11) Laying the last strip of wall tiles.
Complete this step 2 days after finishing the floor. The slabs must be in contact with the floor covering.
12) Bathroom screen cladding.
13) Installation of a suspended ceiling (if it is planned in the project).
The frame of the suspended structure is installed when the walls are ready. However, it can be done before laying the floor.
14) Installation of sockets, switches, lamps.
15) Installation of plumbing fixtures (except for the bathroom bowl).
16) Interior decoration.
Only at the final stage are shelves, mirrors, hangers, and wall accessories installed in the bathroom.
Popular styles
A noble style is suitable for classics: white walls and ceilings, a large amount of space, bright light, exquisite decor and beautiful elements.
High-tech is a more modern style that combines simplicity and technology.
The design is dominated by cold shades, there is no decoration at all, the room is divided by glass or plastic.
Furniture should be simple and multifunctional. Here it is possible to decorate the bathroom with plastic panels with your own hands.
Examples of bathroom finishing with budget materials
In addition to wall tiles and suspended ceiling structures, there are other facing materials that are affordable and practical at the same time. Here are some options for using such materials.
1) PVC panels on the walls and ceiling.
2) PVC on the walls and aluminum panels on the ceiling.
3) Painting walls and ceilings with waterproof compounds.
4) Designer combination of PVC panels and waterproof paint on the walls and paint on the ceiling.
Let us tell you in more detail about the choice and methods of using such materials in the bathroom.
PVC plates and panels: features of selection and installation
Such slabs can be used for both walls and ceilings. They are usually easy to install, resistant to moisture and household chemicals, and easy to care for.
How to choose
- Decide what sizes and shapes of slabs will suit your design project. There are the following main modifications:
- in the form of wide strips (length from 2700 mm, width from 153 to 500 mm)
- narrow strips, or lining (length from 2700 mm, width 100 or 125 mm)
- tiled/square (from 300*300 mm to 1000*1000 mm).
- Choose dense and rigid products.
Most models consist of 2 plates connected by stiffening ribs.
The strength of the panel directly depends on its thickness (that is, the distance between the plates) and the density of the ribs.
The minimum required thickness for PVC walls is 10 mm. For ceilings it can be 5 mm.
- Please also note that wall lining is produced in a length of no more than 6 m. Ceiling lining can reach 12 m.
- When choosing plate panels in a store, immediately exclude batches in which the stiffening ribs are deformed, the front panel is translucent (ribs are visible), or the pattern is partially erased.
- There are also sheet single-layer panels, square and rectangular, often three-dimensional. They are often produced in interesting designs, like tiles, brick or wood, or with relief.
When choosing such models, also pay attention to thickness and density.
- At the same time, you can use sheet PVC panels only in a bathroom with smooth walls or on one perfectly aligned accent wall.
- If you choose PVC with a wood, stone pattern or any other interesting design, inquire about the technology of applying the pattern.
Laminated modifications, in which a film with a pattern is applied to the panel and then varnished, retain their aesthetic appearance for a long time. If the design is applied directly to the product, the quality is worse.
In addition, when purchasing two-layer panels, you can choose the type (pattern) of fastening the planks.
For finishing the ceiling in design projects, aluminum panels are often provided, which are more expensive and stylish. In some cases, their increased cost (compared to PVC lining) is justified. They retain a beautiful shine for a long time, do not deform and can be used with powerful lamps (unlike plastic ones).
How to mount
To fasten two-layer panels, a frame is usually made, wooden, metal or plastic.
Nowadays, it is best to use specially designed plastic strips for such a frame. Convenient latches (clasps) on them allow easy installation and dismantling, with a minimum of components.
The second method is gluing the panels.
If you want to place plastic lining vertically on the wall, first secure guide profiles around the perimeter of the floor and ceiling.
The panels are adjusted to each other using these profiles. And to attach to the wall, you can use waterproof glue, liquid nails or silicone sealant.
PVC sheets are attached only using the adhesive method. It is best to purchase a special adhesive produced by a brand of slabs.
Bathroom paints: composition and types
Paint is an alternative inexpensive material for finishing a bathroom. It can be applied only to the ceiling, to part of the walls, or to all walls and ceiling.
First of all, water-based paints with the addition of latexes, cheap synthetic ones or expensive ones of higher quality, are suitable for baths and toilets. Thanks to latex, a uniformly colored, moisture- and steam-resistant layer is formed.
This group contains the following main types of paints.
- Acrylic. These are the most inexpensive mixtures, in which cheap latexes predominate.
- Latex. If there is such a marking on the packaging, the composition is dominated by expensive, higher-quality latexes.
- Acrylate, or 100% acrylate. This type also includes high-quality paints, more dense and viscous than acrylic ones, and very resistant to water vapor.
High-quality and abrasion-resistant latex paints are more profitable than cheap acrylic ones. Their high cost is compensated by their long service life and ease of maintenance.
But remember: even when using the highest quality paint, the walls near the shower, bathtub and washbasin must be finished with tiles or glass panels.
Romantic style
Romance lies in coziness and comfort; furniture should be elegant. The cabinets should have carved patterns or hand painting. Woven rugs will be popular.
If the bathroom is spacious, then you can place a chair with a soft back in it. Romantic style is associated with beauty salons. It has a similar atmosphere and elegant interior.
Ideas for renovating a bathroom with your own hands can be different, the most important thing is to calculate and choose everything correctly.
Where to start: basic preparatory work
Procedure for work in an old house
1) Objectively evaluate the location of the plumbing fixtures.
And at the same time – convenience of planning.
What to leave in place? What's better to move? How can you make the room area more ergonomic and comfortable for everyone?
Perhaps a spacious cast-iron bathtub can be restored and organically fit into the new interior? Or expand?
2) Develop a new design project.
Draw a detailed sketch of the future interior for water procedures on paper or (which is preferable) order/make a visualization in a special computer program. Think through everything in detail, taking into account the plumbing and fittings that will remain.
Ideas for inspiration can be found on our Kvartblog here and here.
3D visualization, of course, will save you from unexpected inconveniences. But if you change the location of the plumbing, plan to demolish or, conversely, make an additional partition, it is better to discuss the new plan with a specialist from an engineering company. Moreover, it is advisable to immediately ask for advice regarding further installation of electrical wiring.
3) Remove any plumbing fixtures that need to be replaced.
Old cast iron pipes must also be dismantled.
4) Remove old finish.
In a house built before the early 2000s, it is advisable to completely clean the walls and remove the old flooring. And in addition, before finishing, cover the wall with light partitions.
This is, firstly, due to the fact that in old buildings the bathroom and toilet were made in a compartment built using harmful asbestos cement.
Secondly, in any case, fresh, modern finishing materials will look better in the new interior.
5) ...And old electrical wires.
They can be left only if the new wiring system is external.
Procedure for work in a new building
1) Develop a project.
In a new apartment with a spacious bathroom, you have the opportunity to think from scratch about convenient zoning, a plumbing layout plan, and introduce new design features.
2) Design a plumbing diagram.
This stage complements the previous one. You can use a special computer program that will draw up a diagram of communications and heating for you and simplify some of the work.
Repair process
It is best to create a project where all dimensions, number of handles, shelves, and so on will be indicated.
It is important to carry out repairs in stages so that everything has time to dry and prepare for the next stage.
Communications in some apartments have to be updated, so it is important to pay attention to them and check whether they work well.
Make a plan for the upcoming work
Of course, every person who has never engaged in such activities is thinking about where to start renovating a bathroom . Initially, it is best to think about making a plan for the work that lies ahead of you. Planning.
The first step is to gather information. Seeing before and after photos of a bathroom renovation can also be quite useful for beginners.
Visit friends and acquaintances. Find out more information from the Internet. You need to assess the scale of the work, calculate all the financial expenses that lie ahead of you.
Ideally, it is best to turn to professionals who can create a future model of your bathroom on a computer. Make a table that clearly outlines all future financial expenses.
DIY bathroom photo
Source.
The best ideas for decorating a bathroom
If you still don’t know what kind of bathroom you want in your house or apartment, then it’s best to ask this question first. First of all, start looking at designer websites that have photos and videos of exactly the bathrooms that you like most.
You can also visit special showrooms that feature bathrooms, and among them you can choose exactly the option that will be closest to you.
Which bathroom design to choose
If you make repairs yourself, you need to be prepared for many difficulties. All this can also be perfectly combined with each other.
To choose a beautiful bathroom design made by yourself, you must initially do a lot of work to choose exactly the style and design that will be combined with the entire living space as a whole.
- Modern bathroom design 5 square meters 2021
- Design of a bathroom with toilet and washing machine 4 sq. m
- New bathroom designs for 2022 - 170 photos of the best design solutions. See the exclusive and stylish design of a modern bathroom here!
A bathroom today can be designed in a variety of styles, from modern to high-tech, from Provence to classic. The main thing is not to be afraid to experiment and then you will be able to create exactly the kind of bathroom you have always dreamed of, and on your own.
What renovation to do in the bathroom depending on its design and style
What interior design should you choose for your bathroom? This, first of all, depends on the size of the room itself. What exactly the owners prefer is not the most important thing in this case. In a small room, for example, renovation in a classic style will not be possible. A minimalist style is perfect for such a bathroom and toilet. Let's take a closer look at what textures and colors of materials can be used when renovating a bathroom.
Minimalism is a suitable style for a small room
The minimalist style is ideal for a small bathroom; its name already speaks for itself. This choice presupposes the presence of a minimum number of things and objects with maximum comfort.
An important point: this design is perfect for a large bathroom. If you prefer a similar interior style, then this is a great solution for your bathroom if you are thinking about what kind of renovation to do in it so that it turns out beautifully and inexpensively.
Minimalism involves the absence of unnecessary decor and decorations; nothing will distract you while you are in the bathroom. Pay attention to this style if you dream of spending time calmly and harmoniously in this room. Then only the most necessary furniture and plumbing will be at your service.
Recommended articles on this topic:
- Arrangement of a small apartment
- Stages of renovation in an apartment
- Turnkey cosmetic repairs
This laconic style is characterized by light, clean and fresh interior colors. Together with the use of stunning textures, this makes it possible to implement interesting design solutions, with the help of which you can even visually expand the space of your bathroom and toilet.
When renovating a room, you don’t need to focus on any one color, such as white. It will be quite monotonous and boring. A variety of decorative elements or exquisite plumbing fixtures will help you add some bright touches to your interior. Hang different colored towels, an unusual plant or furniture in a contrasting color.
You just need to remember that you shouldn’t use more than three colors at the same time in interior design, it will be unnecessary, because everything is good in moderation. Choose suitable color combinations, guided by the well-known color rule, or maybe you will find some ready-made option for renovating a minimalist bathroom.
Modern Bathroom Styles
Also, we must not forget about the fashion trends that exist today in the modern market. For example, at the moment the Scandinavian style is very fashionable, which can often be found in many design magazines.
This unique style is characterized by simplicity and modernity with innovative technology, without which it is difficult to imagine the life of a modern person. This style contains ethnic patterns, various rhombuses and geometry, which is expressed in every detail.
Key elements of bathroom decor
Sink
Today, hanging laconic sinks with geometric shapes are in trend. The absence of a pedestal saves space, adding a feeling of airiness and spaciousness. A spectacular shade and expensive countertop material (wood, marble) are a worthy decoration for the bathroom. A more economical and durable option is artificial stone. Glass countertops look stylish and modern, but they get dirty quickly and are not as durable as stone or wood.
Stylish modern countertop with contrasting shades
Compact wooden tabletop does not take up much space
The outer part of the sink can be decorated with your own hands using vinyl moisture-resistant stickers, drawings and mosaics.
Painting bathroom fixtures
An easy way to freshen up your decor is to use sink decals
To replace the usual pedestal, improvised means are also suitable: a high stool, an elongated stump, pallets, a metal barrel or an antique bedside table.
Ordinary pallets make an unusual eco-style sink cabinet
Pedestal for sink made of metal barrels
buybuy
Decorative barrel pouf Chanel No. 5
buybuy
Decorative metal barrel “Tiffany”
Tip : A classic white sink will sparkle in a new way with a striking retro-style copper faucet.
Shelves
If niches eat up a lot of space, then it is convenient to store bath accessories and bathroom decor on narrow racks and open shelves. When sharing a bathroom, the space above the toilet often remains unused - why not place a couple of shelves there?
Light wood shelves go well with a black and white bathroom interior
Practical use of space above the toilet
Tip : High shelves will draw the eye upward, creating the illusion of more space.
Tiny bathrooms benefit from storage in the corner, under the ceiling, and along the bathtub. Shelves along the entire wall area are a bold solution that adds texture and volume to the space. To update the decor, it will be enough to change the accessories along the walls.
An elongated mirror and corner shelves directed upward visually make the room taller
Shelves around the bathtub enhance the texture of the walls and make it easy to change the decor
Convenient open mini-shelves around the sink - everything is at hand
Paintings and inscriptions
Several succinct and bright phrases from volumetric letters, inscriptions or posters on the wall will become an original decoration for the bathroom. Letters with LEDs will serve as an additional source of lighting.
A strict black and white interior will be complemented by a laconic poster
Nautical themed bathroom signs
It is advisable to place a gallery of paintings and photos away from wet areas and protect them with glass frames. A practical option is to transfer your favorite image to a base made of wood or plastic. But remember: too much wall decor can visually narrow the room.
Wide brims and simple frames match the overall color scheme of the bathroom
The dark background of the painting on the far wall of the bathroom gives the effect of depth
Lighting
A massive hanging chandelier is a luxurious sight, but not for small bathrooms. It is better to replace it with several spotlights placed around the perimeter and in key areas.