Types of arches
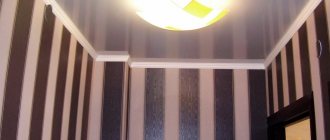
Interior or corridor arches can have different shapes. They differ mainly in the shape of the upper part and sometimes in the way they are connected to the vertical parts. Their main types are presented in the photo.
Types of interior and corridor arches
This group lacks one of the most popular recently - the half-arch. They have a rounded corner only on one side, on the other it remains straight. This is where the name came from - semi-arch. It looks good in modern interiors: minimalism, hi-tech, maybe art deco.
One of the options for a semi-arch in the interior
The classic is distinguished by the correct shape of the top. This is strictly a semicircle, the radius of which is equal to half the width of the doorway. This type looks good with an opening height of at least 2.5 m. It fits well into any interior, but looks best in a long corridor, or instead of the entrance door to the kitchen.
A classic arch requires a height of at least 2.5 m
An arched opening in the Modern style is distinguished by a small radius of curvature and a sharp transition at the junction with the vertical components of the opening. It looks good if the walls and ceiling have a more or less simple design. Looks great in place of the former balcony door, good at the entrance to the office.
Art Nouveau arch on the site of a former balcony door
The “Romantic” style arch is more likely to be simply rounded corners (mostly masters call it that). Looks good with a large width and not the greatest height.
The “romantic” shape is good with large width and small height
The “ellipse” shape is very close to “romance”. It differs only in greater curvature in the middle part. Also suitable for low and wide openings. It just looks a little softer.
Suitable for openings of large width and not very high height
Trapezoid is a non-standard design consisting of broken lines. It is difficult to play out in the interior, therefore it is used infrequently: for some non-standard designs.
One of the design options is trapezoid
It is very similar to an ordinary opening, and that is essentially what it is, only without the door leaf. For greater originality, it is often accompanied by wooden carved elements in the form of columns on the sides. In this form it is good for classical interiors, as well as ethno-style - Greek or Roman, depending on the type of columns.
Portal with wood frame
For decoration in modern styles, they use another example - next to the main arch, smaller portals are located. This technique allows you to “beat” a simple form.
Another version of the “portal” arch
Before you start making an arch, you need to decide on its parameters. select the type, and then the parameters: where it will start, and what the radius of curvature will be. It could be a really sharp bend, or it could just be some rounding of the corners.
Rounded corners in standard doorways look better than steep arched curves
To understand how your chosen shape will look, you can cut out a template from cardboard and attach it to the doorway. Evaluate the effect. If everything suits you, you can make a blank using this template. But only one - for one of the sides of the opening. The second one needs to be done in place, otherwise it will turn out crooked.
Functions
Before you begin installing the arch, you need to decide what role it will play in your hallway.
An arched ceiling can serve as:
An original element of the interior - the structure is made from various materials, non-standard shapes using lighting, additional decorative elements, ornaments, carvings.
A method of zoning rooms - an arch looks much more impressive than a door and does a better job of zoning rooms.
Correction of the room - the corridor does not always have the desired shape. With the help of an arch in the hallway you can visually make changes. Expand a narrow room with an arch with rounded corners; a round one transforms a room with a low ceiling.
Attention! The arched element not only transforms the room, it is useful and looks very beautiful. To do this, it is important to choose the right materials and shape.
Step-by-step instructions with photos: the fastest way
Do-it-yourself plasterboard arches are made in different ways. This takes a minimal amount of time. Having decided on the shape, we proceed to installation. We attach a frame to the prepared opening, cleared of peeling plaster and relatively leveled, according to the dimensions of the future arch. It is made from a drywall profile or a dry wooden block of a suitable size. Sometimes, if the wall is narrow, you can only choose wood.
A profile frame is screwed to the selected dimensions
To begin, we cut out a rectangle from drywall to the size of the future arch, find its middle, mark it, and then temporarily screw it into place. We retreat from the edge 12.5 mm - the thickness of the plasterboard sheet. If the adjacent walls are already plastered, add a couple more millimeters of putty so that the surface can be leveled.
Screwed the drywall into place
Now we take a piece of profile or hard corner and set aside half the width of the opening from one edge. At this point we make a hole in the corner and insert a nail into it. We stick this nail into the middle of the doorway we marked earlier on the sheet. It turns out to be a kind of compass, with which it is easy to draw an ideal line.
Device for outlining an arc
By changing the mounting height you can get a more or less high arch. If you need a flatter curve, increase the length of the “compass”.
Using a corner we draw an arc
Having removed the sheet, we cut out an arc along the outlined contour. This can be done with a special drywall saw, a metal saw with a fine tooth for a smoother edge, or a jigsaw (there will be a lot of dust). If the cut is not very even, smooth it out using sandpaper attached to a grater. With this device we achieve a perfectly even curve of the shape we need. We fasten the cut fragment of the arch - the side wall - back into place.
We fix the cut out fragment
If everything is smooth, there are no distortions or irregularities, on the other side of the opening we attach the same sheet of drywall as a few steps earlier - a rectangle or square, depending on the shape. It must be fixed strictly vertically. Now we transfer the shape of the arch onto it. We take a square, at a right angle and press one side against the drywall, onto which we transfer the arch, and the other side against the arch. Having aligned the square perpendicularly, mark a point with a pencil. We make such points along the entire arc. The more often they are done, the easier it will be to draw the line and the more accurate the match will be - the less you will have to grind down.
Transfer the arch shape to another sheet of drywall
Why is it so difficult and not just to make a copy of the first sheet? Because few openings are symmetrical. As a result, installing the second sheet so that the lines of the arch coincide is very problematic.
Having marked all the points, remove the sheet, draw a line, and cut along it. We install it in its original place. Now we take the smoother again with sandpaper and now we smooth both edges until they match completely. One point - the trowel should be wider than the opening so that both walls of the arch are captured in one pass.
Level both walls at the same time
We measure the length of the arc, cut out a piece of the profile of the same length, make notches on the walls every 3-4 cm. This tape will need to be secured along the arch arch on one side and the other.
How to cut a profile for an arch
We fasten it with self-tapping screws, carefully, pressing the profile and holding it with a block, not with your fingers: it’s easy to get the screw into your fingers. By the way, you need to wear gloves when working with the cut profile. If you don’t, you’ll definitely cut your hands.
We fasten the notched profile, simultaneously giving it the shape of an arch
By the way, the back of the profile can be aligned along the edge - it’s easier to work this way, but the joint will still have to be sealed later. Screw the strip to the other side in the same way.
This is a bottom view - profiles are attached to the sides
There is a second way to attach the profile - attach it to a quick-setting universal glue, such as liquid nails. This method is acceptable if the opening width is small. If the arch is thick, the glue may not be able to withstand the mass of drywall that will be attached from below.
The next step is to attach the jumpers. First, the depth of the arch is lost, 1-1.5 cm is subtracted from it. This will be the length of the lintels. Cut profile pieces of this length.
Jumpers are cut from the same profile
At the places where the jumpers are attached, the “petals” are cut off, and the prepared fragment is installed and secured. It should not rest against the walls, it should be located approximately 5 mm from the back. Jumpers are needed to make the structure more rigid, otherwise it “walks” when pressed.
Fastening jumpers
Next, you need to cut out a rectangle from drywall that will cover the structure from below. Its width is determined simply - from the outer edge of one sheet of plasterboard to the outer edge of the second sheet. The length is measured with a flexible tape (can be a tailor's tape) or a tape measure with an assistant. We attach this sheet with self-tapping screws to the arch frame. The sheet has to be bent, but read how to do this a little lower - closer to the end of the article.
We attach a strip of gypsum board to the arch
Next came the finishing work: a special corner is attached to the corner, everything is puttied using the usual technology: first the starting joints and corners, then the finishing one.
Required tools and materials
Artificial stone in the interior of a hallway, kitchen, bedroom, loggia: photo + instructions for decorating walls
Before starting work, you should prepare all the necessary tools and materials. Let's start with the last ones. First of all, naturally, you will need a decorative stone. Considering the fact that the work will be carried out indoors, you can use both natural and artificial stone, since in this case the resistance of the material to “external irritants” is practically unimportant. So you can choose a stone based solely on your aesthetic preferences and financial capabilities. In addition to the stone itself, you will need glue or mortar, a primer, grout and a special composition to protect the walls from moisture - a water repellent. Also, putty can be useful for preliminary preparation of the surface of the arch.
A knitwear motif appears many times, most often consisting of two ribbons. Tympanons of windows, oiled vine leaves or knitters between two lines are filled with fantastic and real animals and birds and religious scenes. The flat relief, somewhat reminiscent of woodcut, is close to the popular motifs of embroidery and lace.
Some paintings survive in some Moravian group churches. The most significant are the frescoes of the Temple of the Savior in the Ravanica monastery and the Church of St. In Ravanica there is a wonderful fragmentary surviving group portrait of the founders of the temple: Prince Lazar, his wife Milis and sons Stefan and Vuki. “The Entry of the Lord into Jerusalem” on the frescoes of this temple develops against a complex architectural background and turns into a truly mass scene. The elongated figures excel in their softness and grace, the linearity is enhanced in their rendering, and the brush painting style appears here for the iconostatic design.
The tools you will need are a building level, a spatula, a construction mixer, tile nippers or a cutting machine, a trowel, a bucket, a tape measure, paint brushes, a metal brush, a rubber mallet, plastic or wooden wedges of the same thickness, and for the final finishing – a household spray bottle.
Serbian wall paintings retained their high artistic qualities during this period. The last Serb battalion in the battle against the Turks was the Smederevo fortress on the Danube: an impressive defensive structure consisting of two rows of brick and stone walls. After the conquest of Smederev Turk, construction in Serbia was not yet over, although it was greatly weakened.
Serbian medieval art played an important role in its time. Particularly noteworthy are the centuries that are of paramount importance for the art of all of Eastern Europe. Serbian painting, full of emotional tension, opened up wonderful opportunities for artists to express human feelings and passions. The introduction of new iconographic themes and types allowed Serbian masters to capture far beyond the real world, without going beyond religious canons. Serbian art has enriched the iconography of many countries.
Having prepared everything you need, you can begin work on decorating the arch with stone, which should begin with careful preparation of the surface.
Arched opening made of plasterboard: second method (photo report)
This method is good if the thickness of the partition is small: try attaching the profiles if the gap between them is several centimeters, and then attach the jumpers. It all starts the same way: the first wall of the arch is cut out, attached and transferred to the second sheet.
First we also cut out the sides
Afterwards, wooden crossbars are cut along the width of the gap between the two sheets, which are attached along the edge of the arch with self-tapping screws.
Insert wooden blocks cut along the width of the opening
The cut strip of drywall is fastened starting from one of the sides. To make it more convenient, you can fix it with clamps, since the thickness of the wall is small. When attaching the strip, you can use the self-tapping screws that were used to fasten the bars. This way you will definitely hit the crossbar.
Using clamps, the strip can be fixed
Then all that remains is to secure a special perforated corner in the corner and smooth out the unevenness.
A corner is attached to the arch arch, everything is puttied
Putty allows you to hide all the flaws
It is also more convenient to smooth the dried putty along the arch arch with the entire plane of sandpaper attached to a grater. It’s unpleasant that dust falls into your eyes, making it almost impossible to work without glasses.
DIY plasterboard arch is ready
Preparation of adhesive solution
Decorative stone can be laid using special glue, cement-sand mortar, or liquid nails.
The quality of adhesion of the finishing material to the base depends on the roughness of the back side of the tile and the quality of the adhesive mixture. If you need to prepare the solution yourself, you need to do this in small portions, since it sets quickly enough, losing its properties. You need to mix the powder and water in a convenient, capacious container using a mixer (this can be a drill with a special attachment). You need to mix until you get the consistency of thick sour cream.
How to make an arch instead of a door: method three - typesetting technique
Another way to make arches from plasterboard with your own hands is by typesetting. The arch is divided into segments and assembled from pieces that create a curvature close to the required one.
The arch is assembled from plates cut from plasterboard
They are attached to putty diluted with a mixture of PVA and water. This batch dries quickly, so first we cut the plates and try them on. You can fold it on a table, but the vault will turn out upside down, but it will allow you to evaluate how correctly the plates are assembled.
Side view of the arch opening
Then the plates begin to be attached to the opening, periodically strengthening them with self-tapping screws for reliability. Place washers under the heads so as not to push through the cardboard. Remove excess putty immediately. If it gets stuck, it’s impossible to tear it off. The finished surface is treated with a primer to improve adhesion (adhesion), and then puttied, leveling the arch. To make it easier to display, you can use a template attached on both sides.
A putty arch looks like this
Making sharp bends using this technology is not easy, but for rounded corners and semi-arches it is a great way to do without profiles.
Laying
Laying is done from bottom to top. You need to start from the corner of the opening-wall. The seam should be left approximately 4-5 mm. If corner stones are used, they must be glued from below. If flat ones are used, the installation should be done with an overlap.
During the procedure, you should not forget to check the horizontal positioning. Elements on the arc can be trimmed to maintain the required radius. This can be done with wire cutters or a grinder with a special attachment.
The edges must be sanded using a file. When the finishing is completed, you need to wait for the solution or glue to dry. After this, you need to start refining the seams. For these purposes, we use grout of the appropriate color. To perform the procedure, it is better to use a construction syringe. Otherwise, you can use a rubber spatula. You can make the tool yourself. To do this, cut a square piece of polyethylene, roll it into a cone, and secure it with tape. The tip of this element must be cut so that the resulting size corresponds to the size of the seams between the stones.
Related article: How to sew curtains for a balcony with your own hands
How to bend drywall
One important detail: standard wall plasterboard does not bend well. For curved surfaces, they specially came up with thin ones - 6 and 6 mm thick. This bent part is easier to make from it. With a slight curvature, such a thin sheet can bend easily and without tricks. If you don’t want to buy thin GVL, there are two ways to bend the standard one.
The first is to take a needle roller and roll the cut section well on one side. You need to roll with force so that the plaster breaks. Then the leaf is soaked in water and left for two to three hours. After such procedures, it should bend quite well. You take it, fix it on one side, and gradually press it against the arch frame, bend it, gradually screwing it along the edges with self-tapping screws. The method is not bad, but if there is a lack of experience and insufficient processing of the gypsum, the sheet may burst. You will either have to mask the gap later, or start over.
Roll the strip with a roller with needles
The second way to bend drywall: on one side, make notches with a knife approximately every 4-5 cm. The notches should cut the paper. This strip is also gradually fixed, breaking the plaster as necessary. It bursts along the cut lines with light pressure.
Notches on one side make it easy to break the plaster
Advantages of artificial decorative stone over natural stone when creating an arch design
A photo of an arch made of decorative stone in an apartment can be found on the Internet. This type of material has a lower cost than natural one. In urban environments, it is optimal, saves space, has a wide range of colors and shapes, and is suitable for both interior and entrance structures. It also has the following advantages:
- no rot, corrosion or fungus occurs;
- lighter in weight than natural;
- For care you only need a non-abrasive product and water;
- creates a cladding that does not differ in appearance from natural stone;
- You can handle the installation yourself;
- protects against mechanical damage, closes joint corners and internal openings.
The price for such material is affordable. You can decorate the vault with a large number of stones without worrying about financial expenses.
DIY finishing
Decorative stone finishing is carried out in accordance with architectural standards. Compliance with them ensures correct proportions. Basic Rules:
- The opening is lined evenly. The top is never more massive than the bottom.
- The curvature of the edges of the opening is taken into account, the seams and the relief of the stones need to be monitored so that they look symmetrical.
- The decor of the opening should have a finished look - the finishing is formed symmetrically, especially in the absence of a door frame.
- The stone is complemented with products that suit the style - rough wood, polished panels, etc.
DIY finishing options
What do experts advise?
To make the masonry look more natural, in some places the building can be diversified with decorative chips. To do this, draw a line with a knife and bite small pieces of stone along it with pliers. Then file this area.
DCs of different sizes can be alternated. Make sure that the tile joints do not match from row to row. If the finishing does not start from the floor, you need to secure the auxiliary profile and remove it when the structure is completely dry. To make the corners clear and even, they need to be processed with a grinder and a diamond wheel.
To ensure that the arch does not lose its attractiveness, it can be treated with acrylic varnish.