A bar counter is a rather unusual decoration for any home. You need to know some rules about what to combine with and how to use this piece of furniture in the interior. You can make a bar counter from a tabletop with your own hands. To do this, it is enough to know some simple rules.
Kitchen design with a bar counter.
Every person wants to create a cozy corner in their home where they can rest and unwind after a hard day at work. Therefore, a large countertop in the kitchen is one of the best options.
Designers offer many solutions for the proper distribution of free space. A bar counter will fit well into any room, help save space, and also add some unforgettable charm.
Of course, you can buy a variety of product models. But making furniture with your own hands is much more interesting. Especially if you do it with your family.
You can easily make a bar counter for the kitchen with your own hands.
By making a bar counter from a tabletop with your own hands, you will definitely surprise your guests. It looks stylish, comfortable, and adds some zest to what is happening. Here you can relax and have a good time, as if you were in some expensive establishment. Some people consider making a bar counter something complicated, but it is a fairly simple procedure that is accessible to everyone.
If you have previously tried to make something yourself, then it will not be difficult for you to make a bar counter. To do this, just read the step-by-step guide and choose the appropriate option for yourself.
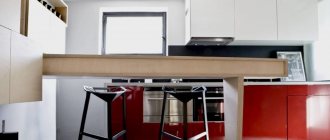
The bar counter adds some zest to the kitchen design.
Features of a DIY bar counter
Usually the bar counter is placed slightly higher above the floor than a regular table. If you make a product approximately one meter high, then it will be much easier for you to purchase separately high chairs. We should not forget about the size of the plumb line when making the tabletop.
Original bar counter with chairs in the interior.
A mandatory attribute of the bar counter is a cabinet, which is located in the upper part. Typically it serves the following purposes:
- do not allow spilled liquid to get on clothes;
- ensure correct position behind the counter;
- Gives a modern look.
Additional Information. A cabinet is an optional element of the bar counter, but it will help give a special atmosphere. There should be at least sixty centimeters left to the bar counter. This will allow you to sit comfortably and will not create additional discomfort. The railings are made of simple material that is not very expensive. In original models they are usually made of metal, which significantly increases the cost of the structure.
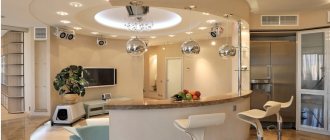
Bar counter in the interior of a modern kitchen.
To make a bar counter yourself, you should adhere to the rules listed above. It is also recommended to review the drawings for clarity.
See also Bar counter for the kitchen: main types.
Deciding on the form
Take a stroll through the cafes and bars adjacent to your home. Pay attention to how different bar counters can look. We assure you: in the kitchen the variety of types and forms of bars is even wider than in catering establishments.
Bar counters can be very diverse
Choose based on the design style, dimensions and configuration of your kitchen to create a truly organic interior into which the bar counter will fit well.
The most traditional option, which is most often used in home kitchens, is a straight wall-mounted bar counter. To some extent, this is an alternative to a kitchen peninsula. One of the ends (most often narrow) rests against the wall. This type is ideal for zoning, which is why it is often used in studio apartments. These racks are often installed to replace a dining table - however, in this case, you will lose some of the usable space that can be used for storage.
A bar counter against the wall is the most traditional solution
An interesting option for a small kitchen is to turn the window sill into a bar counter. Just extend it a little and you have a compact and convenient bar. If the family is not too large, such a counter can fully replace the dining table, while simultaneously working as an additional work surface.
A window sill can be an excellent basis for a bar counter
Under such a bar you can hide a battery and create a place to store various small items that are not too demanding on temperature conditions - this can be very important during the heating season.
As for the window opening itself, you can install small shelves on the sides. For example, for wine bottles, tea and coffee. However, there are many options for using these surfaces - even bookshelves. It all depends on your desires.
An additional bonus is the beautiful view from the window. If, of course, this is provided for by the location of your apartment.
Nowadays it is popular to combine a kitchen with a balcony or loggia (by the way, these two concepts should not be confused - these are completely different types of extensions). You can make things a lot easier if you transform the partition between the kitchen and the outdoor space into a breakfast bar. This way you won’t need to break out the entire wall - just open part of it.
Stylish and convenient solution
You can decorate such a bar counter in any style - it will look extremely impressive, no matter what design you choose.
And designing the rack itself will be much easier than coming up with it from scratch - you already have the base ready. All that remains is to decide how you will decorate the lower part and put a suitable tabletop.
Bonus: such a bar counter will provide you with excellent implicit zoning: on the one hand, the lounge area or dining area on the balcony will be separated from the kitchen area, on the other hand, the transition will look natural and organic.
Often a kitchen peninsula is turned into a bar counter. You can read more about this in the corresponding article. It should be noted that this technique is extremely convenient - in addition to the bar, you also get an additional work surface.
Turn your peninsula into a breakfast bar
This solution is very convenient for small kitchens - there is no need to think about where to put the bar counter. It is a natural extension of the kitchen set.
If you have a large, spacious kitchen, it makes sense to think about an island bar counter. The free-standing structure will definitely attract attention. True, such a solution is not suitable for every design style - for example, for minimalism or boho, a counter in the middle of the kitchen may seem like obvious excess.
You can use the lower part of the structure to your advantage. For example, arrange additional shelves there for storing various kitchen utensils. Often, mini refrigerators or microwaves are installed in such bar counters. The scope for imagination is unlimited - this design allows for a wide variety of experiments.
An interesting solution is combined bar counters. They are most often installed in two cases: if the kitchen is small and you want to make a bar in it, or if your family has children or old people who are not very comfortable sitting on high chairs.
An excellent choice for a large family
A combined rack is a structure that is installed on a work surface or dining table. Thus, you get two in one - a table or part of the set, equipped with a miniature bar counter.
Tip: In a studio kitchen, such a counter can be used to separate the kitchen and the room. Install the structure with its low part towards the kitchen area, and the bar counter towards the room. Simple but very stylish.
What can you make a bar counter from?
You can make your own bar counter from various materials. You should not choose options that are too bulky. Most kitchens are small, so don't push yourself around during the construction process. It is recommended to opt for democratic models.
The most popular materials for countertops are:
- Plastic. The cheapest material that is not durable. On the market you can find different colors with a variety of prints. Fits perfectly into any environment.
- Chipboard covered with laminate. A more complex material to process, which is characterized by high strength, reliability and durability. There are many different options. The coating imitates wood or marble.
- Drywall. Various sizes, shapes, styles are available. Will fit perfectly into country houses or modern apartments. Can be painted in any color to suit any interior.
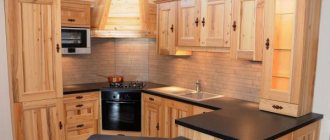
- Tree. Looks beautiful and luxurious. The cost of the material differs depending on the type of wood. Making a tabletop with your own hands will be easy if you have minimal carpentry skills.
Handmade wooden bar counter.
See alsoDesign of kitchen-living room 16 sq.m. m., photo.
Color solutions
Here we have no right to advise you anything: it all depends on the design style and color scheme of your kitchen. Look at the photo selection at the end of the article to find interesting solutions.
Have you decided what your bar counter should look like? Move on to what surrounds her!
Types of bar counters
Depending on the design features, the following types of products are distinguished.
- Stationary. Maximum or minimum dimensions are possible depending on needs. Traditional bar stools are suitable for seating. You can also add footrests, backrests, and headrests.
- Combined. It is possible to complement the basic design with a dining table, which will fit perfectly into an ordinary kitchen. The height is usually slightly lower than standard and reaches nine hundred centimeters. You can use a standard chair for sitting.
- Two-level. Also used in conjunction with a regular kitchen table, which allows you to divide the space in the kitchen. For example, one part will go into the kitchen, and the second into the living room, which saves free space and allows you to effectively use the entire room.
Design of a two-level bar counter in the kitchen.
See alsoStandard sizes of kitchen tables.
How to make a bar counter from a countertop?
The whole process takes place in several key stages, including:
- preparation of materials and creation of a general design diagram;
- making a base to which the remaining elements will be attached;
- assembly and decoration.
Note! Particular attention should be paid to the manufacture of the tabletop. This is the main element, on the quality and stability of which the quality of the entire product depends. You can buy a ready-made countertop or make it yourself if you wish.
The countertop for the bar counter can be made from different materials.
See alsoKitchen design with a bar counter
Material selection
The most optimal options for use:
- Chipboard. The cheapest option. There are many different options for processing. It is very light and can be coated with varnish or paint. The main disadvantage is that chipboard sheets are sensitive to high humidity. Therefore, it is not recommended to use them in rooms where liquid may get on the surface. Buy only thick sheets of this material to increase their service life.
- Tree. Environmentally friendly material with an attractive appearance. Suitable for installation in almost any room. The cost of such structures is high, since natural wood is highly valued among fans. This type of countertop requires careful care. It is not recommended to place hot dishes to avoid damaging the top layer.
- Glass. These countertops look the most elegant. They have an attractive appearance. The structure is very fragile, which requires special attention when caring. Scratches and small specks often remain on the surface, so it is worth using specialized surface cleaning products.
- Stone. Both natural and artificial products are suitable. They are distinguished by high strength, reliability, and pleasant appearance. Virtually indestructible due to its robust construction. The cost of natural stone is much higher than other materials. At home, it is almost impossible to process without special skills.
- Plastic. Features a large number of different colors. The most popular option on the market. Characterized by ease of processing and care. Service life is short.
Bar counter frame.
See also DIY kitchen panels: 9 original ideas
Creating a Project
First you need to prepare a model and drawing. The final complexity of the project, as well as the time spent on manufacturing, depends on which scheme is chosen, as well as on the materials.
Take measurements of the room in which you are going to install. Be sure to take into account the dimensions of other furniture in the kitchen in order to allocate space for placing the countertop. The drawing will allow you to create a clear picture of the result you want to achieve.
You can use special modeling applications. This will significantly simplify and automate the entire process. This way you can look at the situation from all sides and choose the best option for yourself.
Before you start making the bar counter, you need to prepare a project.
Thus, the model will allow you to create a rough sketch of what you want to get in the end. This is the most acceptable option for oversized structures.
See also: Making an educational mat with your own hands for children from 0 to 3 years old with photos
Types of construction
First, let's decide which type of bar counter is suitable for your apartment. In general, all designs are divided into varieties according to the following parameters:
- location;
- type of base.
The rest of the differences are in the little things: shape, color, etc. These parameters depend solely on your taste and the style of the room, so we won’t dwell on them. But let's look at the items from the list in more detail.
Let's start with the location. The stand can be:
- insular. This is a free-standing element of the interior that can be approached from all sides. Thus, you can set up a full-fledged bar. It looks very stylish, but is only suitable for large rooms, because this type of placement requires a lot of space;
- adjacent to the kitchen unit. In this case, the counter can be placed in two ways: either to serve as a continuation of the kitchen unit, or to be located at an angle to it (usually perpendicular). The first approach is good because it does not require a lot of free space. And with the help of a corner stand you can perfectly zone a room;
- adjacent to the wall. Most often, the long side of the rack is used for fastening. This interior element is good for its increased stability due to its fixation to the wall. In addition, the wall rack can be folded - this is an excellent method of saving space if necessary.
As for the reasons, there are two options:
- open. The base is represented by either a support pipe or legs. The space under the countertop remains open;
- closed. The tabletop is located on the body, inside of which there may be cabinets with shelves, niches for built-in appliances, etc.
The first option makes the stand visually light and airy. And the second makes it possible to save space by arranging an area inside the base for storing various things or for installing equipment.
Dimensions and dimensions
Designers do not highlight any special requirements for these characteristics. You should adhere to general recommendations for creating a bar counter:
- Typically the height of the structure is at least one meter. In this case, high chairs are used to make it convenient to reach the tabletop.
- The width must be at least fifty centimeters. Such a tabletop will allow you to place all the necessary elements, lean on your elbows, and also provide all the necessary functionality.
The height of the bar counter must be at least one meter.
Additional Information. Everything else depends on your wishes and imagination. The classic option for placing a tabletop is a cabinet, but at home it is possible to build ordinary legs.
See alsoWhy you need to make crafts for the interior with your own hands
Calculation of dimensions for drawing
Before you start making a rack, you need to build a drawing or diagram. This will help you correctly calculate all the necessary indicators, and also not get confused during subsequent assembly.
The construction of the drawing is based on the dimensions of the structural elements. There are standard dimensions that you can use as a guide:
- height: for island structures from 110 to 130 cm, for those adjacent to the set from 85 to 90 cm;
- the width can vary from 55 to 80 cm. The wider the stand, the more convenient it will be to use;
- length depends on the expected number of users. Installed at the rate of 60 cm per person.
Manufacturing procedure
It is necessary to adhere to a certain procedure. First you need to build a tabletop - the basic element that determines the design and functionality of the entire structure as a whole. It is recommended to choose the most durable materials that can be easily processed at home.
Note! If you do not want to cut out the countertop yourself, it is recommended to buy a finished product. It is sold in any specialty store at an affordable price.
Some rules should be taken into account when constructing the base of the structure:
- You can make a brick base. For this purpose, blocks of special red facing bricks are used. Such structures are durable, strong and highly resistant to various adverse environmental factors.
- You can make a metal frame. This design is usually attached to furniture that is located nearby to provide the greatest strength.
When making a bar counter, you need to decide on the choice of material.
The work takes place in several stages:
- Carrying out measurements, creating diagrams, design. Selection of optimal design dimensions.
- Making the base using one of the methods described above.
- Frame processing.
- Installing the tabletop onto the base.
- Production of additional shelves upon request.
- Adding various decorative elements.
Important! Please note that before starting any work, a primary drawing should be prepared. Only after this do you start making the structure.
See alsoLifehacks for home and interior
Other bar counter options
The design of the bar counter can be made from a variety of materials. Let's look at the most common ones.
See alsoHow to beautifully decorate a wall with photographs
How to make a bar counter from plasterboard?
Follow the instructions:
- Measure the main design parameters. Consider the location of the tabletop for seating comfort.
- The frame is best made from metal blanks. For cutting, special scissors and screws are used.
- Frames for the walls are manufactured separately.
- The profile is secured to each other with screws.
DIY plasterboard bar counter.
See also: Useful tips for those who want to decorate their home with their own hands
Bar counter made of wood
Follow the algorithm:
- Take measurements and mark the area for installing the base according to the drawing.
- The bars are attached strictly along the marking lines.
- Install tabletop supports.
- For the remaining fastening elements, wooden beams are installed.
- After this, the countertop is installed.
Wooden bar counter in the interior.
See also: How to decorate a shoebox with your own hands?
Bar counter made of laminated chipboard
The process of manufacturing a structure from laminated chipboard does not differ from previous options. You will need to build the frame yourself, but you can purchase a ready-made tabletop at a specialized market.
Bar counter made of chipboard.
Bar counter lighting and suitable equipment
In order for the bar counter to fit best into the interior, you should choose suitable lighting for the area. It is recommended to use halogen lamps, which are placed on a special beam above the tabletop. Small lampshades are also suitable, creating an atmosphere of warmth and comfort.
Note! Use special equipment designed to adjust the light intensity. This allows you to create a personalized design and atmosphere.
You can use different ceiling lights to illuminate the bar counter.
Additional recommendations
Please note the following during operation:
- the height of the structure should not exceed one and a half meters;
- the best width is up to half a meter;
- for fastening, use special fixing blocks;
- During installation, consider the location for mounting the lighting;
- You can order the countertop separately if the material for processing is difficult at home;
- Don't choose the cheapest options.
The bar counter will fit perfectly into the design of the kitchen in the art deco style.
A bar counter will perfectly diversify your interior, make the room unusual and help save space. The process of making a countertop is simple, but requires special attention.
Accessories and fittings
Bar chairs
The main “neighbors” of the counter are high stools, which are also called bar stools. Since the standard counter height is 110-125 cm, the chairs should be high.
When choosing chairs, please note that a large number of legs is acceptable if the kitchen space is large. For a miniature kitchen, it is better to choose chairs with one leg.
Option: in a very small kitchen you can do without free-standing chairs. The seats are screwed to the bottom of the tabletop and simply pulled out if necessary.
Hard chairs can be modernized by placing cushions on the seats that match the rest of the textiles. The backs and arms on the chairs are optional. But having a footrest is a must.
Before buying a chair, try to sit on them - do your legs reach the stand, is it comfortable to “climb” onto the high seat. Otherwise, it is better to look for models with adjustable height of both the seat itself and the footrest.
Lighting for the bar counter
Lighting is the most important detail. It is most convenient to plan in advance autonomous lighting for the part of the kitchen with a counter.
Options:
- built-in ceiling lights around the perimeter of the rack;
- LED strips at the bottom of the tabletop;
- lamps on long cords arranged in a row above the counter;
- lamps or LEDs on the outside of the base.
Bar pipe
An optional, but very functional and stylish part of the rack. It can extend all the way to the ceiling and support an illuminated overhead console. It can simply rest against the ceiling and be “overgrown” with a variety of glass holders and hanging shelves.
If your kitchen has low ceilings, it is better to avoid a high bar pipe, as it visually lowers the height of the ceilings.
The material from which such a pipe-leg is made may vary. Traditionally, it is made of metal (brass, nickel or stainless steel); for a classic kitchen, you can choose a model made of wood, decorated with carvings.
Consoles
If you have chosen a more massive, non-open type of rack, then please note that the consoles that serve as the base can be decorated to your liking. From the kitchen side, of course, it is more convenient if it is a set of open and closed shelves and drawers. The facades are matched to the tone of the main furniture.
But the part of the base facing outward is a real haven for designer imagination. Here are some options:
- To face it with stone is good, stylish and luxurious. Pairs perfectly with the classic kitchen decor.
- Cover with MDF sheets, repeating furniture facades. Such a counter will seem like a continuation of the kitchen unit.
- Imitation of brickwork is an interesting option for country and loft style kitchens.
- Glass panels are an original solution. But don’t forget to illuminate the insides - and you will get a real extravaganza of light and color. By the way, the glass must be impact-resistant. And if you don’t want the contents of the internal shelves to shine through, choose frosted glass.
- Skinali is a variant of glass panels, but decorated with a pattern or photo print. A great way to decorate a bar counter, especially since you can choose a voluminous pattern, which will add style to the entire counter.
- A built-in aquarium is a creative solution for an unusual kitchen. Such a stand immediately turns into an art object and will serve as a real interior decoration. Moreover, if you doubt whether you should choose a real aquarium with live fish, pay attention to the so-called “dry” aquariums. They completely imitate the real thing. In addition, for a dry aquarium you can come up with an unusual design theme: for example, not an underwater world, but a desert world, a rock garden or a mini-jungle.
- Mosaic is a bright and stylish decor for your counter. You can lay out a specific pattern, or you can repeat the mosaic laying on the apron. But keep in mind that the mosaic is heavy, so it requires a strong and good foundation.
- Artistic painting is another way to turn your counter into a work of art. But when choosing paints for a design, do not forget that the overall palette should not be discordant with the other colors in the kitchen.
Accessories
The bar counter creates a special atmosphere of lightness and ease. And since the counter is most often associated with drinking drinks, it is worth equipping it with special accessories that will emphasize functionality.
Such items include:
- special holders for glasses. If the kitchen is small, a holder attached to the main rod is sufficient. In a large kitchen, you can install holders on top, like in a real bar.
- fruit bowl;
- bottle holder;
- shaker;
- blender;
- rimmer (device for decorating the edge of a glass);
- Steiner (bar strainer);
- geyser (a device for pouring liquid in a thin stream);
- muddler (pestle for grinding fresh leaves and berries);
- juicer;
- ice bucket.
Such accessories will add a special flavor to the interior of your kitchen. Now you can invite guests and have a real cocktail party.