Against the backdrop of a general increase in taxes, the retirement age, prices for housing and communal services and food, our people can only become a jack of all trades. But it's not bad. By enlisting the support of your own enthusiasm, you can achieve unimaginable heights. First, let's start with the basics. How to make kitchen furniture with your own hands? And in general, is this possible? The answer is definitely yes. Making a set for your kitchen space is a great anti-crisis idea. Read our article. Here you will find useful advice from furniture makers, study design patterns, material cutting and much more.
How to make kitchen furniture with your own hands?
Real savings for the family budget
One of the most in-demand skills for a thrifty person will be a DIY kitchen renovation. Making a modern, elegant kitchen set with your own hands is a brilliant anti-crisis initiative
To save a lot of money, it is enough to have minimal experience in working with carpentry tools, listen to the advice of furniture makers, master the art of reading blueprints, and learn how to make markings on wood.
We take measurements of the premises
To make a kitchen set, you need to check the quality of the surfaces: evaluate how smooth they are, in which areas there are depressions, curvatures, and bumps. For this reason, measurements are taken at three points: under the ceiling, at shoulder level, above the floor surface (5-10 cm). It is necessary to correlate the actual dimensions of the room with those determined from the documents. Based on these data, a decision is made on what type of set should be made (corner, straight), how many cabinets will fit.
In addition, you need to decide on the height of the headset. When choosing a suitable option, be sure to take into account the average height of the residents of the apartment/house. A set of small height looks inorganic. The structure almost always occupies a significant part of the wall; free space is left under the ceiling in case a suspended, suspended ceiling is installed. In the case when the choice is made on a corner headset, measurements are taken using a laser rangefinder. Otherwise, a simple roulette will be enough.
Examples of a finished kitchen sketch
Before you start working on the diagram and drawings, you need to firmly decide on your taste, aesthetic and practical preferences.
In other words, you should carefully study photos of a DIY kitchen on the World Wide Web or in the specialized press and decide which set should appear in a particular apartment.
An island of calm in the ocean of cooking
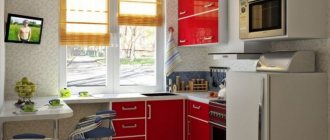
If the area of the room reaches sixteen squares, then the kitchen should only be an island kitchen. This placement option in this case seems to be the most practical.
On top of that, a beautiful DIY island kitchen is very convenient both for carrying out daring culinary experiments and for quickly tasting new dishes with family and friends.
Budget kitchen projects
After finally linking your preferences to a specific living space, you can move on to the design stage. It consists of drawing up a plan, cutting and a sketch in perspective.
At each of these stages, a number of important tasks are solved. Drawing up a plan includes measuring the area of the walls, ceiling and floor, marking and further drawing all cabinets, pencil cases, and shelves onto the kitchen drawings.
What follows is a detailed image of the frame and sheathing. All that remains is to make the cutting, that is, calculate the dimensions of each element of the furnishings, from the cabinet body to the smallest furniture door, and the project will be ready.
Price for drawing up a kitchen sketch
Thanks to such careful preparatory work, you can accurately calculate how much material, fasteners and fittings will be needed. At the same time, it will be possible to answer with great accuracy the most important question in this matter: exactly how much a cheap DIY kitchen will cost.
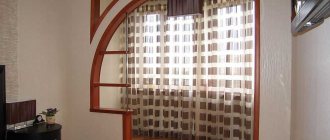
Now you can move on to drawing up a design project, or, more simply, a sketch. In order to perfectly accurately outline the design of both furniture and the entire room, including curtains for the kitchen with your own hands, it is necessary to use the so-called perspective technique. It is based on the selection of one or two vanishing points to which all horizontal lines of the sketch will be directed.
Note!
- How to choose a kitchen - reviews of stylish kitchen design, interior styles, new designs (photo + video)
- Kitchen designer: purpose of the program, operating rules, pros and cons, secrets of arranging objects in the kitchen
- Bar counter height: types of counters, calculation of dimensions, standard sizes, reviews of modern solutions (photo + video)
This technique makes it possible to bring final clarity to what the result of the upcoming repair should look like. All that remains is to paint the sketch of the furnishings with the necessary colors and shades, and the future interior will appear on paper in a completely completed form.
Electrical connection
Moving sockets and switches when installing a new kitchen unit is a common occurrence. Of course, it’s good when, during renovations, you have a design for the future kitchen in your hands and all the wiring is done according to it. I didn’t have a project and this is what it led to.
There is a washing machine in the kitchen and a separate machine is placed in a niche under a group of sockets. I did not imagine that we would choose an electric oven as an oven and place it on the countertop. I had to move the sockets. The only good thing is that in the case of a kitchen, you can install external wiring; anyway, nothing will be visible behind the cabinets.
I also miscalculated the hob during the renovation. For electric ignition, a connection is required in any case and this must be remembered. It’s good that there are sockets nearby and you can stretch the wire through the drywall in a few minutes.
There remain two more electricity consumers present in any modern kitchen. This is a hood located above the stove and lighting of the work area. Here, my approximate calculations almost coincided with what was actually needed when installing kitchen furniture. The error is only a few centimeters, fortunately in the direction that will be closed.
The conclusion suggests itself - the location of sockets, lamps and the layout of wires is best done with a ready-made project in hand. In this case, you will save time, money and your own effort, and installing kitchen appliances will be much easier.
DIY kitchen assembly
Today, fashionable and stylish kitchen sets are made from ordinary modular elements. Thanks to the ease of working with ready-made blocks, assembly will be quick and fun. It will even somewhat remind you of children's fun with Lego constructors.
It should be noted that the assembly process carried out by yourself will bring significant benefits. The money saved in this way can be spent on purchasing expensive and beautiful accessories.
In addition, refusing the help of professional assemblers will allow you to assemble the set exactly as the owner needs. For example, he may not tighten the screws with a death grip in order to leave himself the opportunity to immediately dismantle the cabinets in a week or two and add some decorative elements to them.
Layout
Decide on the list of necessary furniture elements. To do this, analyze your needs and desires. Ask your household what they want. The main and paramount thing is ease of use. Therefore, make your home comfortable based on this principle.
Here are the elements of the kitchen set that will interest you:
- floor cabinets;
- wall cabinets;
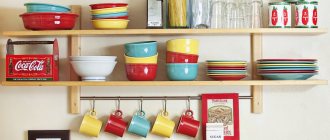
- open shelves;
- dinner table;
- chairs;
- poufs;
- benches;
- cabinets;
- stands;
- main table top;
- island type countertop;
- bar counter.
All these components will give the kitchen space sophistication, sophistication and extraordinary charm. The main thing is to choose the right design and furnish the room according to all the rules and regulations. First of all, the layout depends on the quadrature. The cooking workspace must be ergonomic, functional, and easy to use. After these parameters comes style and design.
The cooking workspace must be ergonomic, functional, and easy to use.
See alsoKitchen renovation, interior design and decoration
Some features of mutual placement
If the owner of the apartment has firmly decided that he needs a kitchen made of wood with his own hands, then when choosing its layout he will need to take into account a number of important technical points. They relate to the relative placement of equipment and furniture.
Here is a list of the most important of these rules:
- there is no need to place gas communications and rubber hoses in close proximity to water supply pipes;
- the gas stove should be approximately two meters away from the main gas pipe;
- the distance between the sink and the gas pipe must be at least half a meter.
When using a corner layout, you must ensure that the sink and gas stove are not located next to the corner cabinet. The fact is that an inattentive or tired housewife is quite capable of splashing water on a burning burner or simply throwing a towel on it.
Drawings of kitchen units
Fig.21.
Drawing of a kitchen with a corner sink.
Fig.22.
Drawings of kitchen modules.
Fig.23.
Drawings of kitchen sections.
Fig.24.
Drawing of a corner kitchen.
Error detection and correction
As you know, the first pancake is usually baked in a lump. This pattern will most likely make itself felt the first time you make a kitchen with your own hands.
Even a very experienced engineer does not believe in the success of a project until it is implemented “in the metal.” Well, a novice home craftsman should even more so be prepared for the fact that some holes will not line up, unnecessary protrusions will appear somewhere, and for some reason the doors will not close.
That is why the furniture assembly will almost certainly be immediately followed by fixing errors and disassembling the set to eliminate all errors. Some of them can be fixed in literally a minute or two, while others will have to take half a day.
It can be especially difficult to adjust mismatched holes in adjacent sections. Even a slight deviation will not allow them to be bolted together.
Installation of cabinets starts from the corner
In the angular bedside table, 2 connections are located vertically, and the third is horizontal. The third is sawed through along with the countertop in order to install a sink. Then you will have to shorten the screw tie.
According to this principle, we place each side tables on 4 supports that can be adjusted. This is subsequently closed with a plinth that is pushed inside.
The gap between the front edge of the bedside table and the base is 5.5 cm. The front legs of the bedside table are recessed by 5.5 cm. If all the bedside tables are assembled on the first side, then we align them along the level and intercept them with ties.
Read: Kitchens from IKEA - the best photos of new items from the latest catalog
Expanding the hole in the desired direction
To solve this problem, which is well known to beginning aircraft and ship modellers, you need to draw a small arc on the wall of one of the cabinets, indicating the actual position of the mounting hole.
To do this you will need a sharp pencil, a magnifying glass and a flashlight. Then the section with the incorrectly located hole must be disassembled and widened with a drill or a round file.
Cabinet doors do not close well (adjustment)
Quite a lot of effort will have to be spent on correcting such a defect as incomplete closing of cabinet doors. It can occur for a number of reasons, including due to banal unevenness of the floor in the apartment. If placing one or two coins under the cabinet does not improve the situation, and in addition it begins to sway, then you need to immediately disassemble it.
Most likely, mistakes were made when installing the hinges either on the inner surface of the headset or on the doors themselves. Most often, disassembling the hinges and reinstalling them, taking into account the detected distortion, can solve the problem. Otherwise, you will have to replace the doors with lighter ones and at the same time check for noticeable distortions in the vertical elements of the cabinet.
If the reason for the incomplete closing of the doors cannot be established, then it will be possible to solve this issue simply and ingeniously - by installing strong furniture magnets on the doors and walls of the cabinet. To find out exactly how to install magnetic latches, you need to watch videos on those YouTube channels that are dedicated to the manufacture and assembly of furniture.
Video instructions for adjusting the cabinet door in the kitchen
Tool
To make wooden products you will need:
- a circular saw;
- jointer;
- thicknesser;
- milling machine;
- Miter saw;
- manual frezer;
- electric plane;
- jigsaw;
- drilling machine;
- slotting machine;
- drill;
- screwdriver
The list is impressive. This is a whole workshop for the production of furniture. Not everyone can boast of such machines. If desired, you can get by with the bare minimum. And the missing equipment can be replaced with hand tools, from which the same jointing and circular machines can be made. Within the scope of our article we will not consider detailed mechanical engineering. For these purposes, there is a lot of specialized literature on the Internet, as well as video reviews of suitable topics.
But to assemble furniture from chipboard you will need an order of magnitude less specialized equipment. Must have:
- screwdriver;
- jigsaw;
- drill;
- screwdrivers;
- hand saw;
- rule;
- carpenter's ruler;
- roulette;
- plumb line
The latter is needed to install vertical posts strictly perpendicular to the floor surface.
See also: Choosing the right tile design for the kitchen
Inexpensive and accessible material
Most of the load-bearing parts of the furniture will be hidden behind the facades. This is why walls, supports and posts can be made from inexpensive material. An excellent option in this case would be cheap and produced in large quantities laminated particle board.
It can be easily combined with any facades. If you wish, you can find laminated chipboard with an original decorative coating, which will be visible when opening cabinets and pencil cases.
Don't skimp on facades
The first thing that catches your eye when looking at a kitchen set is its facades. Therefore, you need to choose them without haste, trying each draft version to match the colors of the surrounding interior, wallpaper, floor and ceiling decor. Today, MDF is most popular in the manufacture of facades.
Modern stylish facades are usually covered with all kinds of decorative films, giving the material a pleasant color and structure. Perhaps the facades are the only component of the kitchen on which you should not save, even if their cost exceeds half of all the costs of manufacturing the set.
Luxurious facades will become a kind of front kitchen showcase. To compensate for the blow to the budget caused by their purchase, it is enough to choose the cheapest apron for the kitchen with your own hands. It can be made from ordinary tiles with simple patterns.
Benefits of working independently
Before proceeding with installation, it is necessary to prepare and harmonize the material. And even earlier, it’s worth understanding whether it’s profitable to make tables and chairs with your own hands.
Let's list the benefits.
1. You can do what you like. 2. You can eliminate the shortcomings yourself. 3. The ability to change the plan and layout during work without unnecessary hassle. 4. Wide range of decoration possibilities. 5.The quality of work is guaranteed by you. 6. Decent money savings.
The only downside here is that it takes a lot of time. That's all. But this is more likely not a disadvantage, but rather a repair cost. And if your family has children, working together will bring a lot of positive emotions. The main thing is to prepare well for the whole process. Prepare material for future use, select it first according to need, and much more. First things first.
The main thing is to prepare well for the whole process.
See also “U” shaped kitchen with a bar counter, layout rules, examples and photos.
Table top and shelf for potholders
A do-it-yourself kitchen countertop is selected not only according to aesthetic criteria, but also according to thickness. It is desirable that it be close to four centimeters. This will significantly simplify the installation of the hob and sink.
After installing the countertop, be sure to screw a narrow shelf above it for storing oven mitts. You can make your own kitchen mitts from a variety of available materials. The main thing is that they are not too thin, otherwise the mittens will be unsuitable for removing hot trays from the oven.
Drawers
It's no secret that various pull-out systems are the basis of a modern kitchen. But many people experience an unpleasant feeling when they get acquainted with the prices of various ready-made solutions from European manufacturers. The number of drawers that you want to have in your kitchen, multiplied by the number of dollars at which the seller values them, is by no means equal to the number of rubles that are expected to be spent on this purchase.
How can you save money and not lose in functionality and reliability? We need drawers made to the dimensions we require, fully extendable and capable of smooth closing with fine-tuning.
The point of all ready-made drawer systems is to sell a set of guides and parts for creating drawers of various sizes. By purchasing a kit, you do not receive a fully assembled set for assembling a drawer, but are forced to order cutting of parts - usually the bottom of the drawer and the back wall.
If you decide to make the boxes entirely from chipboard, you can significantly reduce costs. In this case, hidden mounting guides are used, which are produced by the same manufacturers. The design process must begin with the choice of guides, since the design of the drawer is tied to the technical features of the extension mechanism.
I used guides from Blum, with dynamic loads of up to 40 and 60 kg. The photo shows that the sides of the box protrude below the bottom plane (13 mm). All recommendations for filler dimensions and installation features are in the manufacturer’s catalog.
Regarding the Blum company, I would like to say a few words. Recommending the purchase of accessories from this manufacturer is like recommending the purchase of Mercedes cars. There are quite a lot of manufacturers and Blum is one of the most famous. His products are reliable, functional, durable and, as a result, not cheap.
But is it always justified to purchase all kitchen fittings from this particular brand? A similar question was raised at a specialized forum and this is what the collective mind decided: there is one type of common device where an alternative to Blum in various parameters simply does not exist. This is the Aventos HF folding lift.
Regarding hinges, guides and other things, the opinion of forum members was not so categorical. Actually, I was going to buy lifts from Blum, and I had already chosen the guides and hinges and was going to buy from Grass, but a trip to the Perm representative office of Blum changed my plans.
In addition to the fact that they offered me a price for the lift lower than indicated on the website, the issue with the guides was also resolved in favor of Blum. With a difference of 150 rubles per set, I think the choice is obvious.
In total, the kitchen will have two modules with drawers, four in each. The bottom one is made for storing large dishes and has a useful depth of 240 mm. The other three are equal in height and can accommodate items up to 110 mm.
This is a cabinet above which the hob is installed. Pay attention to the installation of connections; they are located under the top drawer and do not block the air circulation necessary when operating gas burners. The gaps are 6 mm. There is enough air exchange between the front of the top drawer and the countertop.
Pay attention to the filler dimensions when assembling boxes, since for two outwardly similar guides from the same company, but with different articles, a parameter important for assembly may change. I didn’t look for dimensions in the company’s catalog, but simply searched for “installation of Blum guides” and did the drilling according to the diagram from the article. The result is an error in the location of the blind hole in the back wall of the box.
It’s good that such a mistake can be corrected with the help of dowels and a drop of PVA. We hammer the beech dowel into the hole, after applying glue.
We saw off flush with the plane and use an awl to mark the center of the new drilling.
After these steps, the box is securely fixed on the guide and works properly. Since the corrected hole is located on the outside of the back wall, no one will see the error and its correction.